16.5. Combining and Comparing Documents You're working on a report with your colleagues, and you send a draft out for everyone to review and put in their two cents . One by one, their versions come back to you, and now you have the chore of incorporating everyone's suggestions and changes into the final draft. The quickest and easiest way to tackle the project is to merge each reviewer's comments and changes into your working copy, and then review the comments and changes to produce a finished piece. After you combine two documents, Word gives you a special workspace where you can view the combined document with changes, as well as both the original and the revised document. Figure 16-12 shows the somewhat busy result. To combine two documents and view the changes, first make sure both documents are closed. Then follow these steps: -
Choose Review  Compare Combine . Compare Combine . When the Combine Documents dialog box opens, you see two drop-down menus at the top where you select the documents that you're merging. 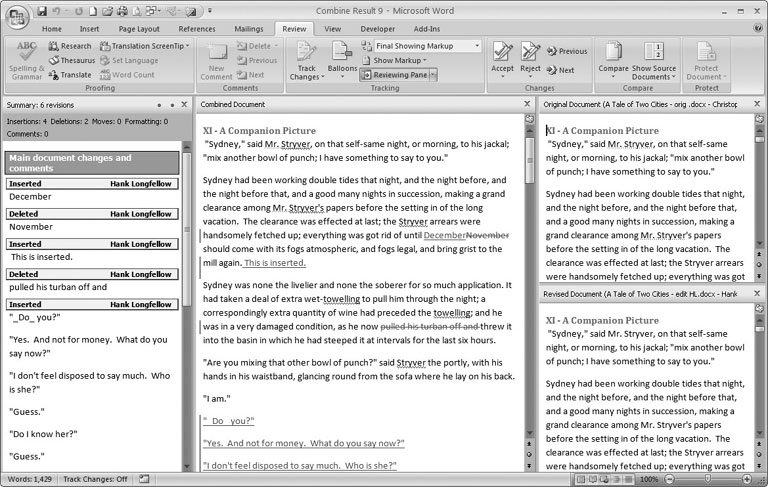 | Figure 16-12. After you combine two documents, Word shows you the changes as a marked up document in the center window. The original and the revised document are shown in small windows on the right. The revision panel on the left provides details about the differences between the two versions and other tracked changes. | | -
In the Original Document drop-down menu, select the name of your document (the one without the edits) . If its name is not on the list, click the little icon that looks like a folder. It opens a standard Windows file box where you can navigate to your document. In the "Label unmarked changes with" text box below the drop-down menu, type your name (or whatever name you want associated with the original document). -
In the Revised Document drop-down menu, select the name of your coworker's document (that is, the edited copy that you want to merge into the original) . If necessary, click the folder icon to navigate to the directory where the file resides. In the text box below the drop-down menu, type your reviewer's name. -
To see more options, at the bottom of the Combine Documents box, click the More button (Figure 16-13) . The Compare Documents box expands to provide additional options and settings, and the More button morphs into a Less button. -
If you wish, choose settings to fine-tune the way the comparisons are shown in your document . At the top you see a group of checkboxes under the heading Comparison Settings. Click to put checkmarks next to the changes you want highlighted and marked in the combined document. For example, if you don't place a checkmark next to Moves, text that was moved in the reviewer's document is shown in its new location in the combined document, but you don't see double underscores and double strikethroughs to show the move. It's as if the move has already been accepted. 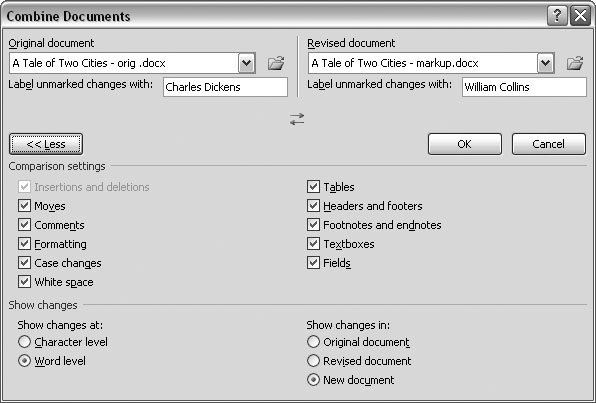 | Figure 16-13. Use the Combine Documents box to merge two versions of a document and to see the differences between the two. The Comparison settings determine which changes are shown in the combined document. Under Show Changes, you can choose to show the changes in the original document, in the revised document, or in a new document. | | -
In the Show Changes group, choose the level of changes you want to view and where you want the combined document to appear . You have two choices to make about the level of changes: Word can show changes at the character level or at the word level. It's a little easier to work at the word level. For example, if you change the word "you" to "your," Word highlights the whole word as a change rather than just showing that you inserted an "r." -
Under the "Show changes in" heading, choose where you want to see the combined document . In most cases, it's best to choose the last option, "New document"; that way, the combined document is an entirely new document, and you can save it under a new name. This choice leaves your original and the reviewer's documents untouched, so in case of an emergency, you can go back and take a look at them. -
Click OK to combine the documents . After a little hemming and hawing, Word shows you something like Figure 16-12, which may be a little intimidating until you decode what's really going on. You see the familiar Reviewing Pane on the left side. In the middle is your Combined Document, sporting underlines and strikeouts to show the changes. The right side of Word's window shows two documents: The original is at the top, and the reviewer's document is on the bottom. All three documents are synchronized, so when you scroll through one document, the other two automatically scroll to the same spot. -
On the Review tab, in the Compare group, use the Show Source menu (Figure 16-14) to adjust the view so that it works for you . Viewing the Combined Document and the Original and Revised document at the same time gives you a good picture of how the reviewer changed the document. On the other hand, if you find yourself suffering from vertigo, you can adjust the view using the Show Source menu. If you don't need the Reviewing Pane, you can close that too. Just click the X button in the upper-right corner of the pane. 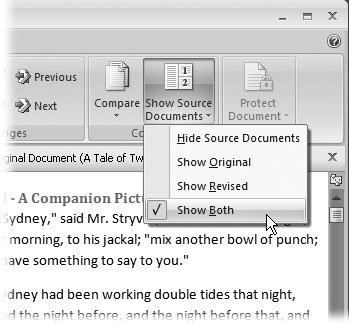 | Figure 16-14. Using the Show Source Documents menu, you can hide one or both of the documents on the right to make it easier to focus on the combined document in the center. | |
16.5.1. Comparing Two Documents The procedure for comparing documents is almost identical to combining two documents, and the command is even on the same menu: Review Compare Compare. The Compare Documents box is almost identical to the Combine Documents box (Figure 16-13), since youre searching for the same types of changes in your documentmoves, comments, insertions, and deletions. What's different between the Combine and Compare commands are the results. When you combine two documents, the result shown in the center window incorporates the changes in both documents. When you compare two documents, the result is a marked up document that shows differences between the two, as shown in Figure 16-15. The result is what's known as a legal blackline , detailing all the changes in a clear, standardized way. This type of comparison is handy when two parties are negotiating the details of a contract. 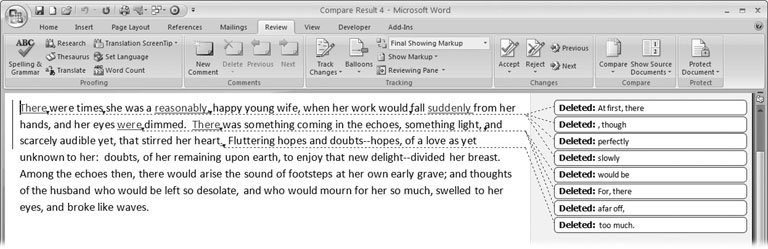 | Figure 16-15. When you compare two documents, Word shows you a marked up copy that points out the differences. The standard markup shows deleted text in balloons and inserted text underlined and in place. A vertical line in the margin makes it easy for you to zero in on changes. | |
|