Managing eDirectory
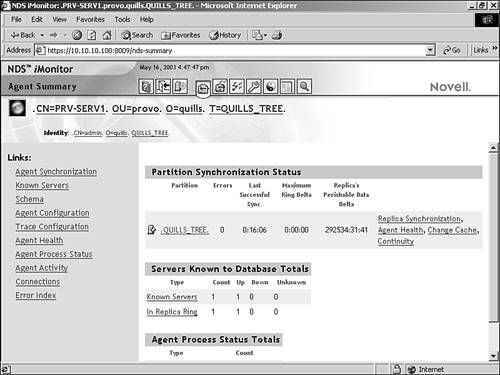
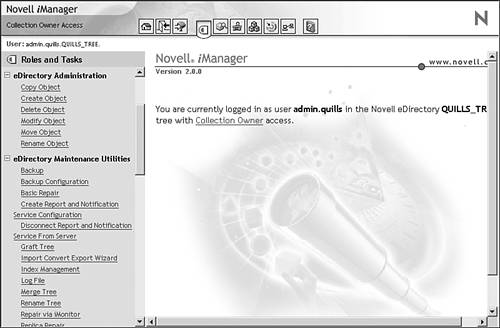
| Once you have an understanding of the basics of eDirectory architecture and design, it is important to understand the activities and tools necessary to maintain eDirectory on a day-to-day basis. As with the rest of NetWare 6.5, eDirectory management is now available through ever-more-powerful Web-based utilities. NetWare 6.5 includes much more comprehensive eDirectory management options in iManager and iMonitor. For information on installing and configuring both iMonitor and iManager, see Chapter 3, "Novell Management Tools." iManager provides comprehensive role-based management capabilities for the entire NetWare 6.5 environment. iMonitor consolidates the monitoring and data gathering aspects of several console-based tools, including DSTrace, DSRepair, and DSBrowse. It also includes the reporting functionality of DSDiag. The iMonitor interface is shown in Figure 5.8. Figure 5.8. The iMonitor user interface. iManager now provides a complete set of eDirectory management tools and functions for object, partition, and replica operations (see Figure 5.9). Much of this functionality is also available from the Partition and Replica view in ConsoleOne. You can also use RConsoleJ for remote access to the server console from ConsoleOne, from which you can run any of the legacy command- line-based utilities. Figure 5.9. eDirectory management options in iManager. This section gives you an overview of common eDirectory tasks and the tools used to perform them. eDirectory management tasks can be organized into six main categories:
NOTE Managing specific eDirectory objects is covered in the appropriate chapter on that topic. For example, User and Group object management is covered in Chapter 6, " Users and Network Security ," whereas Printer object management is covered in Chapter 7, " NetWare Printing Services ." Partition OperationsThere are three primary partition operations that you will be required to make:
WARNING eDirectory does a great deal of work when performing partition operations. In larger eDirectory environments, each of the operations described in the following sections can take a significant amount of time to process completely. Furthermore, each operation has to complete before the next can begin. Make sure you take this into account when planning these tasks. Create a PartitionThe first operation we want to look at is creating a partition. As mentioned earlier, partitioning the tree serves to break up the eDirectory database into chunks that can be distributed across multiple servers for fault tolerance and increased performance. If you want to create a new partition, complete the following steps:
By default, the Master replica of the new partition is created on the server that maintains the Master replica of the Parent partition. Read/Write replicas are stored on servers that maintain Read/Write replicas of the Parent partition. You can move or change replica placement after the partition has been created, if desired. Merge a PartitionSometimes you want to consolidate partitions, such as when moving from an older NDS environment to a much more scalable eDirectory tree. To merge a partition with its parent, complete the following steps:
Once merged, all replicas of the Child partition are removed and the Child partition data will be replicated to the existing Parent partition replicas. Move a PartitionThe partition move operation is commonly known as a prune and graft . It involves moving a partition and all its associated containers and objects from one location in the tree to another (pruning a branch from one part of the tree and grafting it in somewhere else). This is the most complex of the partition operations, so note the following qualifications before attempting a partition move:
If you want to prune and graft a partition, complete the following steps:
The summary screen lists all servers involved in the Move operation so that you can make sure everything is in good shape before attempting the move. Replica OperationsNow that you have eDirectory partitions created and situated within the tree, you might notice that the default placement for the replicas is less than perfect. After all, you probably don't want all Master replicas on one server, and you want to avoid replicating across expensive WAN links, as discussed previously. Similar to partition operations, replica operations are accomplished from iManager in Partition and Replica Management. There are four primary replica operations:
Selecting Replica View in iManager shows you all servers that hold replicas of the selected partition. These servers form the replica ring . NOTE You will likely see Subordinate reference replicas listed in the iManager Replica View. However, Subordinate references are not manageable in iManager, so their placement is purely informational. Add a ReplicaIf you want to place a partition replica on a server that does not currently have a copy of that partition, complete the following steps:
Once created, the new partition will participate in all replication processes for that partition. Too many replicas can slow down partition operations significantly, so try to limit the number of replicas to three. Change the Replica TypeSometimes it is useful to be able change the type of an existing replica. For example, if a Master replica is stored on a server and it is going down for a hardware upgrade, you can change an existing Read/Write replica to be the Master so that eDirectory partition operations can continue normally. NOTE You cannot change the type of a Master replica because a Master replica must exist for every partition. If you want to change a Master replica, change an existing Read/Write replica to be the new Master, and the existing Master will automatically be converted to a Read/Write. If you want to change the type of a replica, complete the following steps:
The replica will immediately start behaving as the new replica type you have selected. NOTE You cannot create a Master replica from a Filtered replica. Delete a ReplicaSometimes, when partitions have been merged or moved, a given replica is no longer necessary. To delete an existing replica from a server, complete the following steps:
The replica is removed from the server on which it was stored, and all future partition operations will include only the remaining replicas. Create a Filtered ReplicaIf you are using Filtered replicas in your network, you can configure them with the Replica Wizard option in iManager. To create a Filtered replica, complete the following steps:
Filtered replicas are often used when eDirectory is sharing data with an external system, such as another directory or database, but only a subset of eDirectory information is shared. Tree OperationsThere are a few operations that you can perform on an entire eDirectory tree, and these are available from iManager as well. Each of these operations is available under eDirectory Maintenance:
NOTE Tree operations are complex operations that are not recommended for those who are not experienced eDirectory administrators. You can easily damage trees with these operations, so be very careful and perform these types of tree operations only when it is absolutely necessary. Rename a TreeOnce in a while it might become necessary to rename an eDirectory tree. Perhaps an organizational name change has occurred, or you are moving to match your directory naming scheme to that being used on the Web. Whatever the reason, you can rename your tree by completing the following steps:
The utility will first perform a check on the tree to be sure that it can be renamed successfully. Once the rename is complete, you will be prompted to log out and log back in to the "new" tree. Merge Two TreesiManager moves the capability to perform a tree merge away from the command-line utility DSMERGE.NLM for the first time. During a tree merge, a source tree is inserted into a target tree such that the tree branches at the Organization level, with each branch corresponding to the contents of one of the formerly distinct trees. To perform a tree merge from iManager, complete the following steps:
The utility will first perform a check on both trees to be sure that they can be successfully merged. If you encounter an error during this check process, follow the instructions to resolve the conflict and try the merge again. Graft One Tree into AnotherA graft is a subset of a merge, in which you can choose the insertion point for the source tree objects. During a tree graft, a source tree is inserted into the specified location of a target tree. The source tree is then converted into a Domain object and it and all of its contents become part of the target tree. To graft one tree into another, complete the following steps:
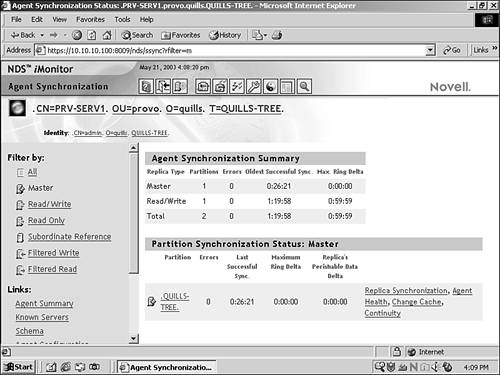
The utility will first perform a check on both trees to be sure that they can be successfully merged. If you encounter an error during this check process, follow the instructions to resolve the conflict and try the merge again. Monitoring and Maintaining eDirectoryThis section identifies some common administrative tasks that will help you effectively monitor the operation of eDirectory in your network and make little repairs as they are found. After all, the one thing more impressive than resolving a serious network problem is preventing it from occurring in the first place. Although this is not always possible, a program of active monitoring and proactive maintenance will go a long way toward getting you home on time at night. For more information on Novell management tools, see Chapter 3. The following tasks are a starting point for maintaining your eDirectory environment. By monitoring eDirectory process execution, you can see every type of communication activity and determine whether any errors are being reported . The best way to keep track of the activities of eDirectory processes is through iMonitor (see Figure 5.10). iMonitor provides comprehensive trace capabilities for eDirectory. More detailed information on DS Trace capabilities in iMonitor is available in Appendix D, "Novell eDirectory Reference." Figure 5.10. The eDirectory process monitoring configuration in iMonitor. To access the iMonitor Trace page, select DS Trace from the NoRM navigation frame, or click the Trace Configuration icon in the iMonitor header frame. Trace in iMonitor gives you access to all the process monitoring capabilities formerly available solely through DSTRACE.NLM. Tracing eDirectory activity involves the following tasks:
eDirectory traces provide a powerful tool to track eDirectory processes and monitor operations when troubleshooting directory issues. Verify the Version of eDirectoryEven if you don't apply updates immediately, it's a good idea to be aware of what updates exist and, more importantly, those issues they are intended to resolve. Keep track of the versions that you have installed on your servers, so as you review Novell support documents, you can keep an eye out for any problems that might relate to your environment. NOTE With the release of NetWare 6, Novell implemented a new versioning scheme in an attempt to eliminate inconsistencies in the previous model. Although still known as eDirectory v8.6 or 8.7 to provide eDirectory customers with a version context they are familiar with, the build version takes a considerably different format. For example, the build version of eDirectory that ships with NetWare 6.5 is 10510.64. You can check the version of eDirectory that you are currently running on any server in the following ways:
NOTE Review Novell's support Web site, http://support.novell.com, on at least a quarterly basis for updates to eDirectory files and utilities. Verify That Time Is SynchronizedCheck the time sync status for each partition in the tree every couple of weeks. Keep an eye out for synthetic time messages that might keep background processes from completing properly. You can check the status of time synchronization in the following ways:
If time is not synchronizing properly, you can run into problems with the timestamps that are maintained on eDirectory objects. Timestamps indicate when the object was last synchronized. Probably the best-known eDirectory timestamp issue is synthetic time . Synthetic time is when an eDirectory object has a modification timestamp ahead of current network time. If the period between current time and synthetic time is small, this problem will correct itself. However, if the period is large, it is possible to resolve the problem manually by reviewing the eDirectory communications processes to be sure that all replicas are communicating properly. From iMonitor, review the status of the Master replica from Agent Summary. You can drill down on the Master to review current state and a detailed set of statistics. Make sure the Master does not contain any errors, and that it is receiving current updates properly. Timestamps can be repaired in two ways:
WARNING This operation generates a large amount of eDirectory- related traffic as timestamps for all replicas are reset. Verify Replica SynchronizationYou can view synchronization status from several perspectives. However, making sure that all replicas of a given partition are synchronizing properly is probably one of the best ways to keep track of things. Check this every couple of weeks. You can check the sync status of a replica ring in the following ways:
If you begin to notice inconsistencies in replica rings, you can use the following general steps to diagnose and resolve the problems:
You should regularly use the preceding techniques to monitor synchronization activities and make sure that eDirectory is performing properly. Check External ReferencesExternal references are pointers to eDirectory objects not stored in replicas on the current server. The check examines each external reference and makes sure that it links to a valid eDirectory object. Performing this check on a weekly basis makes sure that queries can traverse the tree properly. You can do one of the following to check external references:
One nice thing about the external reference check is that it will list any obituaries in your tree. Obituaries are references to deleted objects that are maintained until word of the deletion has been propagated to all servers hosting replicas of the affected partition. It is possible for obituaries and other types of external references to become corrupt or get stuck in the tree. One thing that can cause this is problems with network addresses. To resolve network referral problems, do the following:
Checking External References in this way will help ensure the health and smooth operation of you eDirectory environment. Check the eDirectory SchemaAnytime you make changes to the eDirectory schema, confirm that all servers hosting eDirectory replicas are properly receiving schema updates. You can check the schema synchronization status in iMonitor by selecting Agent Process Status, and then reviewing the data under the Schema Sync Status heading. It is possible that an eDirectory server, due to communications problems or corruption of synchronization timestamps, will fail to receive schema updates as they are applied to the eDirectory environment. The resulting schema inconsistencies can be resolved by doing the following:
Unless you are making frequent changes to the schema, these types of activities shouldn't be necessary, but you should be aware of how such schema issues can be resolved. Review Tree for Unknown ObjectsOn a monthly basis, search eDirectory for unknown objects. You can do this from iManager by completing the following steps (you can also search for unknown objects from ConsoleOne):
Unknown objects can indicate resources that have not been properly installed or removed from the tree. However, they can also indicate that iManager or ConsoleOne does not have a snap-in capable of recognizing that object type, so don't immediately assume that unknown objects need to be deleted. It is also possible to get eDirectory object and attribute inconsistencies when replicas of the same partition, for whatever reason, have different information stored about the same eDirectory object or object attribute. In order to isolate the server(s) that have the faulty information, it is necessary to unload eDirectory on other servers. This type of troubleshooting can only be done during off hours. In order to troubleshoot this type of problem, do the following:
These tasks will help you ensure the object health within your eDirectory tree, and stay on top of the health of your eDirectory environment. Managing eDirectory TrafficReplication is an event-driven process, meaning that it is initiated by the occurrence of some external trigger. A few of these trigger events include adding, deleting, and moving directory objects, as well as modifying object attributes. Each trigger event is flagged as being high convergence or not. High convergence means that eDirectory considers this event to be more significant than others, and it should be replicated as quickly as possible. High convergence events are scheduled for fast synchronization (Fast Sync). Fast Sync occurs every 10 seconds by default. Other events are replicated using slow synchronization (Slow Sync). Slow Sync occurs every 30 minutes by default. Both of these sync processes serve to send the changed information out to each server that maintains a replica of the affected partition. Because only the actual database changes are replicated, as opposed to sending the entire partition, replication operations are generally small. Because each directory operation is timestamped, the synchronization process relies heavily on the time synchronization processes described earlier in this chapter. During the eDirectory synchronization process, each operation will be ordered based upon its timestamp and will be applied to the eDirectory database in that order. Using WAN Traffic ManagerIf your network spans geographical areas, you might want to use the WAN Traffic Manager to control how often eDirectory information is synchronized across the network. WAN Traffic Manager enables you to control when routine eDirectory synchronization takes place, so that the traffic is minimized and/or confined to less active times of day. WAN Traffic Manager is an optional feature of NetWare 6.5. You can select it for installation during the NetWare 6.5 installation process or you can install it after the fact using iManager. You need to install WAN Traffic Manager on each server whose traffic you want to control. If servers that share replicas of the same partition are on opposite sides of a WAN link, all those servers should have WAN Traffic Manager installed if you want to control their traffic. Creating a WAN Traffic PolicyTo control the eDirectory traffic, you need to create a WAN traffic policy, which defines the rules that control how the traffic goes out on the network. This policy is stored as a property of each server object. If you have several servers that all require the same policy, you can create a LAN Area object, which contains a list of all the affected servers. Then you can assign the policy to that single LAN Area object, instead of to multiple individual servers. NetWare 6.5 includes several predefined policies that may suit your situation. For example, one commonly used policy specifies that all routine updates should be performed between 1:00 and 3:00 a.m. You can also edit those policies to create customized policies for your network. For more detailed information about these predefined policies, see the Novell online documentation. WARNING Creating and using WAN traffic policies can have adverse effects on your eDirectory communications if done incorrectly. Make sure you understand the consequences of the policy before you enact it. For more information on using WAN Traffic Manager, see the NetWare 6.5 online documentation. The following predefined policies are available in NetWare 6.5:
The following sections explain how to set up a LAN Area object and how to assign a WAN policy to a server or LAN Area object. Creating a LAN Area objectIf you want to assign a single WAN policy to multiple servers, you can save time by creating a LAN Area object that contains a list of all the servers, and then assigning the policy to the LAN Area object. Complete the following steps to create a LAN Area object.
When you are finished, the new LAN Area object, along with its associated eDirectory traffic policies, will be active. |

EAN: 2147483647
Pages: 172