| Photoshop offers several commands for speeding up professional imaging workflow. We'll explore each option available as of this writing. If you are working with an older version of Photoshop, you might not have some of these automation tools. Each is a significant timesaver, and you should attempt to integrate them into your workflow as often as feasible. Batch If you liked actions, you'll love the Batch command. The Batch command allows you to apply an action to a group of images. This is a huge timesaver, especially for mundane tasks like resizing. You can also use it to batch process an entire roll of images and run the same Levels adjustment to each image. Let's give it a try. Tip: Batch Jams A Batch process can get stuck on file closings, especially with JPEG or TIFF compression, which asks for user interaction. You'll want to either batch-convert the files ahead of time to another format (like PSD) or record the close-and-save step as part of the action. Be sure to check the Override Action "Save As" Commands option. This will ensure that your files are saved in the folder specified by the Batch command.
Let's start by making the action "batchable." 1. | Open a TIFF image from the Batch 1 folder.
| 2. | Call up the Actions palette.
| 3. | Choose File > Save As and save a copy to the desktop. This is a temporary copy to prep the action and can be thrown away when you're done.
| 4. | Create a new action called Zoom Blur Batch and start to record.
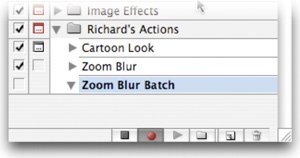 | 5. | Click the Zoom Blur action and press Play (an action can record the running of another action).
| 6. | When the action completes, choose File > Save As. Navigate to your desktop and save the file. Uncheck the Layers box and click Save.
| 7. | Choose a compression option; in this case LZW is very efficient.
| 8. | Click Stop.
| 9. | You can discard the two temp images from your desktop now (or later).
|
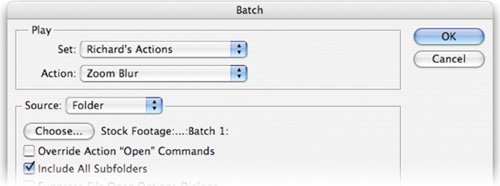
The action is now ready to be applied to a folder of images. 1. | Choose File > Automate > Batch to invoke the Batch window.
| 2. | Specify a Set and an action from the set that you'd like to use. The action must be currently loaded if it is to appear in this list. In this case, use the Zoom Blur Batch action that we created earlier.
| 3. | Choose the files that you want to process from the Source pop-up menu:
- Folder: This option processes all items in a specified folder. Click Choose to navigate to and select the folder. A folder can include additional subfolders as well. For our images, choose Folder. Click Choose and navigate to the folder called Batch 1 in the Chapter 15 folder.
 - Import: This option processes images from a digital camera, scanner, or a PDF file. A useful batch and action would be to create an action that sets a documents resolution to 300 pixels per inch without resampling. You could then run this action on all items you import from a digital camera.
- Opened Files: This option processes all open files.
- Bridge: This option works on all selected items in Adobe Bridge. First, you would select several images in Bridge and choose Tools > Photoshop > Batch.
| | | 4. | You now need to set processing options that guide what is and is not processed as well as how to handle errors or files:
| 5. | You need to specify a destination for the processed files by choosing one from the Destination menu:
Tip: File Naming Compatibility For File Naming Compatibility, be sure to choose Windows and Mac OS to ensure file names are compatible with the OS. - None: This option leaves the files open without saving changes.
- Save And Close: This option saves the files in their current location. This is a destructive edit as it will overwrite the original files.
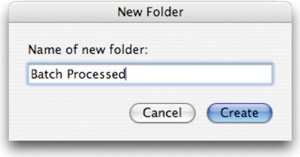
- Folder: This method saves the processed files to another location (this is the safest option). Click Choose to specify the destination folder. For this Batch, navigate to the desktop and create a new folder called Batch Processed.
 | 6. | If the action you're using includes a Save As command, choose Override Action "Save As" Commands. Otherwise, the image may write to the wrong folder. For maximum compatibility, check this option.
Tip: Converting File Formats The Batch command cannot convert file formats. This can easily be done in advance using the Image Processor script that ships with Photoshop CS2. If you're using an older version of Photoshop, you can record a Save As command followed by the Close command as part of the original action (remember you can go back and duplicate the action, then modify it). Be sure to choose Override Action "Save In" Commands for the Destination when setting up the Batch process. | | | 7. | If you chose Folder as the destination, you'll need to specify a file-naming convention. Several pop-up fields are available for easy file naming. These fields make it very easy to rename files from a digital camera or to specify a serial number. As photos from digital cameras often end up with the same name, this is a very good idea as you can create more accurate and descriptive names for each image. In this case choose the following settings:
- Field 1: Fruit Stand (manually type in)
- Field 2: _ (manually type in)
- Field 3: mmddyy (date) (from pop-up list)
- Field 4: _ (manually type in)
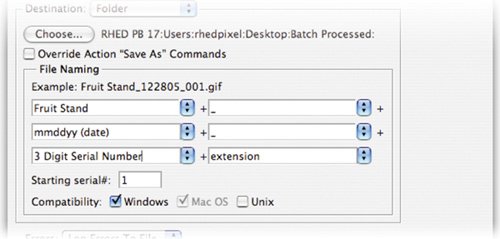 - Field 5: 3 Digit Serial Number (from pop-up list)
- Field 6: extension (from pop-up list)
These settings will result in a name like Fruit Stand_122705_001.tif
| 8. | You need to set an option for error processing from the Errors pop-up menu:
- Stop For Errors: This option suspends the process until you confirm the error message. Only choose this option if you will be monitoring the Batch process closely.
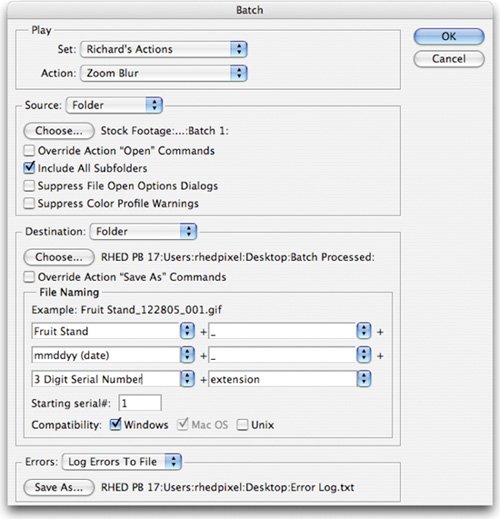 - Log Errors To File: This option records each error into a file without stopping the process. After processing, a message will appear to tell you if any errors occurred. For this Batch, choose Log Errors To File. Save a file called Error Log.txt on the desktop
| 9. | Click OK to run the Batch. Photoshop will batch-process the images. Depending on the speed of your computer, this may take a few minutes. You can abort a Batch by pressing Esc at any time.
|
PDF Presentation Several documents can be combined into a single PDF document. This can be useful to send a lot of files to a client or as a way to present your work. Video Training  | PDF Presentation |
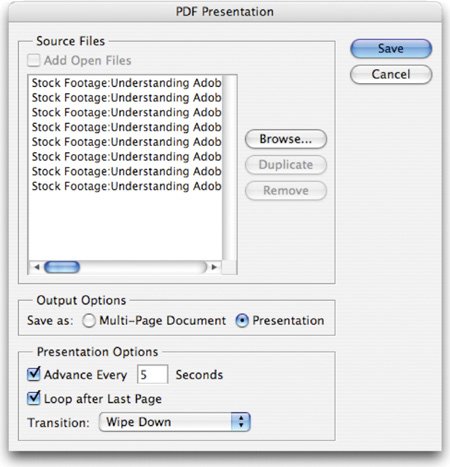
1. | Choose File > Automate > PDF Presentation.
 | 2. | In the PDF Presentation dialog box, click the Browse button. Navigate to the folder you want to use. In this case, navigate to the folder PDF Presentation in the Chapter 15 folder and open it. Shift-click to select multiple files or Cmd-click (Ctrl-click) to select discontiguous files in a list. Additionally, you could also choose the Add Open Files option to add files already open in Photoshop.
| 3. | Drag the files into the order you want the pages (or slides) to appear. The topmost files are presented first. Just drag them to reorder the images.
| 4. | In the Output Options area of the PDF Presentation dialog box, you need to choose from the following options:
Note: Duplicate a File If you want a file to appear more than once in the presentation, select the file and click the Duplicate button. You can then drag it to a new position in the PDF. - Multi-Page Document: This creates a PDF file with each image on a separate page.
- Presentation: This creates a PDF slide show presentation.
| | | 5. | If the Presentation option is chosen, you can specify the following options:
- Advance Every [5] Seconds: This allows you to specify how long each image is shown. The default duration is 5 seconds. Unchecking this option causes the slides to be manually advanced. In this case choose every 5 seconds.
- Loop After Last Page: This tells the presentation to automatically start over after reaching the end. This can be useful if the presentation is to be self-running at a kiosk. For this presentation, choose this option.
- Transition: You can specify a transition to use between slides. For this presentation, choose Wipe Down.
| 6. | Click Save to create a PDF file. Navigate to the desktop and name the file Presentation.pdf.
| 7. | The Save Adobe PDF dialog box opens. You can choose an Adobe PDF preset or specify detailed options for the PDF document. Use High Quality Print if printing is a concern or Smallest File Size to make the file easier to email.
| 8. | Click Save PDF. Photoshop will create the PDF file. A dialog box appears telling you if the PDF presentation was created successfully.
|
Create Droplet A droplet is a lot like a permanent batch. The interface is almost the same as the Batch command in that you choose an action and set naming and destination options. The key difference is that you don't set an input source. Instead, a droplet is created that allows you to drag an image (or folder of images) onto it to run. Tip: Saving Droplets Save your droplets in a convenient location for drag-and-drop.
1. | Choose File > Automate > Create Droplet. The Droplet interface opens and should appear similar to the Batch window.
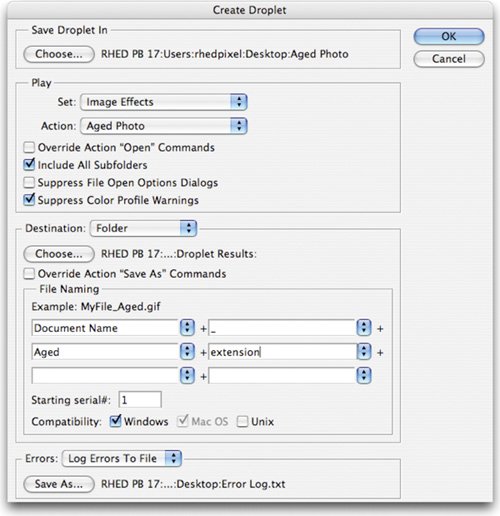 | 2. | Click the Choose button in the Save Droplet In section of the dialog box and navigate to a location in which to save it. In this case, name the droplet Aged Photo and save it to the desktop.
| 3. | Select the set and action that you want to use. In this example, choose the Image Effects and the Aged Photo action.
| | | 4. | The Override commands in the Play area are identical to the Batch command. In this case, leave the Suppress Color Profile Warnings box checked. It's also a good idea to check Include All Subfolders Processes files in subdirectories.
| 5. | Choose a destination for the processed images. In the Destination menu, choose Folder and create a new folder on the desktop called Droplet Results.
| 6. | Specify the file-naming convention and select file compatibility options for the new files. Feel free to choose a naming convention that makes sense to you. Be sure to make the files Mac and PC compatible.
| 7. | Choose to log errors to a file. Set the log to write to the desktop in a file called Error Log.
| 8. | Click OK to create the droplet.
| 9. | To prevent the Batch from stopping to ask about file compatibility, let's change a File Handling option. Press Cmd+K (Ctrl+K) to call up Photoshop's preferences.
 | 10. | Choose File Handling from the pop-up menu.
| 11. | Uncheck Ask Before Saving Layered TIFF files. If you're running CS2 or later, check the box for Enable Large Document Format (.psb) and set Maximize PSD and PSB File Compatibility to Always.
| 12. | In the Chapter 15 folder, you'll find a folder called Droplet. Drag it on top of the new droplet you created (Aged Photo) to run the action on the entire folder.
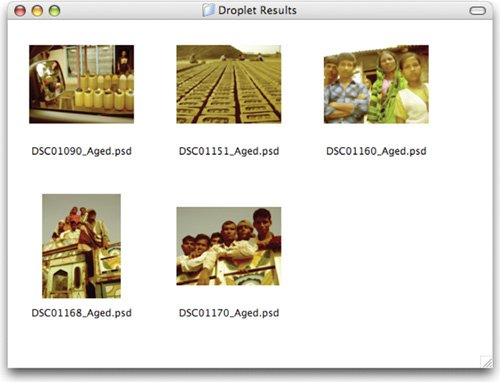 | 13. | Sit back and wait; the batch should run without errors. Droplets can be useful as well if you want to set up a time-intensive task and walk away from your computer for a while. Just be sure to test a few images before leaving.
|
Conditional Mode Change The Conditional Mode Change command is meant to be used within an action. It allows you to specify conditions for a mode change to occur during an action. Recording a mode change into an action can result in an error if the action is run on an image that has a different image mode. For example, if one step of an action were to convert an image from a source mode of RGB to a target mode of CMYK, applying this action to an image in Grayscale mode would result in an error. The command allows you to specify one or more source modes and a mode for the target mode. 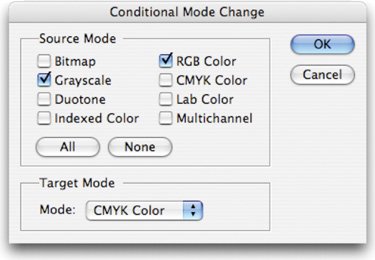 Contact Sheet II In traditional photography, it is a common practice to create a contact sheet from rolls of film. This allows the photographer (and clients) to select images they'd like to see printed at full size. This step is done for both convenience and cost-savings. Video Training  | Contact Sheet II |
This best practice also works in the digital domain. Contact sheets are a convenient way to get images in front of a client without having to make expensive prints or wasting paper. Creating a contact sheet is easy; let's give it a try: 1. | Choose File > Automate > Contact Sheet II.
| | | 2. | In the Contact Sheet II dialog box, specify which images to use. This can be done by choosing from the Use menu in the Source Images area:
- Current Open Documents: This uses all images that are currently open in Photoshop.
- Folder: You must click Choose (Browse) then navigate to a folder containing images. You can also specify to Include All Subfolders to include images within any subfolders. For our example, click Choose (Browse) and navigate to Historical Contact Sheet in the Chapter 15 folder.
- Selected Images From Bridge: If you've selected images in Bridge choose this command, then Photoshop will use those for the contact sheet.
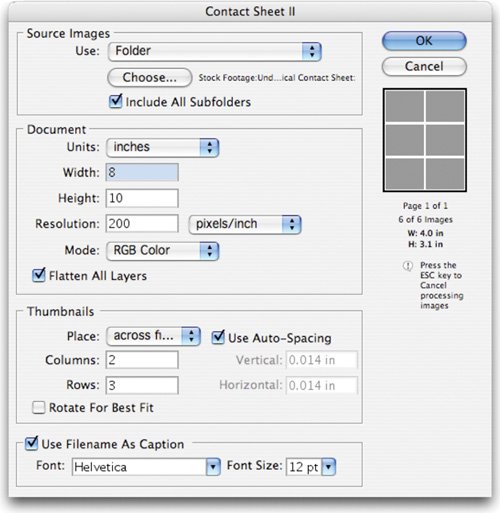 | 3. | In the Document area, you must specify the dimensions of the paper, a resolution, and color mode for the contact sheet. For this sample, enter a page size of 8 inches x 10 inches, a resolution of 200 ppi, and an RGB color mode. These settings will work well for both email and an inkjet printer.
| 4. | Select Flatten All Layers to put all images and text on a single layer. This will result in a smaller file. If you want the ability to edit photo captions, uncheck this box.
| 5. | In the Thumbnails area, you can specify options for the thumbnail previews and layout.
- Place: You must choose to arrange thumbnails across (from left to right, then top to bottom) or down (from top to bottom, then left to right).
- Columns/Rows: Enter the number of columns and rows you want for each contact sheet. Photoshop automatically creates new contact sheets when the current one is full. As you modify these settings, you'll see a visual preview of the specified layout. In our sample, the folder contains six images, so choose 2 columns and 3 rows to maximize thumbnail size.
- Use Auto-Spacing: Select Use Auto-Spacing and Photoshop will optimize the amount of space between each thumbnail.
- Rotate For Best Fit: Deselect Rotate For Best Fit so the images appear properly oriented. If you check this option, some thumbnails will be larger (but rotated 90°).
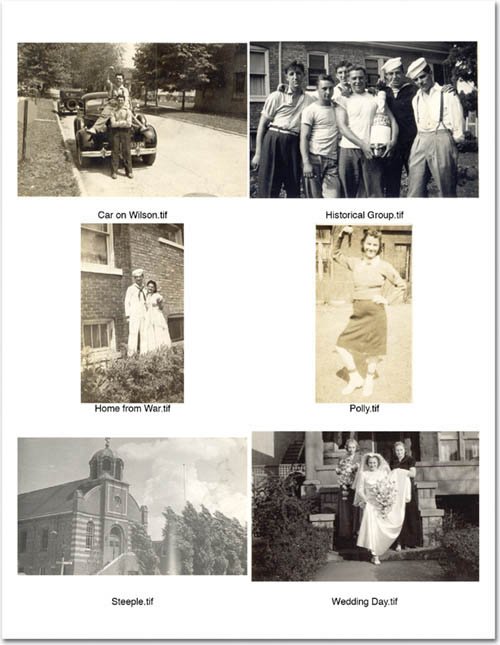
| | | 6. | Check Use Filename As Caption to label each thumbnail using its source file name. This is an important option so you and the client can clearly identify each image. You can use the menu to specify a font and size for the captions.
 | 7. | Click OK to run the script.
| 8. | When the file is done, choose Save As and save the file as a PDF file for maximum compatibility and easy email use.
|
Crop and Straighten Photos When scanning images, it's often possible to fit more than one image on the scanner bed. Scanning multiple images at once can save input time when loading images into Photoshop. Fortunately, the Crop And Straighten Photos command picks up and keeps the efficiency going. Let's give it a try: 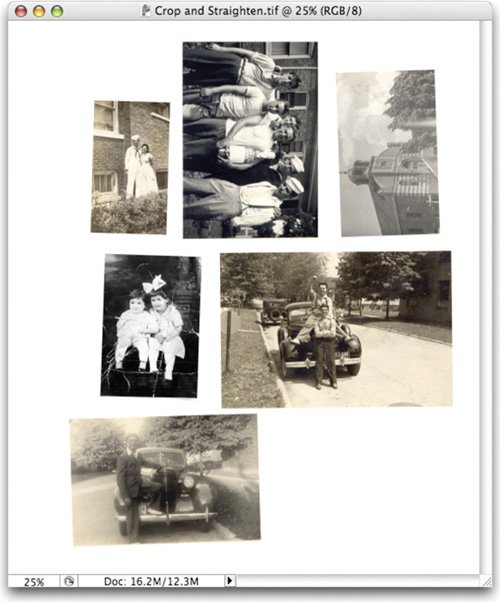 1. | Open the file Crop and Straighten.tif from the Chapter 15 folder. If you would rather, just scan in a few images on your own scanner.
| 2. | If you're working in a multilayered image, select the layer that contains the images. If you only want some of the images, draw a selection border around one or more images.
| | | 3. | Choose File > Automate > Crop And Straighten Photos.
Tip: Crop and Straighten Best Results For best results, you need to keep 1/8 inch between the images in your scan. If the Crop And Straighten Photos command does not succeed (which is rare), you should process the individual images using the Crop tool. | 4. | Each image should be cropped, straightened, and moved into its own document window.
|
Fit Image The Fit Image command is another that is meant to be inserted into an action. It allows you to specify a maximum width and height (in pixels) that the image cannot exceed. This is useful when sizing images for the screen or Internet. Picture Package The Picture Package command allows you to fit multiple pictures onto a page. This can be helpful as it allows you to bundle multiple images into a single sheet for printing, thus saving you time and money. Let's give it a try: Video Training  | Picture Package |
1. | Choose File > Automate > Picture Package.
| 2. | In the Source Images area, choose to use a File (you can also use a folder or the open document).
| 3. | Click Choose and navigate to the Chapter 15 folder. Inside you'll find a folder called Picture Package. Open that folder and choose the first image.
| 4. | In the Document area choose a Page Size (8 x 10 works best for most inkjet printers). The RGB mode and 300 ppi work best for inkjet work as well. In the Layout drop-down menu, you have several choices (it will feel like grade school picture day all over again).
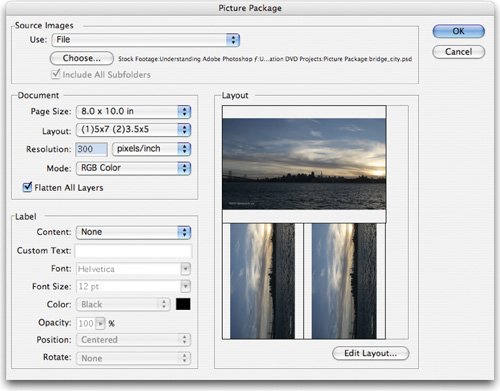 | 5. | In the Picture Package dialog box, choose a layout from the Layout menu. For this example, choose the (1) 5X7 (2) 3.5X5. Photoshop rearranges and sizes the images in the Layout preview.
| | | 6. | Let's add more images into this layout. Click the bottom-right image. Navigate to the Picture Package folder and choose the second image in the list.
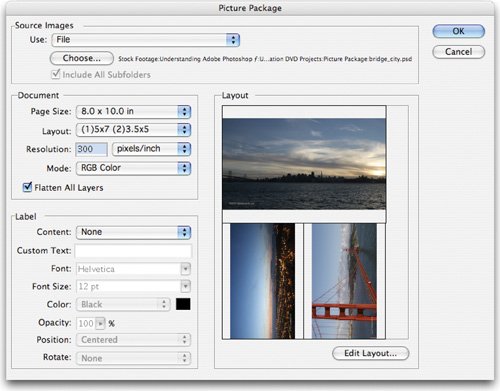 | 7. | Click the bottom-left picture and pick the third image from the Picture Package folder.
| 8. | Click OK to create the Picture Package. The package is now ready for printing. A paper cutter or Xacto knife with a straightedge metal ruler works best to separate your picturesjust be careful when cutting.
|
Web Photo Gallery Photoshop's Web Photo Gallery command is one of the most popular in Photoshop. Power users and amateurs alike have discovered the power and flexibility of creating entire galleries right within Photoshop. Without knowing any HTML or Flash, users can quickly create online galleries for their images. If they are familiar with Web programming, they can customize the templates for quicker results. Video Training  | Web Photo Gallery |
1. | Choose File > Automate > Web Photo Gallery.
| 2. | Choose a style for the gallery from the Styles pop-up menu. You can see a preview of the main page for the chosen style in the preview area. Photoshop CS2 includes 30 different templates including interactive ones for client feedback and impressive galleries powered by Flash. For our sample, choose Centered Frame 2Feedback.
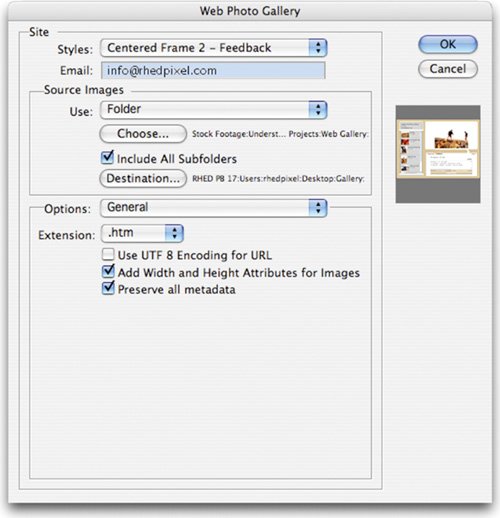 | 3. | Enter an email address if you want the client to be able to send you feedback.
| 4. | Choose the source files to use for the gallery from the Use menu. In our sample use a Folder and click Choose. Navigate to the folder Web Gallery in the Chapter 15 folder.
| | | 5. | Click Destination and navigate to a place to create the Web site. It is best to target a folder, not a drive. Navigate to the desktop and create a folder called Gallery.
| 6. | There are several options that you can customize (and they vary by the template you pick). Pick each option and modify it to taste.
- General: Includes metadata with your images so shooting info is included. You can also choose to use the extension .htm or .html, depending on your server requirements.
 - Banner: Specify information to be included in the banner area of the Web page.
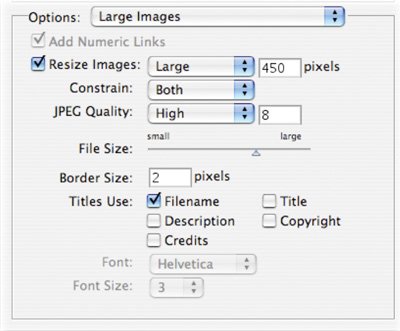
- Large Images: Set the size for the images displayed on the detail pages. Be sure to balance size versus download time.
- Thumbnails: Set how large the thumbnail images are for the index pages.
- Custom Colors: Some templates allow you to change colors of certain elements. These colors will not affect every template.
 - Security: Watermark images with security information. This will put some clients' minds at ease.
| 7. | Click OK. Photoshop creates a Web page and stores all of the HTML and JPEG files in the destination folder.
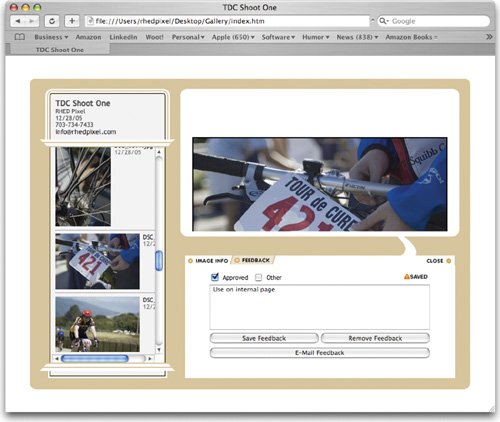
| | | 8. | The resulting Web site can be posted to the Internet if you have a Web site or Web hosting (many Internet Service Providers provide hosting as part of their Internet access plans). You can also zip the file and send it to a client via email (clients can then click to expand the archive and open the index.htm file). With the Feedback template, the client can approve and add comments to each image (they must click Save before switching images). They can then click Email to send the feedback to you.
|
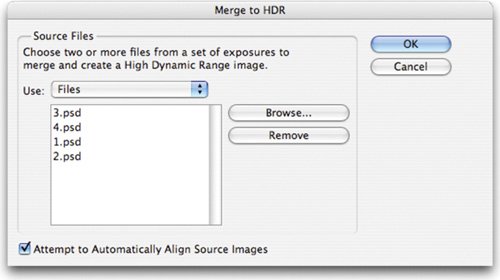
Photomerge The Photomerge command allows you to merge several (adjacent) photographs into one continuous image. This command is used to make panoramic images. We covered this command in depth back in Chapter 8. If you skipped that hands-on activity, feel free to flip back to Chapter 8. If you'd like another practice image, you'll find a folder called Photomerge in the Photoshop Application folder (Photoshop > Samples > Photomerge). 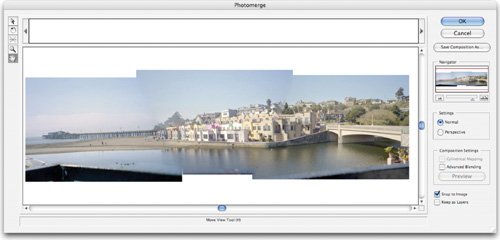 Merge to HDR The Merge to HDR command is new to Photoshop CS2. It allows you to take multiple exposures of a subject (shot from a locked tripod or camera mount) and merge them into a new image that better displays highlights and shadows. The resulting image is also a 32-bit image that allows great flexibility for adjusting exposure. We covered HDR images in depth in Chapter 10, "Color Correction and Enhancement." Let's create an HDR image: 1. | Choose File > Automate > Merge To HDR.
| | | 2. | Within the Merge to HDR dialog box, click Browse to navigate to the source images. You'll find an HDR sample in the Sample Images folder (Photoshop> Samples> Merge to HDR). Click Open. In the folder, Shift-click images 14 to select them. Click Open.
 | 3. | A second Merge to HDR dialog box opens. You'll see thumbnails for each of the images used as well as a resulting image.
| 4. | Leave the Bit Depth set to 32 Bit/Channel.
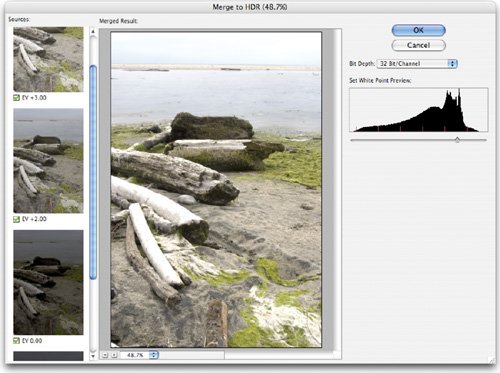 | 5. | Adjust the slider below the histogram to set the white point.
| 6. | Click OK to create a new HDR image.
|
|