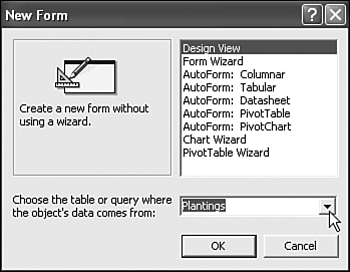
Using the Field List

Another tool that's available only in design view is the Field List. The Field List enables you to easily add new data to be displayed on a form. To see the Field List in action, you'll build a new form based on the Plantings table, which doesn't yet have a user interface in the database. To add one, follow these steps:

  1. Select the Forms shortcut in the Database window.

  2. Click the New button on the Database Window toolbar.

  3. In the New Form dialog box, select Design View . Then select the Plantings table in the data source combo box, as shown in Figure 13.6.

    Figure 13.6. Creating a new form from scratch.

    graphics/13fig06.gif

  4. Click OK to create the form and open it in design view.

  5. Access might automatically display the Field List. If it doesn't, either click the Field List button on the toolbar or select View , Field List . The Field List (shown in Figure 13.7) lists all the fields in the table or query on which the form is basedin this case, the Plantings table.

    Figure 13.7. The Field List.

    graphics/13fig07.gif

  6. To add controls to the form, you can drag and drop items from the Field List. For example, select the DatePlanted field in the Field List; then drag and drop it onto the form. When you release the mouse button, Access creates a label and text box for this field.

  7. Drag and drop the Notes and Future fields from the Field List to the form.

  8. Click the Save button on the toolbar. Name the form Plantings and click OK .

  9. Select View , Form View to see your new form.

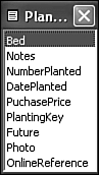
Chapter 11, "Customizing Your Tables," discussed the fact that properties in Access can be inherited from one object to another. The new Plantings form provides a good example of this. Because you set properties on fields when you built the Plantings table, the form automatically makes some settings for you:

  • The Caption property for each field is used as the text for the label on the form.

  • The Description property for each field is displayed on the status bar when that field is active.

  • The data type for each field is used to determine the type of control to display. That's why the Future field (which accepts only Yes or No values) is displayed as a check box rather than as a text box.

  • The Format and Input Mask properties control the appearance and function of the control that holds the Date field.


Absolute Beginner's Guide to MicrosoftR Access 2002
ISBN: N/A
EAN: N/A
Year: 2002
Pages: 133

flylib.com © 2008-2017.
If you may any questions please contact us: flylib@qtcs.net