Building a Template
|
|
Now, let's create a template that you might use as a base page for a small electronic magazine site.
First, we'll create a new template and add a few graphics and editable regions. Once the template is complete, we'll base a new page on the template. Follow these steps (or use one of the methods reviewed in the earlier section, "Creating a Template"):
-
Choose File ® New to open the New Document dialog box.
-
Select Template Page from the Categories list.
-
Select ASP VBScript Template from the Template Page list.
-
Click Create.
On the CD-Rom Before you start this next section, copy the two graphic files, backfence2.jpg and rtracsban.gif, from the accompanying CD to the Images folder in your web root folder. You might need to create the folders at this point.
We'll be working with the MasteringDreamweaver folders off the IIS root, wwwroot:
C:\inetpub\wwwroot\MasteringDreamweaver\images C:\inetpub\wwwroot\MasteringDreamweaver\Chapter23 C:\inetpub\wwwroot\MasteringDreamweaver\Templates
These folders simply constitute our example environment; yours may be different. The Template folder might not exist on your system yet. Dreamweaver MX will create the folder for you when you save your first template file.
Now, let's insert a few graphics that make up the company's logo. Follow these steps:
-
With the Layout View window active, choose Insert ® Image ® Open the Images folder.
-
Select backfence2.jpg.
-
If Dreamweaver MX displays an information message about relative paths in saved documents, click OK to clear it. Figure 23.7 shows the graphic in the Layout View window.
Figure 23.7: Insert the fence graphic. -
Insert a return after the graphic and repeat steps 1 through 3 to insert the second graphic file, rtracsban.gif, beneath the first graphic, as shown in Figure 23.8.
Figure 23.8: Insert the banner graphic below the fence graphic.Note Throughout this chapter, the Document window is set up to display both the Code and Design view when possible so you can view each item's relevant code.
-
Dreamweaver MX aligns both graphics to the left, by default. To center both graphics, select both (hold down the Shift key while you click both graphics), and then choose Text ®Align ® Center.
-
Before we do anything else, save the template by choosing File ® Save As Template.
-
When Dreamweaver MX displays the message that the template contains no editable regions, click OK.
-
Specify the site you want to save the template in (we're working in MasteringDreamweaver), enter a name for the site, as we've done in Figure 23.9, and click Save.
Figure 23.9: After adding the graphics, save the template.
Dreamweaver MX automatically saves the file to the appropriate site's Templates folder. If the Templates folder doesn't exist yet, Dreamweaver MX creates it.
Inserting Locked Content
A template can contain content that's not editable. Simply enter the content right onto the page; don't define it as any kind of region. That content is locked, which means the page author can't edit that content.
Our template doesn't contain any content as yet, so position the insertion point below the banner and enter the text A Harey Tale. Then right-align the text, as shown in Figure 23.10.
Figure 23.10: Enter text directly into the page to lock it, meaning no one can edit it outside the template.
Dreamweaver MX prohibits the page author from modifying that text in any way. Each subsequent page contains the two logo graphics and the small line of text just below. The page author can neither modify nor delete them. The template author must open the template and make any modifications, but doing so will affect all pages based on (and still actively connected to) that template.
Inserting an Editable Region
Let's continue with our example by assuming that the title, byline, and article content changes from issue to issue. You can handle this situation easily by adding a few editable regions to the template. That way, the page author can update the title, byline, and content as required. An editable region is an area of content that you might want to modify in subsequent pages. You can enter the content and then select it, or you can insert the editable region and then enter the content into the region.
| Warning | Make sure you're actually working with a template page before adding an editable region to a page. If you add an editable region to a page and then save it, Dreamweaver MX will automatically save the page as a template, whether you meant to or not. |
To insert an editable region, follow these steps:
-
Move the insertion point to a blank line.
-
Click the Editable Region button on the Insert bar, shown in Figure 23.11, to open the New Editable Region dialog box, which is shown in Figure 23.12.(Click the Templates tab in the Insert bar to display the Template objects.)
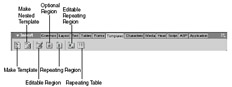
Figure 23.11: Use the Insert bar to quickly insert regions.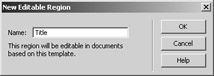
Figure 23.12: In the Name box, enter a name for the new editable region. -
In the Name box, enter a name for the region, and click OK.
-
Center the region.
As you can see in Figure 23.13, the region's tab contains the region's name. Since the editable region is empty (has no content), the content area also displays the region's name. If you create an editable region that includes content, that content will be displayed.
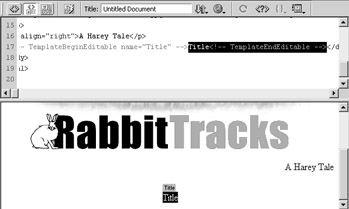
Figure 23.13: Dreamweaver MX highlights the new region's border. -
Repeat steps 1 through 3 to add two more editable regions to the template. Name them Byline and Article, as shown in Figure 23.14.Be sure to include a few blank lines between each region; otherwise, Dreamweaver MX will combine the regions on the same line.
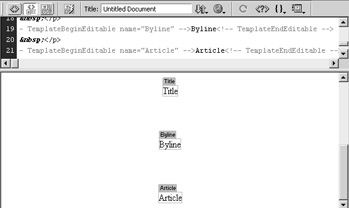
Figure 23.14: Add a total of three editable regions to the template.Tip Things change, and that's what templates are for. At any time, you can lock content by simply changing the template. To remove an editable region, open the template, select the editable region, and then choose Modify ® Templates ® Remove Template Markup. You won't delete any content, just the editable tags. Remember, you can't lock or unlock content in a subsequent page; you must change the template.
Dreamweaver MX provides several ways to insert a region. Besides clicking the appropriate button on the Insert bar, you can use one of the following methods:
-
Choose Insert ® Template Objects and then choose one of the following options: Editable Region,Optional Region, Repeating Region, Editable Optional Region, Repeating Table.
-
Right-click the content, choose Templates and then select one of the following options: New EditableRegion, New Optional Region, New Repeating Region.
Inserting a Repeating Region
The next element we want to add to our template is a credits area, in which we acknowledge contributors that aren't part of the staff. That means the page author will edit this data each issue. It's even possible that there will be no acknowledgments. We'll use a repeating region to accommodate this content.
A repeating region enables you to replicate a region. Use them the same as you would an editable region, except that these regions aren't editable. Use them to control the layout of repeated data that won't change from page to page, such as a list of contacts, employees, products-any kind of data that you might want to list.
Although a repeating region isn't editable, you can include an editable region in a repeating region to make it editable, and that's what we'll do in this section. Follow these steps:
-
Position the insertion point (at least) two lines below the article region.
-
Click the Repeating Region button on the Insert bar.
-
In the New Repeating Region dialog box, enter the name Contributors, and click OK.
-
At this point, the region isn't editable, so double-click the body of the repeating region, and click the Editable Region button to insert an editable region within the repeating region.
-
Name this region EditableContributors, and click OK.
-
Left-align the nested regions if necessary, as shown in Figure 23.15.Later, we'll add names to this region.
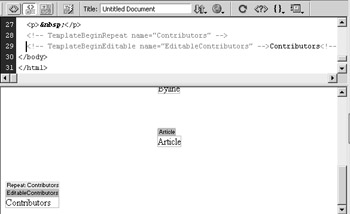
Figure 23.15: Add a repeating region for items you might want to repeat.
If you just want to add a series of names, you can use an editable region. When there's more than one contributor, we want to repeat the formatting for each contributor; that's why we're using a repeating region instead of an editable region.
| Note | Alone, a repeating region isn't editable by a page author. You must open the template and edit any content. This may affect other pages created from the template. |
Inserting a Repeating Table
The next section will list staff contributors that will remain permanent for the most part. In this case, you might use a repeating table region. A repeating table is similar to a repeating region except it includes repeating rows of table cells that include editable regions. You specify which rows in the table are included in the repeating region.
Inserting a repeating table is similar to inserting any other region. To add a repeating table to our sample template, follow these steps:
-
Position the insertion point a few lines below the contributors region.
-
Click the Repeating Table tool on the Insert toolbar to open the Insert Repeating Table dialog box, which is shown in Figure 23.16.
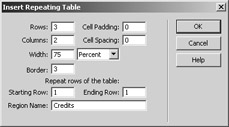
Figure 23.16: Define a two-column repeating table. -
Change the default settings as shown in Figure 23.16, and name the region Credits.
-
Enter six cells of content like the two cells shown in Figure 23.17.

Figure 23.17: Add a repeating table for monthly contributors.
The Repeating Table settings are fairly self-explanatory, but you might want to keep a few things in mind, particularly if you are more familiar with database development than with web development.
-
The Cell Padding property determines the number of pixels between a cell's content and the cell's boundaries.
-
The Cell Spacing property determines the number of pixels between adjacent table cells. If you don't assign a value for either the Cell Padding or the Cell Spacing setting, most browsers default to a padding value of 1 and a spacing value of 2. If you want no padding or spacing, enter the value 0 for both properties. Similarly, if you don't specify a border setting, most browsers default to a setting of 1 pixel. Set the property to 0 if you want no border.
-
The Width property specifies the width of the table in pixels or as a percentage of the browser window's width. Simply choose Percent or Pixels from that property's drop-down list accordingly.
-
The Repeat Rows Of The Table options specify the rows displayed in the repeating region.
Inserting an Optional Region
An optional region allows you to show or hide content. For instance, you might use a template to display product prices. In this case, you'd put the wholesale prices in an optional region because you wouldn't want retail customers to have access to wholesale prices. You use template parameters and conditional statements to determine whether the page displays the optional content. In addition, depending on the type of optional region object used, the template user may be able to edit the content in addition to determining whether the region is shown or hidden.
To insert an editable optional region that displays, by default, the cost of a single issue, follow these steps:
-
Position the insertion point a few lines below the repeating table.
-
Click the Optional Region tool on the Insert toolbar to open the New Optional Region dialog box, which is shown in Figure 23.18.
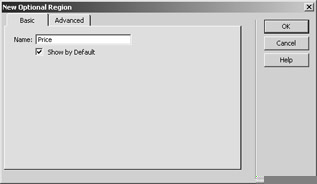
Figure 23.18: Name and determine whether the optional regional is displayed by default in the template-based page.Note The accompanying example inserts an editable optional region. That means the page author can edit the content when basing a new page on the template. If you don't want an editable optional region, enter the content in the template, select it, and then add the optional region using the instructions in this section.
-
In the Basic tab, name the optional region, which currently has only its default name, OptionalRegion1.The Show By Default option-checked by default-determines whether the region is visible by default. Clearing this option sets the default value property to False.
-
Click the Advanced tab, which is shown in Figure 23.19, to display additional options.
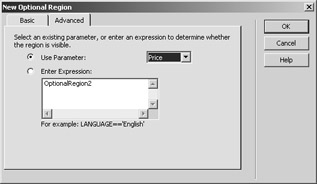
Figure 23.19: You can define the optional region's visibility to be based on a parameter or an expression you enter.
In the Advanced tab, you'll create parameters and define conditional statements that control the visibility of the region's content. You can use simple true or false operations or more complex conditional expressions. To use a parameter, accept the default Use Parameter option. Then, simply choose the parameter from the drop-down list to the right. For now, we're just exploring the options, so close the dialog box by clicking Cancel. Right now we need to add a parameter, and then we'll add an optional region and connect it to that parameter.
Using a Parameter to Control an Optional Region
Parameters help you control content display in template-based pages. In this section, we'll use a parameter to determine whether the page displays the optional content in the Price region.
Each parameter must have a unique name (which is case sensitive), a datatype, and a default value. Dreamweaver MX encloses a parameter in @@ symbols and evaluates the parameter as a simple expression. The difference is that a parameter requires additional data, which the page author is expected to supply when creating the new template-based page. You define a template parameter in the head section using the following syntax:
<!-- TemplateParam name datatype value -->
Now, let's use a simple true/false parameter to determine the state of an optional region, with true being the default. To accomplish this behavior, add the following tag (in the Code window) to the template's head section, as shown in Figure 23.20:
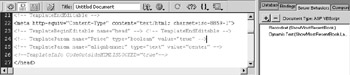
Figure 23.20: Insert a parameter tag so a page author can determine whether the price content is displayed.
<!-- TemplateParam name="price" type="boolean" value="true" -->
| Tip | You don't have to manually add this tag. You can create a parameter in the Optional Regions dialog box, and it automatically inserts the appropriate code in the head section. |
| Tip | The TemplateParam tag is case sensitive. If you use uppercase with a datatype or defined value (such as true or false), Dreamweaver MX will return an error. |
Adding the Optional Region
To add the optional region, follow these steps:
-
Return to the bottom of the page in Design view.
-
Click the Optional Region button to open the New Optional Region dialog box.
-
On the Basic tab, name the region Price.
-
Click the Advanced tab, click the Use Parameter option, and choose the optional region from the drop-down list.
-
After Dreamweaver MX adds the optional region, enter the current price of $3.00, as shown in Figure 23.21.
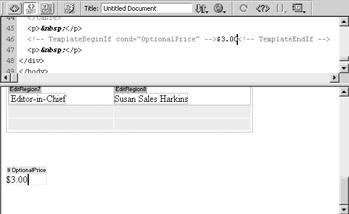
Figure 23.21: Enter the price per issue in the optional region.
By default, this region is displayed in any new template-based page. However, the page author can modify the parameter's value so as to hide the region. We'll show you how to do so later in this chapter.
Depending upon your circumstances, you can choose to use an expression to determine the fate of the optional region. For instance, the price may be discounted for certain viewers.
When this is the case, click the Enter Expression option in the Advanced tab and enter the appropriate expression. The expression can be as simple as a true or false value or complex enough to contain multiple conditions. We're going to stick with the parameter example. Later, we'll modify the parameter in a template-based page so you can see the full effect of this flexible feature.
Editing a Region
Editing a region's properties is a fairly common task, but not exactly intuitive in Dreamweaver MX. Follow these steps:
-
Choose Window ® Properties or press Ctrl+F3 to open the Properties Inspector, as shown in Figure 23.22.

Figure 23.22: Use the Properties Inspector to quickly modify a region's properties. -
Select the Price optional region to display the Properties Inspector with the Edit button, as shown in Figure 23.23.

Figure 23.23: Click the Edit button to open the New Optional Region dialog box. -
Click the Edit button to reopen the New Optional Region dialog box, and make the desired changes in the Basic and/or Advanced tabs.
Using Editable Tag Attributes
Template text, images, and regions are editable within the template, but not always in the template- based page. You can change that by defining an editable tag attribute. For instance, both of the images we dropped into our example template page are centered between the left and right margins. You can allow a bit of flexibility by letting the page author re-align the images in the template- based page. To do so, follow these steps:
-
In the Code window, select the align attribute that precedes the fence image. You might find it easier to first select the image in Design view and then select the div tag to the left of the image tag, as shown in Figure 23.24.You can select the entire statement, as shown in the figure, or just the attribute; the resulting Editable Tag Attributes dialog box is the same in either case.

Figure 23.24: Be sure to select the appropriate tag. -
Choose Modify ® Templates ® Make Attribute Editable to open the Editable Tag Attributes dialog box, which is shown in Figure 23.25.
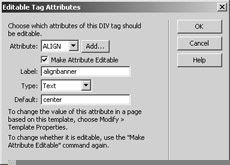
Figure 23.25: Name the new attribute and modify the default setting if necessary. -
Check the Make Attribute Editable option. Dreamweaver MX will fill in the remaining fields for you, even assigning a name for the editable tag.
-
In the Label box, enter a unique label for the attribute. We entered alignbanner.
-
Click OK.
In a template-based page, the page author can change the alignment of either image. We'll show you how later in this chapter.
| Tip | When naming editable attributes, try to include the type of attribute and identify the item. That way, the page author doesn't have to guess at the parameter's purpose-the name makes it very clear. |
Figure 23.26 shows the new editable tag. Notice that the center attribute has been replaced with the string @@(alignbanner)@@. The @@ symbols define align banner as a parameter. You might also be wondering why we didn't repeat the previous steps with the rabbit banner. Since both image tags are contained within the <div> tag with the editable align attribute, any changes to the align attribute will affect both images. Simply enter a new <div> tag between the two images if you want to treat the images differently. Save your template and close it. You're ready to create a new page based on the template you just created.

Figure 23.26: We replaced the original alignment tag with an editable tag.
|
|
EAN: 2147483647
Pages: 214