Performing a More Advanced Search
|
|
To Dreamweaver MX, a more advanced search is a search in which you filter records by multiple criteria. Perhaps you need to find all customers who live in Colorado that bought snow skis last year. You'd specify those two criteria in the search in order to filter the records in your database. Dream- weaver MX allows us to quickly add such a search using very nearly the same technique we used to build the simple search.
Modifying the Search Form
On the CD-Rom Let's add a couple more fields to our search field, letting the user specify Last Name and Admin Level, for instance. Figure 22.12 shows our modified search form, which we're saving as Search_Advanced.asp. Now we're ready to modify our search results page. We're going to save it under the name Search_ Advanced_Results.asp, so that both versions can be included on the CD.
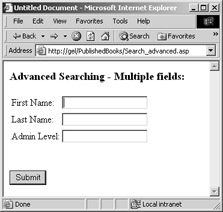
Figure 22.12: We're adding multiple fields upon which to search.
Reviewing the Advanced Recordset Dialog Box
We need to modify the recordset on the search results page, so double-click the recordset on the Bindings tab of the Application panel. Click the Advanced button in the Recordset dialog box, shown in Figure 22.13, to open the advanced version of this dialog box. Your dialog box should now look similar to Figure 22.14.
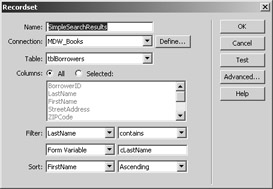
Figure 22.13: Click the Advanced button to open the advanced version of the Recordset dialog box.
As you can see, the dialog box contains a few features we should explore a bit. You're familiar with the first two fields—Name and Connection. The SQL, Variables, and Database Items sections let you customize the recordset even further, which helps when you're building a multiple-field search engine.
The SQL section contains the SQL code that Dreamweaver MX generated for our simple search. You can edit the SQL code directly by entering new text in the SQL section. You can also modify the SQL code by selecting and entering options in the remaining two sections as well.
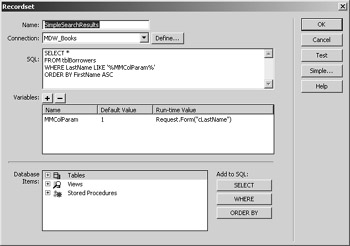
Figure 22.14: The advanced options in the Recordset dialog box.
The Variables section lets you specify variables that are to be used in the SQL statement as further filter criteria. You can see that Dreamweaver MX created a variable called MMColParam and assigned it the value of our form variable cLastName. Notice that since we're using ASP for this example, the form variable is referred to as Request.Form("cLastName"). You can also assign a default value to the variable.
Those of you more accustomed to SQL may wonder why you'd want to go through the trouble of assigning a variable in this area instead of just typing in the full SQL statement. If you use the variables feature, Dreamweaver MX takes care of all the weird syntax that sometimes languages such as ASP require. Plus, Dreamweaver MX adds code that takes care of commas and quotes that may exist in the user input. And you can have a default value for the variable. So you see, this feature can be quite handy.
The Database Items section allows you to add the respective items to the SQL statement as well. That is, if you open the Table view, choose a table, and click Select, Dreamweaver MX adds the table name to the FROM portion of the SQL statement. This feature helps you remember your table names, views, and stored procedures and reminds you where they should go in the SQL statement. But that's about all it does. Once you're comfortable with SQL, you probably won't use this much.
Modifying the Search Results Page's Recordset
OK, now we're ready to actually modify this window. Since we need to add the new search criteria to our SQL code, we need to add two more variables in the Variables area. Follow these steps:
-
Click the plus sign (+) next to Variables to add a new, highlighted blank line to the Variables section.
-
Click Name, and enter FN.
-
Enter "" in the Default Value column.
-
Click the Run-time Value column, and enter Request.Form("cFirstName").
-
Add another new line by clicking the plus sign (+) and entering Rights in the Name column.
-
Enter "" in the Default Value column.
-
Enter Request.Form("cAdminLevel") in the Run-time Value column.
Now that we've defined the variables, we can add them to the SQL. We actually have to type the variables into the SQL code, so let's modify the SQL so that it looks like the following:
SELECT * FROM tblBorrowers WHERE LastName LIKE '%MMColParam%' AND FirstName LIKE '%FN%' AND SecurityLevel LIKE '%Rights%' ORDER BY FirstName ASC
Your window should now look similar to that in Figure 22.15.

Figure 22.15: After adding the new search criteria to your query, your advanced Recordset dialog box should look similar to this.
Since we're using LIKE and the percent signs (%) surrounding our variables (the wildcard in Microsoft Access), our search will look for records containing the text we enter. The text doesn't have to exactly match the record in order for the record to be selected.
Save your page and load your new search page. If you're using our sample database from the CD, enter Mickey, Mouse, and User in First Name, Last Name, and Admin Level, respectively. You should now see Mickey Mouse's information on your screen. Try the search again, leaving one of the criteria blank. You should get an empty recordset and no user records returned to your browser when you search.
|
|
EAN: 2147483647
Pages: 214