Personal Portal Web Application
|
| < Free Open Study > |
|
We have so far covered how to build basic servlets, extending from the GenericServlet class, that extract data from the ServletRequest, ServletResponse, ServletConfig, and ServletContext objects. Now is a good time to look at what is involved in building a simple web application, using servlets at the heart of it.
We are going to gain knowledge of how to build a basic web site architecture to serve a dynamic web site. We will build the bones of a web site that we could develop to act as a themed portal for clients, offering personalization and content management. Since we are only beginning to work with servlets at this point we will try to keep this pretty simple, building on what we have learnt to draw the web application together.
We will implement a web application packaged as personalPortal. This is the building block of a website that could be developed into a themed portal website. We will implement a straightforward PortalServlet that will serve as the application gateway. All requests will enter through this servlet. The servlet will return a single web page of three panels. The top and left (menu) will be generated from the PortalServlet with the help of HTMLPortal, which is a utility class to manage the HTML preparation for the PortalServlet. This allows us to abstract the HTML from this servlet to keep the processing logic clear (as we did using the HTMLTable utility class in earlier examples).
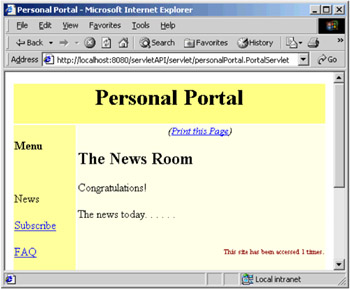
The screenshot above indicates how the initial page will look. The main right panel contains the body of the page. Our PortalServlet will not generate this panel. This will come from different resources in the web application, such as other servlets and HTML web pages. We will use the RequestDispatcher interface to include their content. While doing this we will pass an attribute to the resource receiving the request, that may pick up this attribute, if required.
Clicking on the Menu links on the left will update the page from the PortalServlet with updated content in the main panel, reflecting the new choice. We will also allow users to print out the page contents in a more printer friendly format. For this we remove the right-menu panel, and display the links across the top of the page, as shown below:
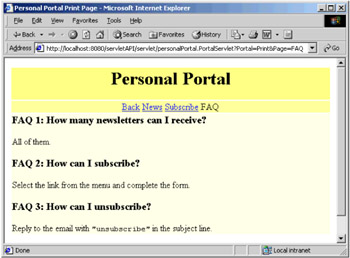
The above screenshot shows the FAQ page, which is a HTML web page (not a servlet) whose output is included by the RequestDispatcher object in the page.
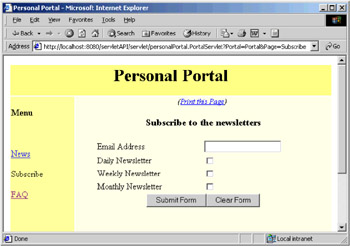
Our subscription page of the PortalServlet is SubscribeServlet's contents included in the right panel. With this, the user is presented with a subscription page to add their e-mail address and select which newsletters they wish to subscribe to. They submit the form back to the PortalServlet that passes the request onto the SubscribeServlet. This then validates the use input and, assuming input is valid, returns to them a page indicating they have successfully signed up to the newsletters. In a real world version of this application, the validation would be more strict (possibly client side JavaScript), with storage of the details to a database.
Hopefully, at this point, you will see some similarities to a standard and common web site design, where the panel on the left holds the menu items; the top-panel holds the title (and sometimes links), with a center/right panel for the body of the page. In this example, we are going to look at how we could go about building a basic implementation of this site design.
Before we look at the code, let's consider the class diagram for the application:
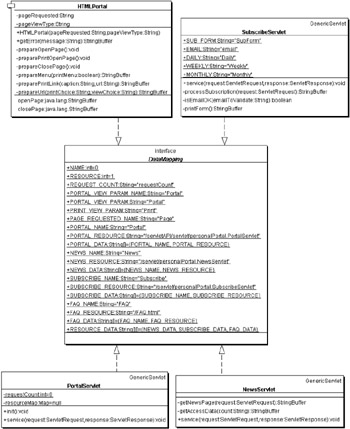
We will be developing one interface, three servlets, and an additional support class, as well as one HTML page. The DataMapping interface is designed to hold constants for use by the servlets, and defines no methods. The HTMLPortal class is a support class for PortalServlet, providing the HTML required by this servlet for the page. SubscribeServlet and NewsServlet produce content for the main panel, as does the additional FAQ.html web page.
Implementing the Personal Portal Web Application
Our next step is to create the code for the web application. Let's now walk through it.
The DataMapping Interface
Normally, when we build a web application, we place information into the initialization parameters in the web application's deployment descriptor. This stores information needed to configure the servlets and web applications. This is useful because we do not have to rebuild the application to change them, and almost anyone can make the changes. However, we will not be covering web deployment until Chapter 4, so we need to store our configuration information elsewhere for this web application.
A live application similar to this would have a database behind it, from which it may load some of these configuration values. Storing this information in a database would be a useful mechanism for accessing and updating them.
An alternative option would be to include creating a properties file to store the data. However, for simplicity's sake, we will store this data as constants in an interface with no defined methods. This means that any class (our servlets) may implement this interface and have full access to the constants, as if they were declared in the implementing class. We store these constants, and then add them to arrays so that our applications can easily iterate through them, whether they are updated or not.
package personalPortal; public interface DataMapping {
The first items of data we store are two constants indicating the position in an array of the name and resource location. We also store some of the parameters and names made in requests:
public static final int NAME = 0; public static final int RESOURCE = 1; public static final String REQUEST_COUNT = "requestCount"; public static final String PORTAL_VIEW_PARAM_NAME = "Portal"; public static final String PORTAL_VIEW_PARAM = "Portal"; public static final String PRINT_VIEW_PARAM = "Print"; public static final String PAGE_REQUESTED_NAME = "Page";
The information that we hold about each page in the application is:
-
Its name
-
Its resource address (URI)
-
An array to hold both of those values
public static final String PORTAL_NAME = "Portal"; public static final String PORTAL_RESOURCE = "/servletAPI/servlet/personalPortal.PortalServlet"; public static final String[] PORTAL_DATA = {PORTAL_NAME, PORTAL_RESOURCE}; public static final String NEWS_NAME = "News"; public static final String NEWS_RESOURCE = "/servlet/personalPortal.NewsServlet"; public static final String[] NEWS_DATA = {NEWS_NAME, NEWS_RESOURCE}; public static final String SUBSCRIBE_NAME = "Subscribe"; public static final String SUBSCRIBE_RESOURCE = "/servlet/personalPortal.SubscribeServlet"; public static final String[] SUBSCRIBE_DATA = {SUBSCRIBE_NAME, SUBSCRIBE_RESOURCE}; public static final String FAQ_NAME = "FAQ"; public static final String FAQ_RESOURCE = "/FAQ.html"; public static final String[] FAQ_DATA = {FAQ_NAME, FAQ_RESOURCE};
Finally, we store all of the String arrays with information about the different pages in a two dimensional array. We use an array instead of another structure for performance in iterating through the contents. We obviously need to keep this updated if we add additional pages to our menu:
public static final String[][] RESOURCE_DATA = {NEWS_DATA, SUBSCRIBE_DATA, FAQ_DATA}; }
The HTMLPortal Class
The HTMLPortal class is used to abstract the HTML creation from the PortalServlet. Creating a class to assist PortalServlet like this will make the logic in PortalServlet easier to follow and maintain.
This class implements the DataMapping interface, which gives it access to the DataMapping constants. There are two StringBuffer objects to hold details of the page, and two String objects to signify the specific page requested by the client and the type of view (normal or print view):
package personalPortal; public class HTMLPortal implements DataMapping { private StringBuffer openPage; private StringBuffer closePage; private String pageRequested; private String pageViewType;
To construct our section of the page (the top heading and the left panel), we need to know two things:
-
the page that has been requested (so we can construct our menus accordingly)
-
the type of view requested (normal or print view)
public HTMLPortal(String pageRequested, String pageViewType) { this.pageRequested = pageRequested; this.pageViewType = pageViewType;
We check the type of page we are outputting, and prepare the opening and closing parts of the page:
if (PORTAL_VIEW_PARAM.equalsIgnoreCase(pageViewType)) { prepareOpenPage(); } else { preparePrintOpenPage(); } prepareClosePage(); }
We have three public methods available to the class user:
-
getOpenPage() - to return the opening HTML
-
getClosePage() - to return the closing HTML
-
getError() - to return a message in HTML
public StringBuffer getOpenPage() { return openPage; } public StringBuffer getClosePage() { return closePage; } public StringBuffer getError(String message) { StringBuffer error = new StringBuffer(); error.append("<h2><font color=\"darkred\">"); error.append(message); error.append("</font></h2>"); return error; }
Our prepareOpenPage() method builds the opening HTML data. We call the prepareMenu() and the preparePrintLink() methods to construct parts of the page:
private void prepareOpenPage() { openPage = new StringBuffer(); openPage.append("<html><head><title>Personal Portal"); openPage.append("</title></head><body>"); openPage.append("<table width=\"100%\"><tr>"); openPage.append("<td colspan=2 align=\"center\" bgcolor=\"#ffff80\">"); openPage.append("<h1>Personal Portal</h1></td></tr><tr>"); openPage.append("<td width=\"20%\" bgcolor=\"#ffffa0\"><br>"); openPage.append("<b>Menu</b><br><br>"); openPage.append(prepareMenu(false)); openPage.append("<br><br><br><br><br><br><br><br><br>"); openPage.append("</ul></td>"); openPage.append("<td width=\"80%\" valign=\"top\"); openPage.append("<bgcolor=\"#ffffe0\">"); openPage.append("<center><i><font size=\"-1\">("); openPage.append(preparePrintLink("Print this Page", pageRequested)); openPage.append(")</font></i></center><br>"); openPage.append(""); openPage.append(""); }
Similar to the previous method, this preparePrintOpenPage() method prepares HTML for the page, but in this case, it is for the print version:
private void preparePrintOpenPage() { openPage = new StringBuffer(); openPage.append("<html><head><title>Personal Portal Print Page"); openPage.append("</title></head><body>"); openPage.append("<table width=\"100%\"><tr>"); openPage.append("<td align=\"center\" bgcolor=\"#ffff80\">"); openPage.append("<h1>Personal Portal</h1></td></tr><tr>"); openPage.append("<td align=\"center\" bgcolor=\"#ffffa0\">"); openPage.append(prepareMenu(true)); openPage.append("</td></tr><tr>"); openPage.append("<td bgcolor=\"#ffffe0\">"); }
Next is a method used to prepare the HTML that closes the page. It adds a copyright notice to the end of the page as well:
private void prepareClosePage() { closePage = new StringBuffer(); closePage.append("</td></tr></table>"); closePage.append("<p align=\"right\">© 2002</body></html> "); }
The prepareMenu() method prepares an HTML menu for either a print view or normal view of the web page:
private StringBuffer prepareMenu(boolean printMenu) { StringBuffer menu = new StringBuffer(); StringBuffer menuBreak = new StringBuffer(); if (printMenu) { menuBreak.append(" "); menu.append("<a href=\"javascript:history.go(-1)\">Back</a>"); } else { menuBreak.append("<br><br>"); }
Here we iterate through the RESOURCE_DATA two-dimensional array, to extract both the page name and the page URI for the links of the menu:
for (int i = 0; i < RESOURCE_DATA.length; i++) { menu.append(menuBreak); if (RESOURCE_DATA[i][NAME].equalsIgnoreCase(pageRequested)) { menu.append(RESOURCE_DATA[i][NAME]); } else { menu.append("<a href=\""); menu.append(prepareUrl(PORTAL_VIEW_PARAM, RESOURCE_DATA[i][NAME])); menu.append("\">"); menu.append(RESOURCE_DATA[i][NAME]); menu.append("</a>"); } } return menu; }
The preparePrintLink() method prepares a link to a page in the print view:
private StringBuffer preparePrintLink(String caption, String url) { StringBuffer link = new StringBuffer(); link.append("<a href=\""); link.append(prepareUrl(PRINT_VIEW_PARAM, url)); link.append("\">"); link.append(caption); link.append("</a>"); return link; }
While building the menu we need to construct the URLs, including the query string, to map to the linked resource. The link must include the request type and the page that was requested. This is the purpose of the prepareUrl() method:
private StringBuffer prepareUrl(String printChoice, String viewChoice) { StringBuffer url = new StringBuffer(); url.append(PORTAL_RESOURCE); url.append("?").append(PORTAL_VIEW_PARAM_NAME); url.append("=").append(printChoice); url.append("&").append(PAGE_REQUESTED_NAME); url.append("=").append(viewChoice); return url; } }
The PortalServlet Class
The PortalServlet is essentially the application manager servlet. All requests come in through this servlet. No HTML is created directly in this class. This servlet uses the HTMLPortal class for HTML generation, and the right panel contents are generated by other resources (HTML or servlet). This servlet implements the DataMapping interface so that it can gain access to the application constants:
package personalPortal; import javax.servlet.*; import javax.servlet.http.*; import java.io.*; import java.util.*; public class PortalServlet extends GenericServlet implements DataMapping { private static int requestCount = 0; private Map resourceMap = null;
The servlet has a static requestCount variable that is incremented on every page access. Normally this data would be stored to a database (or some other permanent storage facility).
In the init() method, we construct an object to map the resource names and locations for use later:
public void init() { resourceMap = new HashMap(); for (int i = 0; i < RESOURCE_DATA.length; i++) { resourceMap.put(RESOURCE_DATA[i][NAME], RESOURCE_DATA[i][RESOURCE]); } }
In the service() method, we process client requests by first determining what the client has requested. If they have passed no parameters with the request we set the default to the news page in normal view:
public void service(ServletRequest request, ServletResponse response) throws ServletException, IOException { requestCount++; ServletContext context = getServletConfig().getServletContext(); String pageViewType = request.getParameter(PORTAL_VIEW_PARAM_NAME); String pageRequested = request.getParameter(PAGE_REQUESTED_NAME); if (pageViewType == null) { pageViewType = PORTAL_VIEW_PARAM; } if (pageRequested == null) { pageRequested = NEWS_NAME; }
Next we create our HTMLPortal object with this data, to build our page. We output the opening part of the page to the client:
HTMLPortal htmlPortal = new HTMLPortal(pageRequested, pageViewType); String requestedResource = (String)resourceMap.get(pageRequested); response.setContentType("text/html"); PrintWriter out = response.getWriter(); out.println(htmlPortal.getOpenPage());
We then retrieve a RequestDispatcher object for the required resource. Assuming that the RequestDispatcher object is valid, we set an attribute on the request (of the count variable) to include this data in the forwarded request, so that another servlet can retrieve this. Calling the dispatcher.include(request, response) method adds the output of that resource (servlet or web page) to that of this servlet:
RequestDispatcher dispatcher = context.getRequestDispatcher(requestedResource); if (dispatcher != null) { request.setAttribute(REQUEST_COUNT, new Integer(requestCount).toString()); dispatcher.include(request, response); } else { out.println(htmlPortal.getError("Request Resource not found")); }
Finally, we add the closing HTML to be sent to the client:
out.println(htmlPortal.getClosePage()); out.close(); } }
At this point, you could to compile and run the example, but you will get a warning in the right panel that the resource was not found. This is because we have not yet created the servlets or HTML resources to include in this panel. We are now going to develop these.
SubscribeServlet Class
Our SubscribeServlet performs two roles. First, it generates a HTML form for the user to fill in if they want to subscribe to the newsletters. Second, it processes the submitted form from the client. In either case, this servlet's content is included in the right panel of the PortalServlet.
So how does the servlet know when the client is making a request for a form, or submitting a form to be processed?
package personalPortal; import javax.servlet.*; import javax.servlet.http.*; import java.io.*; import java.util.*; public class SubscribeServlet extends GenericServlet implements DataMapping { public static final String SUB_FORM = "SubForm"; public static final String EMAIL = "email"; public static final String DAILY = "Daily"; public static final String WEEKLY = "Weekly"; public static final String MONTHLY = "Monthly";
To answer this question, we have to understand that when the servlet is constructing the form, it adds a hidden parameter (SUB_FORM). By checking the request, to see if this exists, it knows whether this is a request for the default form, or to submit the form. The service() method below then delegates the request processing to a specified method depending on the type of request:
public void service(ServletRequest request, ServletResponse response) throws ServletException, IOException { response.setContentType("text/html"); PrintWriter out = response.getWriter(); String subscribeForm = request.getParameter(SUB_FORM); if (subscribeForm != null) { out.println(processSubscription(request)); } else { out.println(printForm()); } }
The processSubscription() method has to extract the specific parameters from the request for processing. In a live application, the application would perform rigorous validation of parameters, according to the business rules for the form, and would then save the submitted data to a database (or some other Enterprise Information System).
In this case we perform a basic check of the e-mail, and if the e-mail passes the test, we return the client a note indicating that their request is being processed. If the e-mail fails the test, they are given a warning page:
private StringBuffer processSubscription(ServletRequest request) { StringBuffer sub = new StringBuffer(); String email = request.getParameter(EMAIL); String daily = request.getParameter(DAILY); String weekly = request.getParameter(WEEKLY); String monthly = request.getParameter(MONTHLY); if (!isEmailOK(email)) { sub.append("<h3>Error Processing Request</h3>"); sub.append("Email entered is invalid. Please go "); sub.append("<a href=\"javascript:history.go(-1)\">Back</a>"); sub.append(" to try again."); } else { sub.append("<h3>Request Processed</h3>"); sub.append("<p>Your request is being processed. "); sub.append("You should receive an e-mail confirmation shortly. "); sub.append("<p>Thank you."); } return sub; }
Our isEmailOK() method performs limited e-mail address validation, checking that it is not null or empty, and has an @ symbol, with a period somewhere afterwards in the string:
private boolean isEmailOK(String emailToValidate) { if (emailToValidate == null || emailToValidate.trim().length() == 0) { return false; } int at = emailToValidate.indexOf("@"); if (at == -1) { return false; } int dot = emailToValidate.indexOf(".", at); if (dot == -1) { return false; } return true; }
Our printForm() method is a long HTML output form. It outputs a form asking for the user's email address, and newsletter selection choices. It also outputs two hidden parameters, the first to identify the page that it will return to (the subscribe page) and the second as an indicator to this servlet that the data is coming from the form, so it should process it, instead of returning it to the client:
private StringBuffer printForm() { StringBuffer form = new StringBuffer(); form.append("<form action=\"").append(PORTAL_RESOURCE); form.append("\" method=\"post\">"); form.append("<input type=\"hidden\" name=\""); form.append(PORTAL_VIEW_PARAM_NAME).append("\" value=\""); form.append(PORTAL_VIEW_PARAM); form.append("\"><input type=\"hidden\" name=\""); form.append(PAGE_REQUESTED_NAME).append("\" value=\""); form.append(SUBSCRIBE_NAME); form.append("\"><input type=\"hidden\" name=\""); form.append(SUB_FORM).append("\" value=\""); form.append(SUB_FORM); form.append("\"><table align=\"center\" width=400>"); form.append("<tr><td colspan=2><h3 align=\"center\">"); form.append("Subscribe to the newsletters</h3></td></tr>"); form.append("<tr><td width=\"50%\">Email Address</td>"); form.append("<td width=\"50%\"><input type=\"text\" name=\""); form.append(EMAIL).append("\">"); form.append("</td></tr><tr><td>Daily Newsletter</td>"); form.append("<td><input type=\"checkbox\" name=\""); form.append(DAILY).append("\"></td></tr>"); form.append("<tr><td>Weekly Newsletter</td>"); form.append("<td><input type=\"checkbox\" name=\""); form.append(WEEKLY).append("\"></td></tr>"); form.append("<tr><td>Monthly Newsletter</td>"); form.append("<td><input type=\"checkbox\" name=\""); form.append(MONTHLY).append("\"></td></tr>"); form.append("<tr><td colspan=2 align=center>"); form.append("<input type=\"submit\" value=\"Submit Form\">"); form.append("<input type=\"reset\" value=\"Clear Form\"></td></tr>"); form.append("</table></form>"); return form; } }
NewsServlet Class
Our last servlet provides the news page for the web application. In a live application, we would like to create this page dynamically, based on the information in a database. We could also personalize the content for the client. However, to keep things simple, in this example we output a basic page. It also demonstrates how to extract the attribute set by the PortalServlet to indicate the number of times that the PortalServlet has been requested:
package personalPortal; import javax.servlet.*; import javax.servlet.http.*; import java.io.*; import java.util.*; public class NewsServlet extends GenericServlet implements DataMapping {
This servlet also implements the DataMapping interface. The service() method retrieves the attribute set by the PortalServlet, prints out the news page, and then prints put the counter information:
public void service(ServletRequest request, ServletResponse response) throws ServletException, IOException { response.setContentType("text/html"); PrintWriter out = response.getWriter(); String count = (String)request.getAttribute(REQUEST_COUNT); out.println(getNewsPage(request)); if (count != null) { out.println(getAccessData(count)); } }
The getNewsPage() method retrieves the news page. We pass the request object as a parameter because we would probably need this if we were to adapt the method so that it personalized the content (we could extract cookie information from the client that may identify them):
private StringBuffer getNewsPage(ServletRequest request) { StringBuffer news = new StringBuffer(); news.append("<h2>The News Room</h2>"); news.append("<p>Congratulations!</p>"); news.append("<p>The news today. . . . . .</p>"); return news; }
Finally we have a getAccessData() method to retrieve the HTML for the counter output:
private StringBuffer getAccessData(String count) { StringBuffer sbCount = new StringBuffer(); sbCount.append("<br><p align=\"right\"><font size=\"-2\""); sbCount.append("color=\"darkred\">This site has been accessed "); sbCount.append(count); sbCount.append(" times.</font></p>"); return sbCount; } }
FAQ HTML Page
When we use the RequestDispatcher to include the content of a resource within a web page, we are not limited to servlet content. We can also include the content of a HTML: page. Here we demonstrate a HTML page that is included in our web application.
This is the FAQ.html file from our application:
<html> <head><title>FAQ</title></head> <body> <h3>FAQ 1: How many newsletters can I receive?</h3> <p>All of them.</p> <h3>FAQ 2: How can I subscribe?</h3> <p>Select the link from the menu and complete the form.</p> <h3>FAQ 3: How can I unsubscribe?</h3> <p>Reply to the e-mail with <code>"unsubscribe"</code> in the subject line.</p> </body> </html>
We could include any HTML files in our web application in a servlet page using the RequestDispatcher class. At this point the web application is complete.
Running the Application
You should use the same directories as in the previous examples in the chapter, except that you should put your Java source code files into the personalPortal package source directory. Place the HTML page in the root of the servletAPI web application directory. When you have compiled the source code and moved the classes into the classes\personalPortal directory, restart Tomcat. You can then access the web application on the following URL:
http://localhost:8080/servletAPI/servlet/personalPortal.PortalServlet
|
| < Free Open Study > |
|
EAN: 2147483647
Pages: 130