Basic Graphics Commands
Overview
Congratulations, you've made it through the first eight chapters, and you're now ready to jump into more advanced topics such as graphics programming. So far, this book has been a primer for computer programming with the BASIC language. My goal up to this point has been to teach you the fundamentals of programming so you'll have a foundation of knowledge and experience to draw upon when writing your first game. There is a lot of prerequisite information required that most established game programmers take for granted, but it can be intimidating to someone who has never written a program before, let alone a game!
I'm going to continue on the path of this primer and gradually take you into deeper and deeper territory with each new chapter. The pace will increase, as will the amount of information on game programming. As you know, everyone learns at a different pace. Some folks learn quickly, while others take a little longer to catch on. That's why the book has kept a leisurely pace up to this point. But this chapter, and in particular the next two chapters, will quicken the pace dramatically. Soon you will have pixels flying across the screen!
This chapter includes an introduction to graphics in general, followed by the specific commands in DarkBASIC for programming your own graphics programs. Not only will you learn the commands to draw objects on the screen, you'll also learn the commands for identifying the model and capabilities of the installed video card and supported video modes. This is important, as you will see, because you can tailor a game to take advantage of the features built into the user's video hardware. I'm sure you will be pleasantly surprised by all the amazing features that are built into DarkBASIC! It absolutely excels at doing graphics.
Graphics in Abundance!
The first step to writing a game on any platform—for example, Windows, Mac, Linux, or Xbox—is to learn the language, which you have now done. On many platforms, the language is called the SDK (Software Development Kit). In the early days of Windows—circa 1992 and Windows 3.0—programmers had to use Microsoft C and the Windows SDK to write programs. This was before the invention of Visual Basic, which made Windows programming easy. In that regard, DarkBASIC has made it even easier. However, DarkBASIC was designed specifically for creating games, as you've already learned.
DarkBASIC is absolutely loaded with graphics commands! If you love graphics, then you've found a great tool for working with them. I'll go over the graphics commands built into DarkBASIC soon. First, I'd like to explore some of the finer features that DarkBASIC provides to enhance the graphics for a game.
Behind the Magic
What behind-the-scenes magic causes graphics to be displayed on a monitor? Every PC has a video card of one type or another that sends output to the monitor. The capabilities of the video card determine how the graphics will look. See Figure 9.1 for a sample illustration.
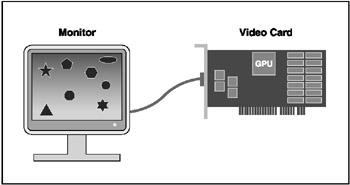
Figure 9.1: Graphics commands are routed to the video card, which prepares and sends the display screen to the monitor.
As a foregone conclusion, the better the video card, the better the graphics will look. The problem is that competition in the video card industry has been absolutely insane in recent years. The two top contenders, Nvidia and ATI, constantly leapfrog each other with each new generation of 3D chip. In general, you will do well to buy a new video card every two years. It doesn't have to be the latest, greatest, top-of-the-line, expensive card. I personally prefer features to raw graphics power. For instance, I usually prefer a video card with video input and output ports for doing video capture and also outputting to a big-screen TV. Some video cards even have a built-in TV tuner, so that you can watch and record programs on your PC or digitize home movies.
Pixels and Resolution
The key to all graphics is the pixel, which is short for picture element. The display screen is made up of many thousands or millions of pixels, especially in the case of extremely high resolutions. For example, a resolution of 16001200, which is usually the upper limit for most monitors, is actually comprised of 1,920,000 pixels. This means that everything on the screen is made up of individual little points of light that are almost too small to see with the unaided eye. Screen resolution is measured by the number of pixels that make up the screen. Take a look at Figure 9.2, which shows a 640480 screen.
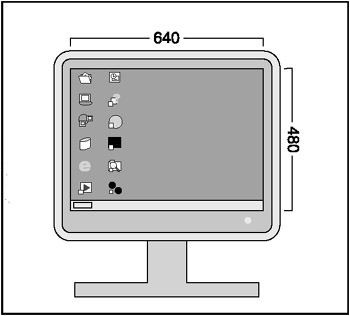
Figure 9.2: The display screen is made up of pixels that define the resolution.
Figure 9.2 shows that there are 640 horizontal pixels (from left to right) and 480 vertical pixels (from top to bottom). To get the total number of pixels for the screen, just multiply the horizontal resolution by the vertical resolution. In the case of a 640480 screen, there are 307,200 pixels, which is very few compared to a 16001200 screen. Even though 16001200 is three times as large as 640480, there are actually more than six times as many pixels at the higher resolution.
Resolutions
Although a low-end video card might run great at 640480, it would choke at 16001200. It takes a lot of processing power to push two million pixels through the monitor cable and out to the screen at 60 frames per second (fps) or more! Just do the math. At 640480 and 307,200 pixels, a game running at 60 fps will need to process 18,432,000 pixels every second! Take it to the high resolution, and it will be a startling revelation. At 16001200 and 1,920,000 pixels, a game running at 60 fps will need to process a whopping 115,200,000 pixels every second. That is a phenomenal number of pixels, to put it mildly. But that's only half the story.
Colors
Each pixel on the screen is capable of displaying any one of a possible 16.7 million colors in 32-bit color mode, or any one of around 64,000 colors in 16-bit color mode. 32-bit images are made up of red, green, blue, and alpha parts, each with eight bits of information. 16-bit images are a little more complicated, with five red, five blue, and either five or six green bits. Figure 9.3 shows how a pixel is physically displayed on a monitor.
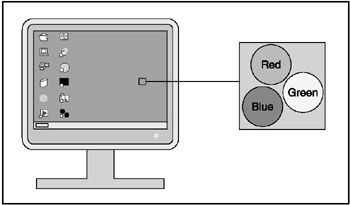
Figure 9.3: The display screen is made up of pixels. Each pixel is made up of red, green, and blue electron streams.
As Figure 9.3 shows, each pixel is actually made up of three electron streams of red, green, and blue. By varying the intensity of an electron stream, the pixel displays a desired color.
Therefore, a 32-bit display actually requires four bytes of memory for every single pixel on the screen (since eight bits equal one byte).
| Note |
In a 32-bit display, there are actually just 24 bits needed for each pixel. The remaining 8 bits make up what is called the alpha byte, which is used for translucent and transparent effects. |
Now you start to see why a powerful graphics accelerator is required to process all the pixels that make up a game screen. Without a graphics processor (such as the Nvidia GeForce4 or the ATI Radeon 8500), the CPU (Central Processing Unit) would have a hard time drawing all those pixels and doing other things in the computer at the same time. Just to give you an idea of the raw pixel fill rate of a modern graphics processor without getting into the subject of polygons and 3D graphics (which make even more demands of the graphics chip), a 16001200 32-bit display needs to move 460,800,000 bytes every second just to fill the screen.
Bits, Bytes, and Polygons?
If you are an avid video game player (like I am), then you are probably familiar with consoles such as the Xbox, PlayStation 2, and GameCube. The video game industry prefers to deal with bits instead of bytes because graphics hardware is fiercely competitive. Console makers will avidly market their machines’ capabilities by the data bus or processors inside, which can be 32-bit, 64-bit, 128-bit, or 256-bit. Keep in mind that 8 bits make up a single byte.
The Nvidia graphics chip inside the Xbox, for example, is capable of pushing a theoretical resolution of 19201440 in 32-bit color. Although I don't know of a high-definition television in the world that will do that kind of ouput, the Xbox is capable of higher resolutions than are available on a standard TV. Now if only the game developers would make use of at least the HDTV capabilities! Of course, video game consoles are now rated by 3D performance instead of the bytes or bits that make up a pixel, as was the case with previous consoles. They are rated in millions of polygons per second. A polygon is a 2D shape that is made up of three or more points, which are referred to as vertices (see Figure 9.4).
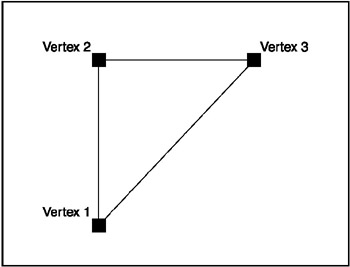
Figure 9.4: Polygons are made up of three or more vertices.
I will hold off on any more details about 3D graphics for now because 3D is a huge subject that I will cover in later chapters. I just want you to understand that 3D graphics are measured differently than the raw pixels involved in drawing 2D graphics.
Double Buffering
New programmers tend to want to jump in and start writing a game using the best skills available. I remember when I started learning to write programs. At the time, I was learning Microsoft BASIC, which was frequently distributed with MS-DOS under the name of GW-BASIC. I remember trying desperately to make a Pac-Man game without any flicker. The problem is that when you learn how to draw things on the screen, they tend to leave a trail behind them as they move (unless you know some more advanced tricks). The solution to that problem is to erase an object on the screen, and then redraw it in a new location. This gets rid of the trails behind the object, which result from the object not being erased before it is moved.
If you've ever written a program in BASIC, then you are likely familiar with screen flicker. It is caused when an image on the screen is erased, moved, and redrawn in a new location—the basis for animation. Unfortunately, I had neither the skill nor the know-how at the time to create a double buffer to reduce flicker.
What Is Double Buffering?
What is a double buffer, you might ask? It is kind of a copy of the display screen in memory. You perform all drawing commands on that memory screen first, and then draw the memory screen to the real screen (see Figure 9.5).
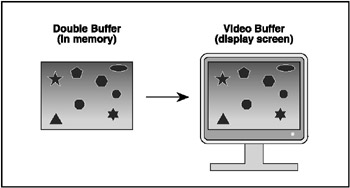
Figure 9.5: A double buffer eliminates flicker and provides smooth, high-speed animation.
A double buffer is a mirror image of the screen, located in high-speed memory. Instead of drawing directly to the screen, graphics commands are pointed to the double buffer. Once all drawing for a frame has been completed, the entire double buffer is quickly drawn to the screen, thus eliminating flicker.
Built-In Double Buffering
Double buffers are somewhat irrelevant because DarkBASIC handles that aspect of programming automatically. Double buffers are so common that it is no wonder the creators of DarkBASIC included that functionality by design. In the past, game programming books have spent dozens of pages on this topic alone, so it's great that DarkBASIC handles this difficult programming problem in the background. In fact, there are ways to control the speed of the double buffer updates using the SYNC command, but that is a topic for the next chapter.
Drawing Commands
DarkBASIC includes all the graphics commands you need to write a game. The best part is that you don't need a special library to use DirectX, which is completely integrated and abstracted inside DarkBASIC. When you write a command such as CIRCLE, DarkBASIC draws a circle on the full-screen DirectX display. You need not know anything about DirectX to make it work, which is something of a key to understanding what makes DarkBASIC tick: It just works.
When you are working with DarkBASIC, there are no header files to include, no library files to link, no DLLs to reference, no run time to install. It just works. Best of all, you do not need an installer because programs that have been compiled with DarkBASIC are standalone executables with no dependencies. Most languages require at least some run-time library or a list of external definitions to use DirectX. Not so with DarkBASIC.
DarkBASIC has numerous vector graphic commands—that is, commands that deal with points and lines—in addition to sprite blitting commands. If you have never heard the terms "sprite" and "blitting" before, don't worry; I'll get into those subjects in the next two chapters.
DirectDraw versus Direct3D
Did you know that DarkBASIC programs use DirectX? That's right—when you write a program with DarkBASIC, you are writing DirectX 7.0 programs without any effort! Possibly the most difficult aspect of DirectX programming is initializing DirectX components, such as DirectDraw. DarkBASIC actually utilizes Direct3D for almost all graphics output. It works this way because DirectX 7.0 separates the 2D and 3D graphics libraries. DirectDraw handles 2D graphics such as bitmaps and sprites, while Direct3D handles 3D graphics such as textures and polygons. These two systems aren't compatible! You can't draw using DirectDraw, for example, and then render a 3D character on the same screen. DirectX 7.0 just doesn't work that way.
Instead, DarkBASIC uses 3D mode for everything—including 2D graphics commands. This might be part of the reason why DarkBASIC is considered a 3D programming language. Although DarkBASIC has many built-in 2D graphics commands, it was clearly designed for rendering 3D graphics. Some 2D commands seem to run slowly; this is another side effect of DarkBASIC's use of Direct3D for all of the graphics commands. This might sound amazing, but DarkBASIC may be able to draw a textured polygon faster than it is able to draw a simple line on the screen!
System and Video Card Commands
Now that you've had an introduction to the graphics commands available in DarkBASIC, I'd like to get into some initialization and management commands that will be useful as you begin to explore the more advanced features of DarkBASIC. There is a sample program at the end of this section called CheckSystem, which runs through these commands and shows you how to use them and their resulting return values.
Graphics Card Commands
The graphics card commands are helpful when you want to know the name of the primary video card or retrieve a list of cards in a multiple-monitor system.
The CURRENT GRAPHICS CARD$() Command
The CURRENT GRAHICS CARD$() command returns a string with the name of the primary video card installed on the system. Unfortunately, this command doesn't return the actual name of the video card, just the name of the driver reported by DirectX.
| Tip |
Important reminder: Commands that return a value must include empty parentheses at the end because that is how DarkBASIC differentiates between regular functions and those which return a value. |
The PERFORM CHECKLIST FOR GRAPHICS CARDS Command
The PERFORM CHECKLIST FOR GRAPHICS CARDS command is possibly the longest command in the entire DarkBASIC language! However, it does perform a useful service by providing a list of video cards that are installed on your PC. This will usually just reference the single video card installed on most systems, but in some cases multiple video cards are used (such as in dual-monitor systems). In such situations, you might want to allow the user to select the correct video card before running the game. Most of the time you will just initialize the primary video card and not bother with multiple displays. There is an option in the DirectX driver options that allows the user to select the default video card, so you can ignore this feature if you want.
The SET GRAPHICS CARD Command
The SET GRAPHICS CARD command is used in conjunction with PERFORM CHECKLIST FOR GRAPHICS CARDS to select a specific video card in a multiple-display system. As I mentioned previously, this is probably not something that you will need to worry about because the end user has the ability to select the primary display by setting a DirectX driver option.
Hardware Acceleration Commands
The commands in this section allow you to check for the presence of a 3D-accelerated graphics card in the system. You can programmatically use acceleration if it's available, or you can cause DarkBASIC to run in software emulation mode, which is often unusable depending on the game.
The EMULATION MODE() Command
The EMULATION MODE() command checks for the availability of 3D hardware acceleration in the primary video card, returning a value of 1 if emulation mode is active (or 0 for hardware acceleration). If your game has a lot of demanding 3D (which will be covered in later chapters), then you might want to make sure acceleration is available. If your game is particularly demanding, you might go so far as to prevent the game from running without acceleration.
The SET EMULATION ON Command
The SET EMULATION ON command causes DarkBASIC to ignore any 3D accelerator and instead run specifically in software emulation mode. As I explained earlier, this mode is not recommended unless the video card does not support 3D, which is highly unlikely in today's computer market.
The SET EMULATION OFF Command
The SET EMULATION OFF command tells DarkBASIC to use 3D hardware acceleration if it's available, thus disabling software emulation mode.
Transform and Lighting Commands
The transform and lighting (T&L) commands are applicable for systems with a late-model video card capable of offloading matrix transformations and hardware lighting from the main processor to the graphics processor. When a video card supports T&L, it frees the main processor from these mathematically demanding computations, particularly when such video cards are optimized for handling T&L. Figure 9.6 shows the relationships between DarkBASIC, DirectX, and the video display driver.
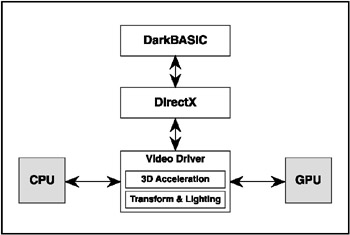
Figure 9.6: The video driver handles advanced features such as T&L and 3D acceleration, providing DirectX programs with a consistent interface regardless of differences among the various video cards.
The TNL AVAILABLE() Command
The TNL AVAILABLE() command returns a 1 if transform and lighting is supported by the primary video card. If your game uses many 3D objects that are visible on the screen at once, or if you use hardware lighting, you might want to check to see whether T&L is available to ensure that a suitable video card is installed before allowing the game to run. This is an extreme case, and it is not likely to be an issue. In general, you will want the user to play the game no matter what the performance will be like. If the user's PC is out of date, then your game might be what convinces him to upgrade to a faster processor or video card.
The ENABLE TNL Command
The ENABLE TNL command tells DarkBASIC to use transform and lighting if the primary video card supports it. T&L is enabled by default when DarkBASIC detects that it is available, so this command is only necessary if you need the ability to toggle T&L while a program is running.
The DISABLE TNL Command
The DISABLE TNL command turns off DarkBASIC's support for transform and lighting. Since T&L is detected automatically and used by DarkBASIC when it is available, you only need this command if you specifically want to disable it.
Memory Commands
This section includes some system commands for retrieving the memory available, including system memory and video memory. These commands are useful if you are allocating a lot of memory and you want to make sure that you don't allocate beyond the memory that is available—meaning, of course, that Windows will use the swap file and virtual memory. The resulting performance hit is akin to killing a game.
The SYSTEM DMEM AVAILABLE() Command
The SYSTEM DMEM AVAILABLE() command returns the amount of free display memory. Generally, this value will return the total amount of installed display memory on the video card when your DarkBASIC program starts running, given that you haven't allocated any textures or 3D objects.
The SYSTEM SMEM AVAILABLE() Command
The SYSTEM SMEM AVAILABLE() command returns the amount of free system memory. This is generally referred to as RAM (Random Access Memory), although this particular command returns just the amount of free memory, not the total installed memory. Therefore, this command might be useful if you are allocating large blocks of memory and you want to make sure that there is enough memory to hold the objects you are trying to allocate.
The SYSTEM TMEM AVAILABLE() Command
The SYSTEM TMEM AVAILABLE() command returns the amount of total system memory that is available to programs. This differs from the SMEM command in that it takes into account the virtual memory in use on the system (in the form of a swap file). This value usually will be very large, depending on the default size of your swap file. For this reason, this command is not very useful in the course of writing a game because you will likely be interested only in the amount of free memory, which the SMEM command provides.
The CheckSystem Program
Okay, how would you like to put all this newfound knowledge to use in a real program? Great, I thought you would! Figure 9.7 shows the CheckSystem program.
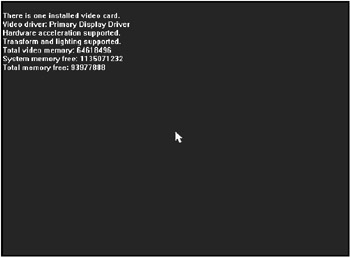
Figure 9.7: The CheckSystem program displays detailed information about the system and the video card.
This program displays the primary video card, the available features, and the amount of free memory in your computer system. Feel free to load the project from the folder for this chapter on the CD-ROM, or type the following lines of code into a new project file using either DarkBASIC or DarkEDIT.
Before you begin, I want to start a new trend. It's time to replace the REM statement with something more convenient. From this chapter forward, I will use the apostrophe instead of the REM statement. The apostrophe character, which is located to the left of the 1 key on most keyboards, is an alternative way to start a comment line in DarkBASIC. Notice how I have used the apostrophe instead of REM in the listing for the CheckSystem program. The comment lines are less imposing, making the source code easier to read.
'---------------------------------
'Beginner's Guide To DarkBASIC Game Programming
'Copyright (C)2002 Jonathan S. Harbour and Joshua R. Smith
'Chapter 9 - CheckSystem Program
'---------------------------------

'Check for installed video cards
PERFORM CHECKLIST FOR GRAPHICS CARDS
VideoCards = CHECKLIST QUANTITY()
IF VideoCards > 1
 PRINT "There are ",VideoCards," installed video cards."
 FOR Index = 1 TO VideoCards
 PRINT " ", Index, " - ", CHECKLIST STRING$(Index)
 NEXT Index
ELSE
 PRINT "There is one installed video card."
ENDIF

'Display current video driver
PRINT "Video driver: ", CURRENT GRAPHICS CARD$()

'Check for hardware acceleration
IF EMULATION MODE() = 1
 PRINT "No hardware acceleration."
ELSE
 PRINT "Hardware acceleration supported."
ENDIF
'Check for transform and lighting
IF TNL AVAILABLE() = 1
 PRINT "Transform and lighting supported."
ELSE
 PRINT "No transform and lighting."
ENDIF

'Display memory available
PRINT "Total video memory: ", SYSTEM DMEM AVAILABLE()
PRINT "System memory free: ", SYSTEM SMEM AVAILABLE()
PRINT "Total memory free: ", SYSTEM TMEM AVAILABLE()

'Wait for user to press a key
WAIT KEY

'Delete checklist array from memory
EMPTY CHECKLIST

'End the program
END
Display Mode Commands
DarkBASIC includes a number of useful utility commands for retrieving a list of display modes supported by your video card. DarkBASIC uses a default resolution of 64048016, but there are many more display modes available, all the way up to the maximum resolution supported by your video card. This section shows you how to retrieve and use the list of display modes.
Reading and Setting the Display Modes
This section includes the commands for reading the list of display modes, as well as setting and checking them.
The PERFORM CHECKLIST FOR DISPLAY MODES Command
PERFORM CHECKLIST FOR DISPLAY MODES is a very long command, but it provides a useful list of the modes supported by your video card, filling in the CHECKLIST STRING$ array with the values returned.
The CHECKLIST QUANTITY() Command
The CHECKLIST QUANTITY() command returns the number of display modes returned by the PERFORM CHECKLIST FOR DISPLAY MODES command. You can use this value to loop through the display modes.
The CHECKLIST STRING$() Command
The CHECKLIST STRING$() command accepts a single parameter—the display mode number—and returns the name of the display mode, such as 102476816 or 1600120016.
The CHECKLIST VALUE A() Command
The CHECKLIST VALUE A() command grabs the first part of the display mode name returned by the CHECKLIST STRING$() command. Since the display mode is returned in the format of 64048016, this command returns the 640 part, which is the horizontal resolution of the display.
The CHECKLIST VALUE B() Command
The CHECKLIST VALUE B() command grabs the second part of the display mode name returned by the CHECKLIST STRING$() command. Since the display mode is returned in the format of 64048016, this command returns the 480 part, which is the vertical resolution of the display.
The CHECKLIST VALUE C() Command
The CHECKLIST VALUE C() command grabs the third part of the display mode name returned by the CHECKLIST STRING$() command. Since the display mode is returned in the format of 64048016, this command returns the 16 part, which is the color depth of the display.
The SET DISPLAY MODE Command
The SET DISPLAY MODE command accepts three parameters to change the display mode—horizontal resolution, vertical resolution, and color depth. For example:
SET DISPLAY MODE 640, 480, 16
Note that DarkBASIC Pro still supports this command, but it is recommended that you set the video mode from the project settings rather than from source code due to the way DarkBASIC Pro compiles the source code and adds bitmaps and other media files to the executable.
The CHECK DISPLAY MODE() Command
The CHECK DISPLAY MODE() command checks the display mode passed as parameter values to see whether it is available on the system. If the display mode is invalid, this command returns a value of 0. For example:
Value = CHECK DISPLAY MODE(640, 480, 16)
Display Mode Properties
This section includes commands that are useful for returning information about the specific video mode currently in use.
The SCREEN TYPE() Command
The SCREEN TYPE() command determines whether 2D hardware acceleration is supported by the video card. A return value of 0 means that hardware acceleration is not available. This command differs from the EMULATION MODE() command in that SCREEN TYPE() reports 2D capabilities and EMULATION MODE() reports 3D capabilities.
The SCREEN WIDTH() Command
The SCREEN WIDTH() command returns the horizontal resolution of the current display mode in pixels. For example, if the display mode is 128096032, the SCREEN WIDTH() command returns a value of 1280.
The SCREEN HEIGHT() Command
The SCREEN HEIGHT() command returns the vertical resolution of the current display mode in pixels. For example, if the display mode is 128096032, the SCREEN HEIGHT() command returns a value of 960.
The SCREEN DEPTH() Command
The SCREEN DEPTH() command returns the color depth of the current display mode in bits per pixel (BPP). For example, if the display mode is 128096032, the SCREEN DEPTH() command returns a value of 32.
The SCREEN FPS() Command
The SCREEN FPS() command is not strictly related to the display mode, but it is a useful command nonetheless. It reports the performance of the graphics system in frames per second. This value will vary widely depending on the video card, but it generally won't go above 100 fps.
The DisplayModes Program
The DisplayModes program will help you learn the various video modes supported by the video card on your PC. This program will also show you how to return the list of supported modes and how to set a particular video mode using the code you have learned so far in this section. The DisplayModes program draws several boxes on the screen to represent each display resolution so you can see how the video modes compare.
Allow me to give you a tour of the program. Figure 9.8 shows the DisplayModes program when it starts. DarkBASIC programs default to the display mode of 64048016 unless you specify otherwise.
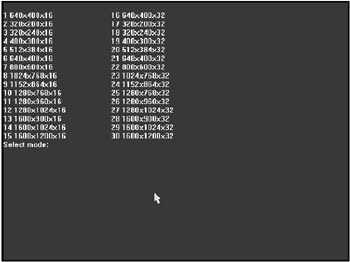
Figure 9.8: The DisplayModes program displays the video modes that are supported on your PC.
| Note |
The list of supported video modes shown in Figure 9.8 might be different than the list of modes available on your PC because it depends on the video card and monitor that you are using. |
Selecting a video mode with the resolution 800600 produces the screen shown in Figure 9.9.
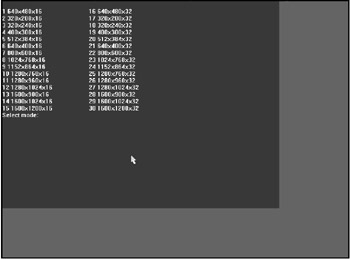
Figure 9.9: The DisplayModes program has been changed to run at 800600.
Changing the mode to 1024768 results in the screen shown in Figure 9.10. Note that the three boxes now displayed on the screen show the three resolutions you have used so far.
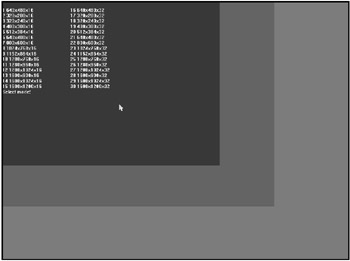
Figure 9.10: The DisplayModes program has been changed to run at 1024768.
1280960 produces the screen shown in Figure 9.11. This resolution is quite high, as you can tell from the small size of the font and mouse cursor.
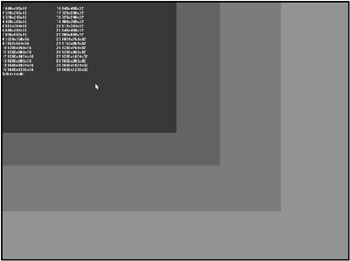
Figure 9.11: The DisplayModes program has been changed to run at 1280960.
The highest resolution that my video card and monitor are capable of displaying is 16001200, which is shown in Figure 9.12.
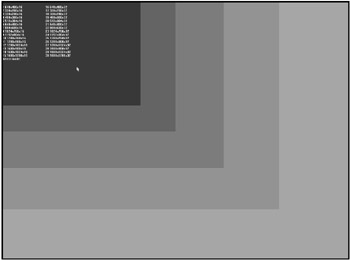
Figure 9.12: The DisplayModes program has been changed to run at 16001200.
The listing for the DisplayModes program follows. Simply create a new file in DarkBASIC (or in DarkEDIT) and type in the source code as shown. There are comments in the code that explain each section of the program, which is only about a page in length.
'-----------------------------
'Beginner's Guide To DarkBASIC Game Programming
'Copyright (C)2002 Jonathan S. Harbour and Joshua R. Smith
'Chapter 9 - DisplayModes Program
'-----------------------------

'Get the list of video modes
PERFORM CHECKLIST FOR DISPLAY MODES
SET DISPLAY MODE 640, 480, 32

DO
 'Draw gray resolution markers
 CLS
 INK RGB(120,120,120),0
 BOX 0,0,1599,1199
 INK RGB(100,100,100),0
 BOX 0,0,1279,959
 INK RGB(80,80,80),0
 BOX 0,0,1023,767
 INK RGB(60,60,60),0
 BOX 0,0,799,599
 INK RGB(30,30,30),0
 BOX 0,0,639,479

 'Display the list of video modes
 INK RGB(255,255,255),0
 modes = CHECKLIST QUANTITY()
 FOR t = 1 TO modes / 2
 'First column of resolutions
 SET CURSOR 0,t * 16
 PRINT t;" ";CHECKLIST STRING$(t);
 'Second column of resolutions
 SET CURSOR 200,t * 16
 index = modes / 2 + t
 PRINT index;" ";CHECKLIST STRING$(index)
 NEXT t

 'Ask user to select a video mode
 INPUT "Select mode: ";position

 'Rip the values out of the modes array
 width=CHECKLIST VALUE A(position)
 height=CHECKLIST VALUE B(position)
 depth=CHECKLIST VALUE C(position)

 'Change the display mode
 SET DISPLAY MODE width, height, depth
LOOP
Taking DarkEDIT for a Spin
I'm going to get off the subject of graphics programming for a moment to bring up DarkEDIT again, because you might want to start using it (especially if you plan to use DarkBASIC Pro, which includes an editor based on DarkEDIT). After you've become proficient with the DarkBASIC code editor, you might get to a point where you'd like more features or you would prefer to just edit your DarkBASIC programs using a program with a standard Windows user interface. I introduced DarkEDIT back in Chapter 1, but I have not discussed it since then.
Running DarkEDIT
I'd like to take the opportunity to go over DarkEDIT in a little more detail now, so you can use it to write the DisplayModes program. Figure 9.13 shows the About DarkEDIT dialog box.
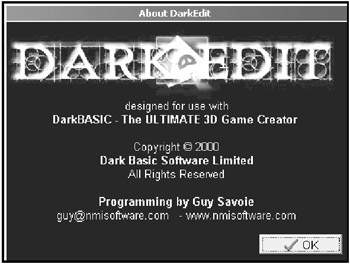
Figure 9.13: DarkEDIT is an alternative source code editor for writing DarkBASIC programs, complete with full support for compiling and running them.
Even if you really like the default DarkBASIC editor (as I do), you should at least try DarkEDIT because it's actually more convenient when you are working with long programs. You can also have many programs loaded at once because DarkEDIT is an MDI (Multiple-Document Interface) application, which allows you to compile or run any one of the programs at any time. In contrast, the built-in DarkBASIC editor supports only two source code files at a time (which, granted, is usually enough).
Creating a Shortcut to DarkEDIT
DarkEDIT is distributed with DarkBASIC, but it isn't included in the Start menu (under Programs, Dark Basic Software) as you might expect. Instead, you must create a shortcut to DarkEDIT from your Windows desktop. To create this shortcut, right-click the desktop and select New, Shortcut. Click the Browse button in the Create Shortcut dialog box and browse to C:Program FilesDark Basic SoftwareDark Basicxdarkedit.exe.
Configuring DarkEDIT
When you get DarkEDIT running, you need to set up the link to it. This involves pointing DarkEDIT to the DB.EXE file so it can compile and run programs (using special DarkBASIC program parameters). To configure DarkEDIT, select Edit Options from the Edit menu, as shown in Figure 9.14.
Figure 9.14: Configuring DarkEDIT so it can link directly to DarkBASIC
The DarkEDIT Options dialog box will appear (see Figure 9.15).
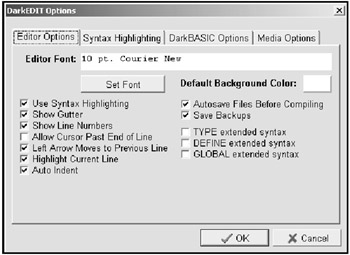
Figure 9.15: The DarkEDIT Options dialog box allows you to customize DarkEDIT to suit your preferences.
Now click the DarkBASIC Options tab to set up the link to DarkBASIC, as shown in Figure 9.16.
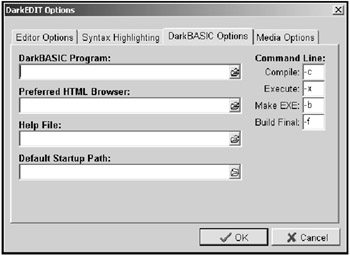
Figure 9.16: The DarkBASIC Options tab on the DarkEDIT Options dialog box is where you link DarkEDIT to DarkBASIC for seamless program compiling.
Click the small folder button at the right of the DarkBASIC Program field to open a file selection dialog box. Browse to C:Program FilesDark Basic SoftwareDark Basic to locate the DB.exe file, as shown in Figure 9.17.

Figure 9.17: Browsing for the DarkBASIC program file
After you have located the DB.exe file, click the Open button to paste the path into the DarkEDIT Options dialog box, as shown in Figure 9.18.

Figure 9.18: DarkEDIT has now been linked to DarkBASIC, allowing you to compile source code files directly in DarkEDIT.
| Note |
DarkBASIC Pro has a completely integrated windowed editor that does not need to be configured in any way because the DarkBASIC Pro IDE (Integrated Development Environment) has the DarkBASIC compiler built in. |
Testing the Link to DarkBASIC
Now let's make sure the link to DarkBASIC is working so you can use DarkEDIT to compile and run programs. Load one of the sample programs from this chapter or any previous chapter by clicking the Open a File icon on the toolbar or by selecting File, Open. Press F4 to compile the program.
You will see DarkEDIT minimize for a moment, and then it will return. If there are any errors in the program code, the error message will be displayed in the status bar (see Figure 9.19). DarkEDIT also highlights the line that contains the error.
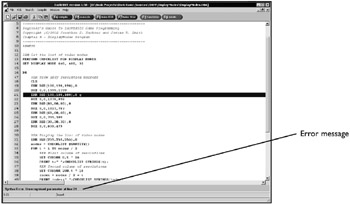
Figure 9.19: DarkEDIT displays any compilation error messages in the status bar at the bottom of the screen.
When the program compiles with no errors, the Compilation Successful message appears at the bottom of the screen (see Figure 9.20). This is a good way to see quickly whether there are any errors in your program without actually trying to run it.
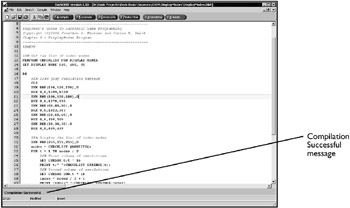
Figure 9.20: DarkEDIT displays the Compilation Successful message in the status bar.
Running Programs from DarkEDIT
When you have a program loaded and compiled, you can either compile the source code to a standalone executable file or just run the program inside DarkBASIC. To run the program, press F5 or click the Execute button on the toolbar. Any time you want to end a program and return to DarkEDIT, just press F12, which is the default exit button for all DarkBASIC programs (often along with the Esc key). When the program ends, focus returns to DarkEDIT.
Basic Graphics Programming
This section involves some actual commands for drawing objects on the screen, unlike the previous sections, which dealt only with initializing and reading information about the video card.
Changing the Drawing Color
By default, DarkBASIC uses white for graphics and text output. If you want to change the color, you can use the INK command in conjunction with RGB, as explained in the following section.
The INK Command
The INK command changes the foreground and background colors used for graphics and text drawing commands. INK accepts two parameters—foreground color and background color—which must be integer values. Normally, you will use the RGB command to generate them. For example:
Forecolor = RGB(120, 120, 120)
Backcolor = RGB(255, 0, 0)
INK Forecolor, Backcolor
The RGB Command
The RGB command, as you have already seen, uses the parameters that you pass to the command and returns an integer containing the red, green, and blue parts that make up a color.
Clearing the Screen
One of the most overlooked commands for keeping the display clean and attractive involves a simple screen clear.
The CLS Command
The CLS command clears the display screen using the current background color that was set using the INK command, as shown in the following code.
REM Set the background color to green
INK 0, RGB(0, 255, 0)
CLS
Note that you can simply pass an integer to the INK command, which is useful when you want to set a color to black, which is the value 0. The CLS command uses the background color previously set with INK.
Clearing the Screen with Random Colors
To show how the INK and CLS commands work together, I've written a short program called ClearScreen, which is shown in Figure 9.21. The figure just shows a solid color, which is what was intended, but what it doesn't show is how the program is clearing the screen quickly using random colors for an interesting effect.

Figure 9.21: The ClearScreen program uses the CLS command to clear the screen with random background colors.
Here is the source code for the ClearScreen program. Feel free to experiment by changing the display mode to some other resolutions to see the result.
'---------------------------------
'Beginner/s Guide To DarkBASIC Game Programming
'Copyright (C)2002 Jonathan S. Harbour and Joshua R. Smith
'Chapter 9 - ClearScreen Program
'---------------------------------
'Initialize the program
SET DISPLAY MODE 640, 480, 16
'Start the main loop
DO
 'Set a random color
 bcolor = RGB(RND(255),RND(255),RND(255))
 INK 0,bcolor

 'Clear the screen
 CLS
LOOP
Reading and Setting Pixels
You can read the basic picture elements (pixels) that make up the screen individually by using the DOT and POINT commands.
The DOT Command
The DOT command does just what it sounds like—it draws a dot on the screen in the form of a single pixel. Before calling the DOT command, you must set the color of the pixel using the INK command. DOT accepts two parameters—the horizontal and vertical positions of the pixel, usually referenced as X and Y coordinates.
Drawing Random Pixels
To help demonstrate drawing pixels, I've written a short program called RandomPixels that quickly draws pixels in random locations on the screen. See Figure 9.22 for a sample of the output produced by this program.
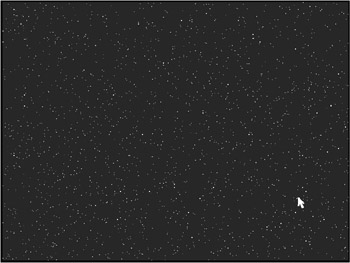
Figure 9.22: The RandomPixels program uses the DOT command to draw pixels at random locations.
Here is the source code for the RandomPixels program. This program in particular is fun to experiment with, so feel free to change the resolution and the color settings to see what happens.
'---------------------------------
'Beginner's Guide To DarkBASIC Game Programming
'Copyright (C)2002 Jonathan S. Harbour and Joshua R. Smith
'Chapter 9 - RandomPixels Program
'---------------------------------

'Initialize the program
SET DISPLAY MODE 640, 480, 16
CLS

'Start the main loop
DO
 'Pick a random color
 fcolor = RGB(RND(255),RND(255),RND(255))
 INK fcolor, RGB(0,0,255)

 'Draw the pixel
 DOT RND(640),RND(480)
LOOP
The POINT Command
The POINT command simply reads the color value of the pixel referenced by the two parameters that are passed (X and Y ). The returned value is an integer like the one returned by RGB. This command is somewhat slow, so you wouldn't want to use it to scan the entire screen (for whatever reason) because it would slow down the program.
Drawing Lines
Pixels are interesting, but the action really begins when you learn to draw lines in DarkBASIC. As you might already know, 3D graphics utilize lines more than pixels because polygons are made up of lines (although lines are comprised of pixels … but you get the idea).
The LINE Command
The LINE command draws a line on the screen using the current color set with the INK command. There are four parameters passed to the LINE command, representing the left, top, right, and bottom points of the line.
Drawing Random Lines
To demonstrate how the LINE command works, I've written a program called RandomLines that quickly draws random lines on the screen, as shown in Figure 9.23. The source code for the RandomLines program follows.
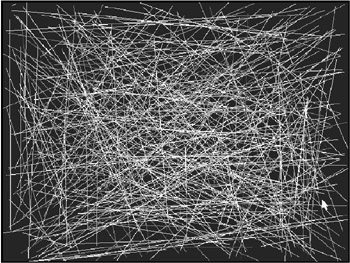
Figure 9.23: The RandomLines program uses the LINE command to draw lines at random locations.
'----------------------------------
'Beginner's Guide To Game Programming With DarkBASIC
'Copyright (C)2002 Jonathan S. Harbour and Joshua R. Smith
'Chapter 9 - RandomLines Program
'----------------------------------

'Initialize the program
SET DISPLAY MODE 640, 480, 16
CLS

'Start the main loop
DO
 'Pick a random color
 fcolor = RGB(RND(255),RND(255),RND(255))
 INK fcolor, RGB(0,0,0)

 'Draw the line
 LINE RND(640), RND(480), RND(640), RND(480)
LOOP
Drawing Rectangles
A rectangle is comprised of four lines that make up the edges. However, rectangles are treated just like lines as far as the parameters for drawing are concerned.
The BOX Command
The BOX command is used to draw rectangles. Like the other graphics drawing commands, BOX depends on the color set previously with the INK command. There are four parameters for the BOX command, just like for the LINE command—left, top, right, and bottom.
Drawing Random Rectangles
To demonstrate the BOX command, I've written a program called RandomBoxes that draws random rectangles on the screen using random colors (see Figure 9.24). The source code follows.

Figure 9.24: The RandomBoxes program uses the BOX command to draw filled rectangles at random locations.
'---------------------------------
'Beginner's Guide To DarkBASIC Game Programming
'Copyright (C)2002 Jonathan S. Harbour and Joshua R. Smith
'Chapter 9 - RandomBoxes Program
'---------------------------------

'Initialize the program
SET DISPLAY MODE 640, 480, 32
CLS

'Start the main loop
DO
 'Set a random color
 fcolor = RGB(RND(255),RND(255),RND(255))
 INK fcolor,0

 'Draw the rectangle
 BOX RND(640), RND(480), RND(640), RND(480)
LOOP
Drawing Circles
Circles are quite a bit different from pixels, lines, and rectangles, which sort of build upon each other. Circles must be drawn using a special algorithm that draws pixels using the mathematical sine and cosine functions. Suffice it to say, it's not as fast or easy to draw a circle as it is to draw a line. Fortunately, DarkBASIC handles the difficulty of drawing circles for you.
The CIRCLE Command
The CIRCLE command draws circles in DarkBASIC. There are three parameters for this command—X, Y, and the radius. The radius determines the size of the circle. Just remember that the radius only represents half the width of the circle. The diameter of a circle is made up of two radii.
Drawing Random Circles
The RandomCircles program demonstrates how to use the CIRCLE command to draw random circles on the screen, as shown in Figure 9.25. The source code follows.
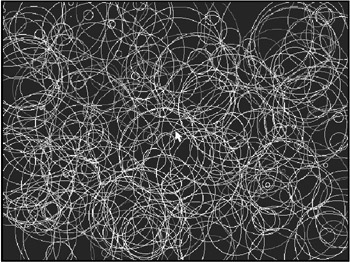
Figure 9.25: The RandomCircles program uses the CIRCLE command to draw circles at random locations.
'---------------------------------
'Beginner's Guide To DarkBASIC Game Programming
'Copyright (C)2002 Jonathan S. Harbour and Joshua R. Smith
'Chapter 9 - RandomCircles Program
'---------------------------------

'Initialize the program
SET DISPLAY MODE 640, 480, 16
CLS

'Start the main loop
DO
 'Set a random color
 fcolor = RGB(RND(255),RND(255),RND(255))
 INK fcolor,0

 'Draw the circle
 CIRCLE RND(640), RND(480), RND(100)
LOOP
Drawing a Circle with Pixels
Do circles intrigue you at all after seeing the RandomCircles program run? I remember the first time I drew a circle using BASIC—I was fascinated by it! Let me show you an interesting little variant of the RandomCircles program. This new program, called DrawCircle, actually plots each of the pixels that make up a circle so you can see how circles are created. Take a look at Figure 9.26 to see the program running.

Figure 9.26: The DrawCircle program uses the DOT command to draw each pixel that makes up a circle.
Following is the source code for the DrawCircle program. The core of this program is the two lines that call the COS() and SIN() functions to position the current pointer around the circumference of the circle (which has a random size). You can use this circle-drawing code for all kinds of cool things! In later chapters, I'll show you how to load bitmaps and sprites and animate them on the screen. One of the most impressive features of animation is the ability to move a sprite around a curve. The code for drawing a circle really helps in that department, as I'll show you in upcoming chapters.
'---------------------------------
'Beginner's Guide To DarkBASIC Game Programming
'Copyright (C)2002 Jonathan S. Harbour and Joshua R. Smith
'Chapter 9 - DrawCircle Program
'---------------------------------

'Initialize the program
SET DISPLAY MODE 640, 480, 16
CLS
v = 0
size = RND(100) + 100

'Start the main loop
DO
 'Set a random color
 fcolor = RGB(RND(255),RND(255),RND(255))
 INK fcolor,0

 'Move the point around the circle
 ox = COS(v) * size
 oy = SIN(v) * size
 v = v + 1

 'Draw the point
 DOT 320 + ox, 240 + oy
LOOP
Drawing Ellipses
Ellipses are related to circles but are not equidistant in radius, meaning that the distance from the center of an ellipse to the edge is not always the same around its circumference.
The ELLIPSE Command
The ELLIPSE command draws ellipses. It takes four parameters—X, Y, X-radius, and Y-radius. The first two parameters are obvious, but what about the last two? X-radius determines the radius from left to right, and Y-radius determines the radius from top to bottom.
Drawing Random Ellipses
The RandomEllipses program demonstrates how to use the ELLIPSE command (see Figure 9.27). This program is similar to the RandomCircles program, so you can adapt that program rather than rewrite it, if you like.
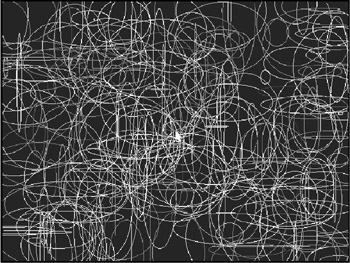
Figure 9.27: The RandomEllipses program uses the ELLIPSE command to draw ellipses at random locations.
'---------------------------------
'Beginner's Guide To DarkBASIC Game Programming
'Copyright (C)2002 Jonathan S. Harbour and Joshua R. Smith
'Chapter 9 - RandomEllipses Program
'---------------------------------

'Initialize the program
SET DISPLAY MODE 640, 480, 16
CLS

'Start the main loop
DO

 'Pick a random color
 fcolor = RGB(RND(255),RND(255),RND(255))
 INK fcolor,0

 'Draw the ellipse
 ELLIPSE RND(640), RND(480), RND(100), RND(100)
LOOP
Drawing an Ellipse with Pixels
To further enhance your understanding of circles and ellipses, I have adapted the DrawCircle program to use ellipses. In this program, instead of using just a single size variable for the radius of the circle to be drawn, there are hsize and vsize variables to represent the X and Y radii of the ellipse (see Figure 9.28).
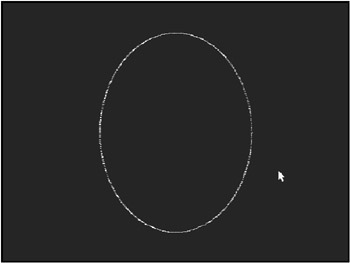
Figure 9.28: The DrawEllipse program uses the DOT command to draw each pixel that makes up an ellipse.
'---------------------------------
'Beginner's Guide To DarkBASIC Game Programming
'Copyright (C)2002 Jonathan S. Harbour and Joshua R. Smith
'Chapter 9 - DrawEllipse Program
'---------------------------------

'Initialize the program
SET DISPLAY MODE 640, 480, 16
CLS
v = 0
hsize = RND(100) + 100
vsize = RND(100) + 100

'Start the main loop
DO
 'Pick a random color
 fcolor = RGB(RND(255),RND(255),RND(255))
 INK fcolor,0

 'Move the point around the circle
 ox = COS(v) * hsize
 oy = SIN(v) * vsize
 v = v + 1

 'Draw the point
 DOT 320 + ox, 240 + oy
LOOP
Summary
This chapter introduced graphics programming in DarkBASIC. The language provides many useful commands for drawing points, lines, circles, and other shapes. There are also commands for setting the foreground and background colors and for clearing the screen. In this chapter you learned to identify the video card, the 2D and 3D graphics capabilities available, and the display modes provided by the video card, as well as how to change the screen resolution.
Quiz
The chapter quiz will help you retain the information that was covered in this chapter, as well as give you an idea about how well you're doing at understanding the subjects. You will find the answers for this quiz in Appendix A, "Answers to the Chapter Quizzes."
|
1. |
Which command retrieves the list of installed video cards (if there's more than one)?
|
|
|
2. |
Which command detects whether a 3D graphics accelerator is present in the system?
|
|
|
3. |
Which command checks for support of transform and lighting (T&L)?
|
|
|
4. |
Which command reports the amount of free video memory available?
|
|
|
5. |
Which command retrieves the list of display modes supported by the video card?
|
|
|
6. |
DarkBASIC supports both 2D and 3D hardware graphics acceleration.
|
|
|
7. |
Which command will draw a single pixel on the screen?
|
|
|
8. |
Which command will draw a circle on the screen?
|
|
|
9. |
Which command will draw a filled rectangle on the screen?
|
|
|
10. |
Which command changes the foreground and background colors?
|
|

Answers
|
1. |
B |
|
2. |
A |
|
3. |
B |
|
4. |
A |
|
5. |
B |
|
6. |
A |
|
7. |
C |
|
8. |
D |
|
9. |
C |
|
10. |
B |
Part I - The Basics of Computer Programming
- Welcome to DarkBASIC
- Introduction to Computer Programming
- Basic Commands, Variables, and Data Types
- Characters, Strings, and Text Output
- Looping Commands
- Making Programs Think Branching Statements and Subroutines
- More Power to the Numbers Data Sequences and Arrays
- Number Crunching Mathematical and Relational Operators and Commands
Part II - Game Fundamentals Graphics, Sound, Input Devices, and File Access
- Basic Graphics Commands
- Game Graphics Learning to Use Bitmaps
- The Art of Using Animated Sprites for 2D Games
- Programming the Keyboard, Mouse, and Joystick
- Adding Sound Effects to Your Game
- Playing Some Tunes CD Audio, MIDI and MP3 Music
- Loading and Saving Information Using Files
- Playing Intro Movies and Cut-Scenes
Part III - Advanced Topics 3D Graphics and Multiplayer Programming
Epilogue
Part IV - Appendixes
EAN: 2147483647
Pages: 203
