Using Text Boxes to Position Text on the Page
The text in the body of a document is contained in a stream of characters that flows from line to line and from page to page. Generally, you neither know nor care where a particular block of text will fall on a page. In this section, however, you'll learn how to place material at a specific position on the page, outside the normal stream of characters. You can use these techniques to position margin notes, figures, tables, sidebars, and other elements that you want to set apart from the body text.
To place a block of text at a specific position on the page, you insert it into a Word element known as a text box, which you can then move to the position you want. Figure 11-14 shows a margin note that was created by placing a text box in the left margin on a page and typing the text for the note into the text box.
To place a text box around existing text in your document, do the following:
- Select the text you want to include in the text box. You can include one or more characters or paragraphs, or a Word table.
- Choose Text Box from the Insert menu.
Figure 11-14. A margin note created by inserting text into a text box.
ON THE WEB
The Ch11Demo.doc Word document, used in the examples in Figures 11-14 and 11-18, is on the Running Office 2000 Reader's Corner page.
Word will then create a new text box, and it will move the selected text into the text box. You'll now probably need to adjust the size, position, and format of the text box, as will be described later.
NOTE
You must be in Print Layout or Web Layout view or in Print Preview to be able to see and work with a text box. If you're not in one of these views when you insert a text box, Word will automatically switch you to Print Layout view.
You can also create an empty text box and then insert text into it, as follows:
- Without selecting text, choose Text Box from the Insert menu. The insertion point can be anywhere within the document.
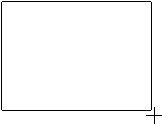
- Drag the mouse pointer to indicate the size and position you want for the text box:
- You can now insert text into the text box. If the insertion point isn't already in the text box, click within the box (not on one of its borders). You can then enter, edit, and format text just as you would for a normal paragraph. A text box can contain one or more paragraphs.
Or, simply click in the document to insert a default-sized text box.
TIP
If you're creating a Web-page document, don't place a text box in a margin area, because it will probably be partially or completely cut off when the page is viewed in a browser. Recall that neither Web browsers nor Word's Web Layout view display the full document margins.
As you type text in a text box, Word will wrap the text when you reach the right text box edge. Word won't, however, automatically increase the height of the box when you reach the bottom; you'll have to manually increase the height of the box to make the text at the bottom visible. (Or, as you'll see later, you can link the text box to another text box so that excess text automatically flows into the second text box.)
To change the height or width of a text box, do the following:
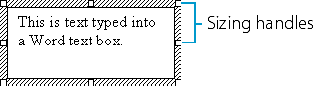
- Click anywhere on the text box to select it. When a text box is selected, Word displays a thick band around it, which contains eight sizing handles:
- Drag any of the sizing handles to resize the text box as you like. To maintain the original proportions of the text box as you change its size, press Shift while dragging one of the corner sizing handles. To resize the text box symmetrically about its center, hold down the Ctrl key while dragging any sizing handle.
You can move a text box as follows:
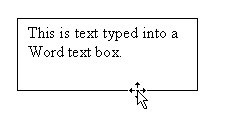
- Place the pointer over one of the edges of the text box (but not over a sizing handle if the text box is selected). Cross-arrows will be displayed at the top of the mouse pointer:
- Drag the text box to the position you want on the page. If you want to copy the text box rather than move it, hold down Ctrl while you drag.
If you move a text box onto an area of the page occupied by text, you'll notice one of the following two types of behavior:
- If you selected existing text in the document before inserting the text box (that is, if you used the first method that was given for creating a text box), the document text will move away from the text box; in other words, the document text will wrap around the text box.
- If you didn't select text before inserting the text box (that is, if you used the second method for creating a text box), the text box will overlap the document text; in other words, the document text won't wrap around the text box.
The way the text box is positioned with respect to adjoining text in the main part of the document is known as its wrapping style. If your text box doesn't currently have the wrapping style you want, don't worry. Later in the chapter (in "Formatting Text Boxes, Pictures and Drawing Objects"), you'll learn how to modify the wrapping style of a text box, as well as many of its other aspects, using the Format Text Box dialog box or the Picture toolbar.
When a text box is selected, Word will usually display the Text Box toolbar automatically. (If it isn't displayed when a text box is selected, point to Toolbars on the View menu, and choose Text Box from the submenu.)
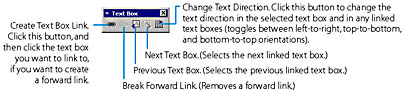
You can use the Text Box toolbar to create a series of two or more linked text boxes. Text will flow from one text box to the next one in the linked series. That is, any text that doesn't fit in a text box will be moved to the next one, in the same way that document text flows from one page to the next.
To remove a text box, plus the text it contains, select it by clicking one of its edges, and then press the Delete key. (If you select the text box by clicking inside an edge, Word will place the insertion point within the text, and pressing Delete will delete only a single character.) If you want to move text from a text box into the main part of the document, be sure to copy the text from the text box and paste it into the document before you delete the box. Note, however, that if a text box is linked to one or more others, deleting the text box won't erase the text, but will merely shift it to the remaining linked text boxes.