Marking the Language
If your document contains text in a foreign language, or text that you want to exclude from proofing, you should perform the steps discussed in this section and in "Using Automatic Language Detection" before using the proofing tools; otherwise, you can safely skip these sections.
In the version of Word sold in the United States, all text is initially marked as English (U.S.), meaning English as written in the United States. If all or some of the text in your document is written in a different language or in non-U.S. English and you want to be able to proof this text, you should mark each block of such text. To do this, select the non-U.S. English text, point to Language on the Tools menu, and then choose Set Language from the submenu to open the Language dialog box. (See Figure 10-1.)
Marking text with a particular language causes the Word proofing tools to search for the appropriate dictionary when you apply those tools to that text. The standard dictionary supplied with the version of Word sold in the United States can be used to proof text marked as any form of English (United States, British, Australian, and so on). (The term dictionary here refers to the set of data files used by the proofing tools.)
If you choose a language other than English, you must install the appropriate foreign language dictionary before you can proof that text. For information on obtaining foreign dictionaries, look up the topic "dictionary" in the Word online Help or go to http://www.alki.com/win/office97/.
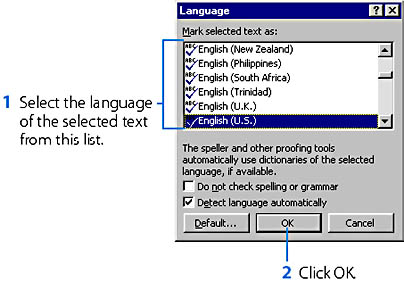
Figure 10-1. The Language dialog box.
Your document might also contain blocks of text that you want to exclude from proofing. For example, if you're writing a paper on Beowulf, you might want to exclude direct quotations that come from the poem so that the spelling checker won't flag all the archaic words and the grammar checker won't try to "improve" the writing style. To do this,
- Select the text you want to exclude from proofing.
- Point to Language on the Tools menu and choose Set Language from the submenu.
- In the Language dialog box, select the Do Not Check Spelling Or Grammar option. (See Figure 10-1.)
TIP
Use Styles to Assign Language to TextIf you frequently mark blocks of text with a particular language or to exclude proofing, you can save time by assigning the language to a style that you can apply to all blocks of text written in that language.
Language is a type of character formatting. If you click the Default button in the Language dialog box, Word will add the selected language format to the Normal style of the document and to the document's template. As a result, the language (or the Do Not Check Spelling Or Grammar option) will be assigned to all text based on the Normal style in the current document as well as in all new documents you subsequently create using the same template.
SEE ALSO
For information on character formatting, see "Applying Character Formatting Directly." For information on assigning character formatting to a style, see "Modifying Styles."
![]()
Using Automatic Language Detection
Rather than marking each block of foreign language text individually, you can have Word automatically detect the language of text in your document and use the appropriate dictionary (if available) for proofing that text. Word will detect only those languages that you explicitly enable for Office applications. Here are the steps:
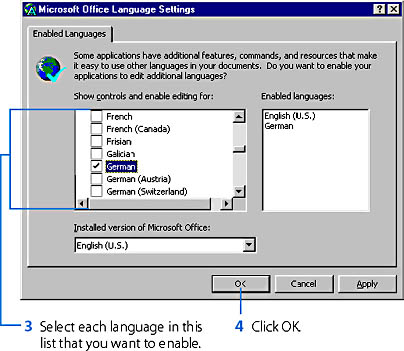
- Point to Programs on the Windows Start menu, point to Office Tools on the Programs submenu, and then choose Microsoft Office Language Settings from the Office Tools submenu. This will open the Microsoft Office Language Settings dialog box.
- In the Microsoft Office Language Settings dialog box, click the Enabled Languages tab (if it isn't opened), and enable the specific language or languages you want Word to be able to detect in your documents, as follows:
- If Word is currently running, you'll have to stop it and then restart it for the changes you made in the Microsoft Office Language Settings dialog box to take effect.
- In Word, point to Language on the Tools menu, and choose Set Language from the submenu.
- In the Language dialog box, select Detect Language Automatically. (See Figure 10-1.) Word will then begin detecting the language in all open documents and in all documents you subsequently open.
Note that in the version of Word sold in the United States, English (U.S.) is the language that's enabled by default.
This procedure will cause Word to detect each enabled language and to look for the appropriate proofing dictionary. You still need to install a dictionary for each non-English language, as discussed in the previous section. (If Word doesn't find the dictionary for a detected language, it will omit proofing that text.)
EAN: 2147483647
Pages: 228