Each time you open a new document, it obtains a copy of the styles that are stored in the template used by Word to create the document. The particular styles that are provided, as well as the formatting stored in each of these styles, vary according to the template you select. All templates have a basic set of general-purpose styles known as built-in styles—for example, Normal, Body Text, and Heading 1 through Heading 9. Some templates provide additional predefined styles for special purposes. For instance, the Professional Report template provides the Company Name, Title Cover, and Subtitle Cover styles for formatting elements on the report's title page. Also, a template or document can contain styles that you define yourself, using the techniques that will be given later in the chapter.
You can modify any of the styles in your document. When you modify a style, all text in your document that is assigned the style acquires the style's new format. This is an important advantage of using styles rather than directly formatting text. Because each document has its own private set of styles, modifying a style affects only the document itself; it does not affect the template or other documents based on the template. (As you'll see later, however, you can easily copy styles between documents and templates.)
NOTE Applying a theme to a document, as described in "Applying a Theme" modifies the document's Normal style and heading styles (Heading 1 through Heading 9). These styles are given a look that's consistent with the theme.
When you modify or create a paragraph or character style, keep in mind that one style can be based on another style. In the Normal template supplied with Word, the Normal paragraph style is the base style for most other paragraph styles. For example, Body Text is defined as "Normal plus 6 points of space following the paragraph." This definition means that Body Text has all the formatting stored in Normal except the amount of space after the paragraph—Normal has 0 points of space after the paragraph, while Body Text has 6 points of space. (Normal itself isn't based on any other style.) Any formatting specifically assigned to a style supersedesthe formatting of the base style.
If you change a style such as Normal, all styles based on it instantly change. For example, if you assigned the Courier New font and "10 points of space following the paragraph" to the Normal style, Body Text would acquire the Courier New font. Body Text would not, however, acquire "10 points of space following the paragraph" because it contains an explicit "space following" value (that is, it does not derive this formatting from Normal).
TIPUse Built-In Styles to Change the Appearance of Standard Document Elements
As mentioned in Chapter 7, Word assigns certain built-in styles to standard elements of your document. For example, it assigns the Comment Text style tocomment text, the Footer style to page footers, and the Page Number style to page numbers. You can therefore change the appearance of one of these standard elements by changing the corresponding style. For example, if you change the Header style, you'll modify the appearance of the headers on all pages of your document. (Assigning headers, footers, and page numbers is discussed in Chapter 11, "Designing Pages" Comments are discussed in Chapter 12, "Working with Word in Workgroups")
Basing one style on another promotes formatting consistency. For example, if you assign a new font to the Normal style, all derived styles automatically acquire the new font, and you avoid having dissimilar fonts throughout your document.
In Chapter 7, "Formatting a Word Document" you learned one way to modify the Normal style: When you click the Default button in the Font dialog box, you change the character formatting stored in Normal to the attributes selected in the dialog box. The Normal style is also modified when you click the Default button in the Language dialog box, which is discussed in "Marking the Language". In the next two sections, you'll learn the two basic ways to modify any property of any style: by using example text and by using the Style dialog box.
TIPView Style Names in the Left Margin
You might find it handy to have Word display the name of each paragraph's style as you're working with your document. Word displays the style name in the left margin of Normal view after you choose Options from the Tools menu, click the View tab, and enter a nonzero measurement in the Style Area Width box. The measurement you enter specifies the width of the area in which Word displays the style name; if the value is 0, Word does not display style names.
Also, you can print a description of the document styles by choosing Print from the File menu and selecting Styles in the Print What list box.
Modifying Styles by Example
The easiest way to modify a style is to use example text. You can use this method to modify any style except Normal. The Formatting toolbar must be displayed for you to modify styles by example. The steps are as follows:
Select text in your document that is assigned the paragraph or character style you want to modify. (If necessary, apply the style to text somewhere in your document.) The style name will appear in the Style list box on the Formatting toolbar. (If you select text that has been assigned a character style, the name of the character style rather than the name of the paragraph style will appear in the Style list box, and you'll be able to use this method to modify only the character style.)
Apply the new formatting directly to the text. You can use any of the methods for directly formatting text that were described in Chapter 7. The best way to modify a character formatting attribute of a paragraph style is to directly apply the attribute to all text in the paragraph.
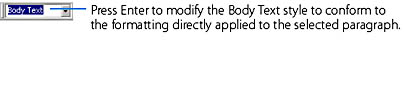
Click in the Style list box on the Formatting toolbar to highlight the style name, and then press Enter:
Word will display the Modify Style dialog box, which is shown in Figure 8-1.
Figure 8-1.The Modify Style dialog box.
NOTE For a paragraph style, if you select the Automatically Update The Style From Now On option in the Modify Style dialog box, or if you have selected the Automatically Update option when modifying the style using the Style dialog box (as described in the next section), Word will automatically modify the style whenever you directly apply formatting to a paragraph that has been assigned the style. (Word will also instantly apply the new formatting to all other paragraphs in the document that have this style).
In other words, you'll be able to modify a style by performing only steps 1 and 2 in the above procedure. The Automatically Update feature thus ensures that all text throughout the document that has a particular style will have a consistent format. You'll need to use the Modify Style dialog box (the one shown in Figure 8-3) to deselect this option.
SEE ALSO For Information on directly formatting text, see "Applying Character Formatting Directly", and "Applying Paragraph Formatting Directly"
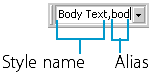
You can also use the Style list box on the Formatting toolbar to define one or more aliases for a style. A style alias is an alternative name for the style. For example, you might want an alias that has a shorter name for a standard style, such as "bod" for "Body Text." To define one or more aliases, type them after the style name in the Style list box, separating each name with a comma, and then press Enter:
To apply a style, you can type either its name or any of its aliases into the Style list box, and press Enter. You can also apply the style by clicking the down arrow next to the Style list box and selecting the style name from the drop-down list. Any aliases will be included after the style name separated by commas. You won't see separate list items for each alias.
Modifying Styles Using the Style Dialog Box
Modifying a style by using the Style dialog box is not as fast as modifying the style by example, but it provides the following additional options:
You can rename the style.
You can change the style on which the modified style is based.
You can change the style that Word automatically assigns to a paragraph that follows a paragraph that's assigned the modified style.
You can define a shortcut key for quickly applying the style.
You can copy the modified style to the document's template.
You can delete the style.
The following is the procedure for modifying a style using the Style dialog box:
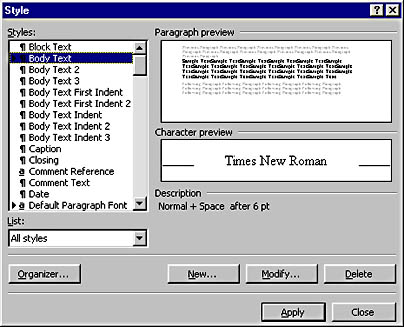
Choose Style from the Format menu to open the Style dialog box, which is shown in Figure 8-2.
Select the name of the style you want to modify in the Styles list box. (Initially, the style of the selected text will be selected.) If you can't find the style, make sure that the All Styles option is selected in the List list box.
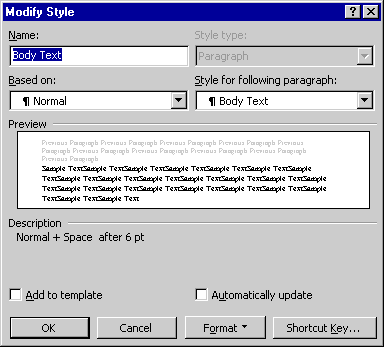
Click the Modify button. Word will display the Modify Style dialog box, which is shown in Figure 8-3.
You can change the name of the style, provided that it isn't a built-in style, by typing a new name into the Name box. (If you attempt to rename a built-in style, Word will add the new name you type as an alias for the style.)
Figure 8-2.The Style dialog box.
Figure 8-3.The Modify Style dialog box.
Each style must have a unique name, and style names are case-sensitive—for example, List and list are considered different styles. Also, for any type of style, you can define one or more aliases by typing them after the style name in the Name box, separating the names with commas.
You can change the base style by selecting a style name from the Based On list box. The result of basing one style on another was discussed earlier in the chapter.
For a paragraph style, if you choose the (No Style) option, the style will not be based on another style, and it will contain its own complete set of paragraph and character formatting. (The Normal style can't be based on another style.)
For a character style, if you choose the Default Paragraph Font or (Underlying Properties) option, the style will not be based on another character style. Rather, it will store only the character formatting attributes that are explicitly assigned to the style.
For a paragraph style, you can change the style for the following paragraph by choosing a style name in the Style For Following Paragraph list box.
For example, if you were modifying the Heading 1 style, you might choose Body Text in the Style For Following Paragraph list box. As a result, if you pressed Enter after typing a paragraph with the Heading 1 style, Word would assign the Body Text style to the newly inserted paragraph. (For most styles, you typically choose the same style in the Style For Following Paragraph list box so that the style doesn't change when you press Enter.)
Select Add To Template if you want to modify the copy of the style within the template that was used to create the document. If you don't select this option, modifying the style will affect only the copy of the style within the current document.
NOTE The Automatically Update option in the Modify Style dialog box has the same effect as the Automatically Update The Style From Now On option in the dialog box that's displayed when you modify a style by example. For an explanation, see the note in previous section.
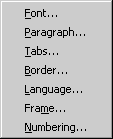
To change the formatting stored in the style, click the Format button and, from the menu that appears, choose the category of the formatting you want to change:
When you choose a category, Word will display a dialog box that allows you to modify the individual formatting attributes. Each of these dialog boxes is the same as the dialog box that is displayed when you directly format text in a document. Table 8-1 lists each category and indicates the place in the book where the dialog box is discussed. When you have made the changes you want in each of the dialog boxes, click OK to return to the Modify Style dialog box. Note that for a character format, you can choose only the Font, Border, or Language category.
When you have finished making all the changes to the style, click OK in the Modify Style dialog box to return to the Style dialog box and to store your changes.
In the Style dialog box, click Apply to return to the document and apply the newly modified style to the selection, or click Close to return to the document without applying the style.
TABLE 8-1.Categories of Formatting You Can Assign to a Style
Style Format Category
Look Here for Discussion of Its Dialog Box
Font
"Applying Character Formatting Directly".
Paragraph
"Applying Paragraph Formatting Directly".
Tabs
"Using Tabs".
Border
"Using Borders and Shading".
Language
"Marking the Language".
Frame
"Using Text Boxes to Position Text on the Page" page. Here, frame refers to an element for positioning text or graphics on a page, which is similar to a text box. It doesn't refer to one of the panes used to view multiple documents in a Web browser or in Word.
Numbering
"Creating Bulleted and Number Lists" page.
Assigning a Style to a Shortcut Key
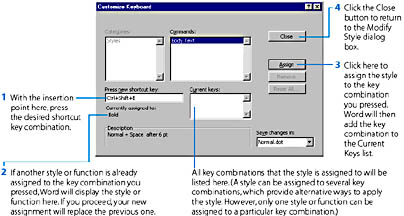
If you want to assign a style to a shortcut key so that you can apply the style by pressing a key combination, choose Style from the Format menu to open the Style dialog box, select the style you want to use, and click the Modify button. In the Modify Style dialog box, click the Shortcut Key button. The Customize Keyboard dialog box will appear, which is shown in Figure 8-4.
Figure 8-4.Defining a shortcut key for applying a style in the Customize Keyboard dialog box.
Defining Shortcut Keys
You can define new shortcut keys in Word that will allow you to perform frequently repeated tasks more rapidly. You can also change Word's default key combinations to suit your preferences (perhaps to match the key combinations of another program that you're accustomed to using). Keep in mind, however, that making extensive shortcut key modifications might make it difficult to learn tasks from this book or from the Word manuals and online Help, because these sources refer to the default key combinations. You might therefore wait until you're familiar with the Word skills involved before making extensive customizations.
You can assign a Word command, a macro, a font, an AutoText entry, a style, or a symbol to a shortcut key. Pressing the shortcut key will instantly choose the command, run the macro, apply the font, insert the AutoText entry, assign the style, or insert the symbol.
To assign one of these items to a shortcut key, do the following:
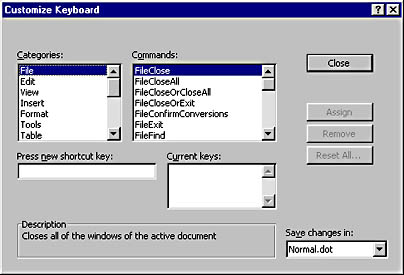
Choose Customize from the Tools menu and click the Keyboard button at the bottom of the Customize dialog box (this button is available on all tabs of the Customize dialog box). Word will open the Customize Keyboard dialog box:
Choose an item in the Save Changes In list box. If you choose Normal.dot, the shortcut key will be available when you work on any document; if you choose the name of the document template, it will be available only when you work on a document based on this same template; and if you choose the name of the current document, it will be available only when you work on this document.
Select a category in the Categories list.
In the list to the right of the Categories list, select the specific item that you want to assign to the shortcut key. (This list will be named Commands, Macros, Fonts, AutoText, Styles, or Common Symbols, according to the current selection in the Categories list. To simplify the remainder of the discussion, the term command will be used to refer to any item for the selected category.
If you chose the Common Symbols category but don't see the character you want in the Common Symbols list, select Insert from the Categories list and Symbol from the Commands list, click the Symbol button that appears, and choose the character you want in the Symbol dialog box. (For information on using the Symbol dialog box, see "Inserting Special Characters".)
If you selected the Styles category but don't see the style you want in the Styles list, you can assign any style to the shortcut key by clicking the Shortcut Key button in the Modify Style dialog box, as explained in "Assigning a Style to a Shortcut Key".
If the selected command has already been assigned to one or more shortcut keys, these keys will be shown in the Current Keys list. Note that you can assign a command to several shortcut keys; each shortcut key will provide an alternative way to carry out the command.
Click in the Press New Shortcut Key box and press the key combination that you want to use to carry out the selected command. A message below the box appears to indicate whether a command has already been assigned to that shortcut key. If a command has already been assigned, your shortcut key will replace the former one. (If you don't want to do this, try another key combination.)
Click the Assign button. The key combination will be added to the Current Keys list.
Make any other shortcut key assignments that you want. You can assign the current command (the one selected in the Commands list) to additional shortcut keys, or you can assign other commands to shortcut keys.
You can remove a specific shortcut key assignment by selecting the key combination in the Current Keys list and clicking the Remove button. You can remove all shortcut key assignments for all commands by clicking the Reset All button. (This will remove the assignments only from the template or document currently selected in the Save Changes In list box.)
Click the Close button in the Customize Keyboard dialog box and then click Close in the Customize dialog box.
Recall from Chapter 7 that Word has already defined shortcut keys for several styles. They are listed in Table 7-5.
Deleting a Style
To delete a style, choose Style from the Format menu to open the Style dialog box, select the style to delete, and click the Delete button. When you delete a style, Word removes it from any text to which it has been applied. (For a paragraph style, Word then formats the paragraph with the Normal style.)
SEE ALSO For information on copying styles between documents and templates, see "Copying Styles".
To delete a group of styles, use the Organizer (explained in "Modifying Templates").
See the comments on deleting built-in styles in the following sidebar.
Built-In Styles
Some of the predefined styles that Word provides are known as built-in styles. A built-in style is one that is always available to any template or document. To see all the built-in styles (not just those currently assigned to text in the document), choose All Styles in the List list box in the lower left corner of the Style dialog box; or, if you're using the Style list box on the Formatting toolbar, press Shift while you click the down arrow. You can't rename a built-in style, although you can assign it an alias.
If you select a built-in style other than Normal or Heading 1 through Heading 9 in the Style dialog box, you can click the Delete button to "delete" the style from the current document, provided that the style has been assigned to text in the document or that it has been modified. Word, however, does not actually delete the style; rather, it does the following:
Word removes the style from any text to which it has been applied. (If the style is a paragraph style, it then assigns the Normal style to each paragraph.)
If the style has been modified, Word restores it to its original state. Clicking Delete is thus a convenient way to remove any modifications you have made to a built-in style.
After you click Delete, the built-in style will still be listed in the Style dialog box when the All Styles option is selected.