Browsing Documents on the Web
Another exciting document management feature of Office 2000 is the ability it gives you to access Internet links quickly and seamlessly while you work. In this section, you'll learn how to connect to the Web in your Office applications, and you'll learn how to navigate a series of hypertext links using the new Web toolbar. You'll also learn how to use Internet Explorer 5 to view Office documents.
Linking Up with the World Wide Web
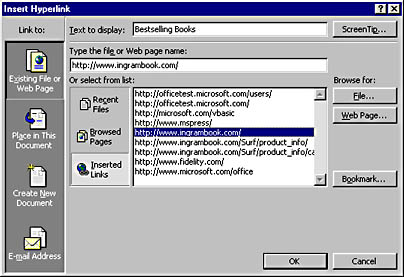
Connecting to the Web in Office applications is simple—so simple, in fact, that you might be wondering what all the fuss is about. You just select a word or cell in your document that you want to act as the doorway, or hyperlink, to the Web, and then you format it by choosing Hyperlink from the Insert menu of most Office applications or by clicking the Insert Hyperlink button. Hyperlink prompts you for the location of your file, which can be a document on your hard disk, a specific location in your document, or an Internet address, such as the home page for your business. (For example, the address for the Microsoft Press Home Page is http://mspress.microsoft.com.)

Hyperlinks appear as underlined words in a special color, and you activate them by clicking the word in your document. By default, the hyperlink first appears in blue and then when you activate it, it changes color. When you activate a Web hyperlink, Office starts your Internet browser and makes the connection using an attached modem, fax modem, ISDN line, or other communication device. Once the connection is established, the Web toolbar (described below) appears to let you switch back and forth between your open connections.
Creating a Link to the Web from a Document
Create a link to the Web from your Office documents by following these steps:
- Select the word or cell in your document that you want to associate the hyperlink with. It usually works best if that word or phrase describes the purpose of the link so that users can see what they're connecting to (for example, "Microsoft Press Home Page" or "Volcanoes on the Internet").
- From the Insert menu, choose Hyperlink or click the Insert Hyperlink button. The Insert Hyperlink dialog box appears, prompting you for the text to display for the link and the pathname of the document or Internet address. If you want, you can specify a particular location in the file that should appear on the screen or an e-mail address as the filename.
- Click OK to add the hyperlink to your document. When the Insert Hyperlink dialog box closes, the highlighted text appears in underlined type and a different color.
- When you activate a hyperlink in a document, Office starts the application associated with the document, displays the Web toolbar, and loads the linked document. If the hyperlink contains an Internet address, Office will start the default Internet browser on your system and ask you for a username and password, if necessary.
SEE ALSO
For more information about creating hyperlinks in Word, see "Inserting and Navigating with Hyperlinks" For details on creating Internet hyperlinks in Excel worksheets, see "Inserting Hyperlinks"
Using the Web Toolbar
After you create or activate a hyperlink in Office, a special Web toolbar appears in your application, which lets you switch back and forth between open hyperlinks, establish additional Internet connections, or run special network-related commands. You don't have to use the Web toolbar when switching between hyperlinks (you can use your browser or the Window menu instead), but in many cases you'll benefit from doing so. Figure 3-21 shows the Web toolbar and identifies the purpose of its buttons.
TIP
To close the Web toolbar, click the Close button on the toolbar's title bar or click the Web Toolbar button on the Standard toolbar.
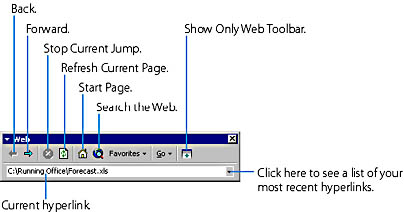
Figure 3-21. The Web toolbar acts like a remote control for your Internet connections. Browse back and forth between open documents just by clicking a button.
Browsing Your Connections
The most basic features of the Web toolbar are the hyperlink navigation buttons.
- To display the last open document or Web page, click the Back button.
- To display the next open document or Web page, click the Forward button.
- If you want to add the open hyperlink to your favorites collection, click the Favorites button, and then click Add To Favorites. (You can recall favorite hyperlinks at any time by clicking the Favorites button and then clicking Open Favorites.)
- If you want to stop the current hyperlink connection (useful when a number of graphics files are opening and you want to halt the process), click the Stop Current Jump button.
- If you ever want to download the most current version of a document or Web page, click the Refresh Current Page button. (We often use the Refresh Current Page button in tandem with the Stop Current Jump button.)
TIP
You can also use the down arrow next to the Address list box to display your most recent Internet connections. To reestablish one of the connections listed, just click the address.
![]()
Using Internet Explorer 5
When you click a Web hyperlink in your Office document, you'll see the Web page in the default Internet browser for your system, typically Internet Explorer or Netscape Navigator. Both of these browsers allow you to view and interact with Web pages written in a formatting code known as HTML (hypertext markup language). In addition to this basic functionality, Internet Explorer and Netscape Navigator allow you to run Web applications and other tools designed specifically for the Internet, and to switch quickly from one Web site to the next.
The default browser supplied with Office 2000 is Internet Explorer 5. As a result, you'll probably see Internet Explorer when you access the Web from Office applications, unless you specifically install the Netscape browser or another program. Figure 3-22 shows how a Web page we like to view looks in Internet Explorer. Notice that the address for the Web page is shown on the Address toolbar and that a collection of useful navigation buttons (Back, Forward, and so on) are presented on the Standard toolbar. At the bottom of the window, the status bar shows information about the current Internet connection, and the contents of the Web page are shown in the large Document area in the center of the window. To view a part of the Web page that you can't see now, click the vertical scroll bar next to the Document area. You can also click hyperlinks in the Web page to view other parts of the Web site.
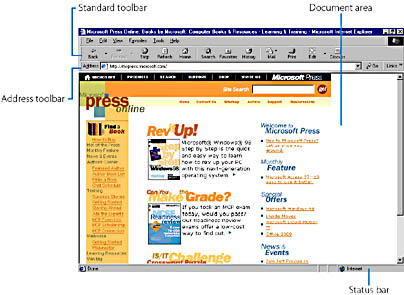
Figure 3-22. Internet Explorer 5 lets you easily view Web pages on the Internet.
Opening a New Web Page
To go to a new Web page, find the Internet address, or URL, of the Web page you want to view, and follow these steps:
- Click the Address toolbar text box to highlight the current Web page address.
- Type the address of the new Web page you want to view. For example, to view the Microsoft Press Web site, type
Http://mspress.microsoft.com/
- Press Enter. After a moment, Internet Explorer will load the Web page you specified and you can examine it closely in the Document window.
Viewing Office Documents
Internet Explorer also allows you to view Office documents in their own native format or in the new Office 2000 Web page (HTML) format. This feature allows you to open Office documents located on the Internet, your corporate intranet, or your local hard disk, without resorting to Windows Explorer or another tool.
To open and edit an Office document in Internet Explorer, follow these steps:
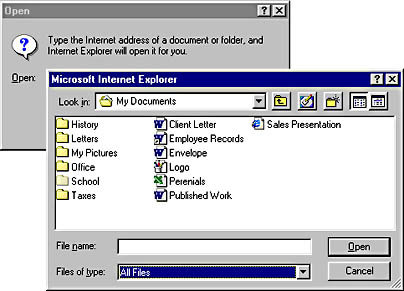
- Click Open on the Internet Explorer File menu.
- In the Open dialog box, click the Browse button. A new, larger Open dialog box appears, allowing you to locate a specific file on your computer, corporate intranet, or the Internet.
- In the Files Of Type drop-down list box, click the type of file you're looking for. If you want to open an Office document that has been saved as an HTML file, leave the current setting as it is. If you're looking for an Office document stored in native format (the format that's unique to a particular application), click All Files. Your screen will look like this:
- Locate the file you want to open in the list box, click it, and then click the Open button.
- Click OK in the first Open dialog box to open the file for editing.
At this point, Internet Explorer does something interesting: it opens the document you requested in Internet Explorer, but also adds Office application commands to the Internet Explorer menu bar. This interesting feature is known as in-place editing, and it allows you to work on your document in Internet Explorer using the exact same features you're used to in the original Office application. To accomplish this feat, Internet Explorer started the original Office application and is running it in the background. As a result, you might see an icon for it on the taskbar while you work.
- When you're finished editing your Office document, save your changes, and choose Close from the Internet Explorer File menu or click the Back button on the Standard toolbar. The last Web page you were viewing in Internet Explorer will appear in the Document area.