Embedding Data
A block of embedded data is known as an embedded object. In an Office document, you can embed data that you have created in another Office application, in an Office Tools program (as described in "Using the Office Tools"), or in any other Windows-based program that's been designed to be a source of embedded data. You can create an embedded object in three ways, which differ in how you obtain the data for the object. First, you can obtain the data for an embedded object from a portion of an existing document, as follows:
- Select the data in the source document, and choose Copy or Cut from the source program's Edit menu.
- Place the insertion point at the position in the receiving document where you want to add the embedded object, and choose Paste Special from the receiving program's Edit menu.
- In the Paste Special dialog box, choose the Paste option, and in the As list, choose the first format description that contains the word object. (See Figure 35-7.) Then click OK.
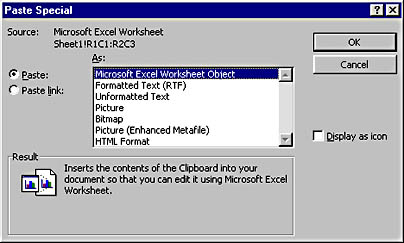
Figure 35-7. Embedding an Excel worksheet object.
The second way to create an embedded object is to use an entire existing document as the source of the data, as follows:
- Place the insertion point at the position in the receiving document where you want to embed the object, choose Object from the receiving program's Insert menu, and click the Create From File tab (or option button) in the Object (or Insert Object) dialog box.
- Make sure that the Link To File (or Link) option is not selected, and either type the name of the source document into the File Name (or File) text box, or click the Browse button to locate the file. (See Figure 35-8.)
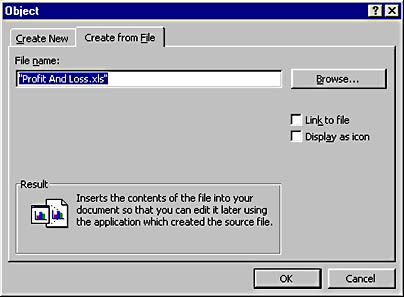
Figure 35-8. Embedding an entire document.
The third way to embed an object is to create new data for the object, using the source program's tools, as follows:
- Place the insertion point at the position in the receiving document where you want to embed the object, choose Object from the receiving program's Insert menu, and click the Create New tab (or option button) in the Object (or Insert Object) dialog box.
- In the Object Type list, select the type of object that you want to embed. This list contains one or more items for every installed Windows-based program that can be the source for an embedded object. Click OK, and one of two things will then happen:
- The source program's window will open, and will display a blank working area (for example, blank worksheet cells) or other tools (for example, a collection of clip art objects you can insert).
- A blank working area will appear within the receiving document, and the source program's menus and buttons will be displayed within the receiving program's window. The source program's keyboard commands will also be available.
- In either case, use the source program's commands to enter the data for the embedded object into the working area.
- When you have finished entering the data, exit the editing mode. If you're working in the source program's window, do this by choosing Exit from the File menu (or using any other method to quit the program) and clicking Yes in the message box if the source program asks whether you want to update the object in the receiving document. If you're working in the receiving program's window, simply click in the receiving document outside the object.
NOTE
With the Office Tools programs (described later), you must use this third method for creating an embedded object, because these programs can't create independent documents.When you use any of these three methods for embedding an object, you might be able to select the Display As Icon option in the dialog box. For an explanation of this option, be sure to see the tip "Display Your Data As an Icon."
To edit an embedded object, simply double-click it. The object will then be opened for editing either within the source program or, more commonly, within the receiving program.
NOTE
For some types of embedded objects, double-clicking the object does not open it for editing. For example, if you double-click an object containing a sound or video clip, the clip will be played. To edit the object, you must use the alternative method, given next.
Alternatively, you can select the object by clicking it and then point to Item Object (where Item is a description of the selected object, such as Worksheet) on the receiving program's Edit menu to display a submenu similar to the one shown here:
Choose one of the following commands from this submenu:
- The Edit command, if present, which normally lets you edit the object within the receiving program's window using the source program's menus and toolbars
- The Open command, if present, which normally lets you edit the object within a separate window provided by the source program
The actual commands that appear on the submenu—and their actions—depend on the source program and the nature of the embedded data.
When you have finished editing the object, exit the editing mode. If you're editing in the source program, do this by exiting from the source program and clicking the Yes button in the message box if the source program asks whether you want to update the object in the receiving document. If you're editing in the receiving program, click in the receiving document outside the object.
TIP
Convert Objects to the Format You PreferIf the Object submenu includes a Convert command, you can choose it to change the embedded object to a different object type. The available object types depend on the object you have selected. For example, if you select a PowerPoint Slide object, you can convert it to a PowerPoint Presentation object. This would allow you to add additional slides to the object (a presentation is composed of a group of slides) or to display the presentation in a slide show by double-clicking the object.
An Embedding Example
Imagine that you're preparing a PowerPoint presentation and that you want to include a table of numeric values in a slide. By embedding an Excel Worksheet object, you can use all the features provided by Excel for creating the table. You could do this as follows:
- Run Excel, open a new document, and enter the data into a worksheet.
- Select the worksheet cells that you want to display in the PowerPoint slide, as shown in Figure 35-9, and choose Copy from Excel's Edit menu.
- Open the slide in the PowerPoint presentation in which you want to display the worksheet cells. (You must be in PowerPoint's Normal view; to switch to this view, choose Normal from PowerPoint's View menu.)
- Choose Paste Special from PowerPoint's Edit menu, and in the Paste Special dialog box, choose the Paste option and select the Microsoft Excel Worksheet Object item in the list, as shown in Figure 35-10. Then click OK.
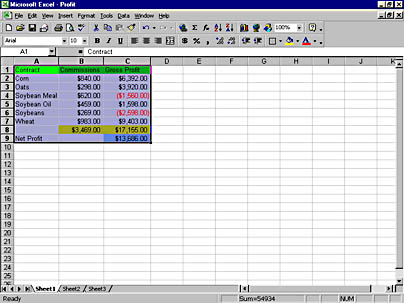
Figure 35-9. Selecting cells in an Excel worksheet.
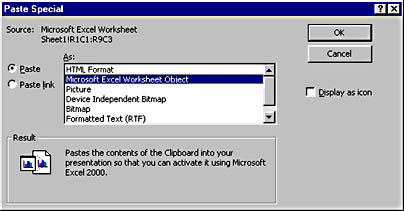
Figure 35-10. Embedding the Excel worksheet cells shown in Figure 35-9 into a PowerPoint slide.
NOTE
After you have pasted the worksheet cells into the slide, you can either save or discard the original Excel document. Note that the embedded object was created by copying cells from an Excel document— rather than choosing Object from PowerPoint's Insert menu to create new data— because the copying method lets you specify the exact number of cells to display in the slide and makes it easier to scale the worksheet within the PowerPoint slide.
The resulting PowerPoint slide is shown in Figure 35-11.
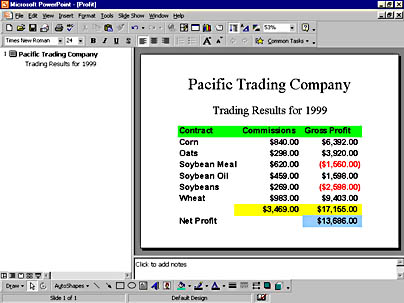
Figure 35-11. Excel worksheet cells embedded in a PowerPoint slide.
ON THE WEB
The Profit.xls and Profit.ppt example files are on the Running Office 2000 Reader's Corner page.
