Tasks
You can use the Tasks folder in Outlook to track short jobs that you need to complete or large projects that you're handling. You can manage tasks for yourself, or— if your computer is connected to an Exchange Server network— you can assign tasks to other people in your workgroup and track these tasks.
To start tracking a new task, open the Tasks folder and choose New Task from the Actions menu or press Ctrl+N. Outlook will open the Task form. You can then enter information for the task as shown in Figures 43-5 and 43-6. Note that you'll need to enter or update some of the information after the task is partially or fully completed (for example, the status and percent complete entered into the Task tab, as well as the completion date and actual work hours entered into the Details tab).
Most fields of the Details tab are self-explanatory. Use the Companies box if you want to enter the names of one or more companies that are associated with the task. If you have been assigned the task and are still the task owner, the Update List box will display the names of all Outlook users who have a copy of the task that is updated whenever you change the task. If you assigned the task to another Outlook user and kept a copy, clicking the Create Unassigned Copy button converts your copy into a task that's owned by you. (See the section "Exchange Server Only: Assigning and Tracking Tasks")
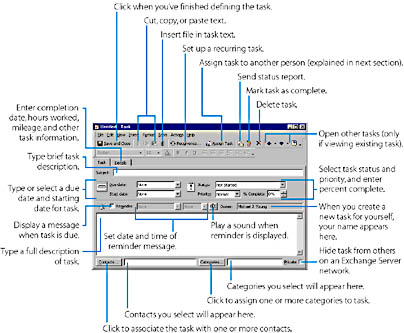
Figure 28-5. Defining a task: the Task tab of the Task form.
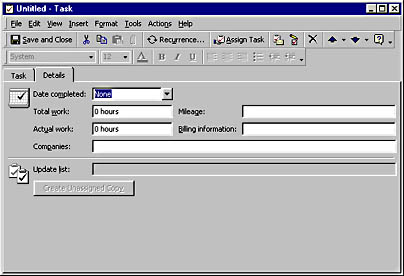
Figure 28-6. Defining a task: the Details tab of the Task form.
Figure 28-7 shows the Tasks folder, in the Simple List view, after several tasks have been defined. In this view, you can also display the first three lines entered into the large text box of each task (shown in Figure 28-5) by selecting the AutoPreview option on the View menu or the AutoPreview button on the Advanced toolbar. Note that the task list that you see in the Simple List view of the Tasks folders is also displayed within the Day/Week/Month view of the Calendar folder (less the Due Date column), as was shown in Figure 27-8.

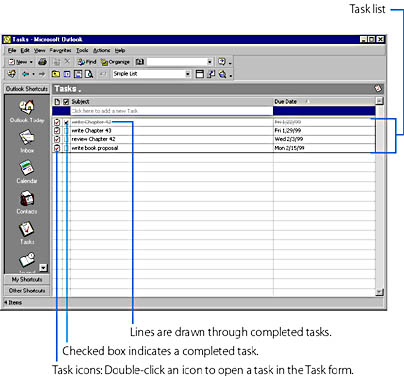
Figure 28-7. The Tasks folder in the Simple List view.
TIP
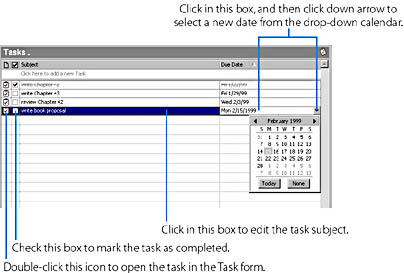
Quickly Define a New TaskYou can define a task by just clicking the box at the top of the Subject column, which is labeled Click Here To Add A New Task. (This box is present in the Simple List view and in several other views. See Figure 28-7.) Type the task subject into the Subject box, enter the due date (if any) into the Due Date box, and press Enter to add the task to the task list. You can later open the task in the Task form (as explained next) to enter additional information.
To view the complete information on a task, or to update this information, you can open the task in the Task form (shown in Figures 28-5 and 28-6) by double-clicking the task's icon in the task list. You might need to do this, for example, to update the status information on a task.
You can also directly edit any of the information for a task that appears in the task list shown in the Information Viewer, without opening the task. For example, in the Simple List view, you can change the task subject by editing the text in the Subject box, you can mark the task as completed by checking the box to the left of the Subject box, or you can change the due date by clicking the Due Date box, clicking the down arrow that appears, and then choosing a new date from the drop-down calendar:
Note that to change information directly within the Information Viewer, you must make sure the Allow In-Cell Editing option is enabled. To find this option, point to Current View on the View menu, choose Customize Current View from the submenu, and then click the Other Settings button in the View Summary dialog box.
To delete a task, click its icon in the task list and press the Delete key, or click anywhere on the task and click the Delete button on the Standard toolbar. To move a task to a different position in the list, drag the icon. To make a copy, hold down the Ctrl key while you drag. (Note, however, that if a sort is applied, you can copy a task but you can't move it.)
![]()
If you want to see your tasks in a timeline arrangement, you can choose the Task Timeline view from the Current View list box on the Advanced toolbar. (See "Using Different Views".) When in this view, you can control the amount of detail that's shown by clicking the Day, Week, or Month button on the Standard toolbar. Figure 28-8 shows the Tasks folder as it appears in the Task Timeline view, with the Week button pressed in. (This figure shows two of the tasks that are listed in Figure 28-7.)
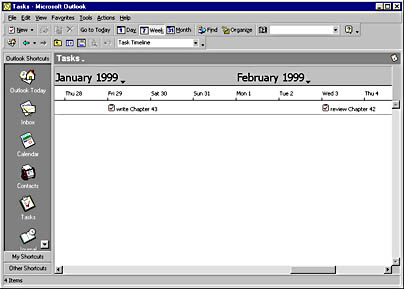
Figure 28-8. The Tasks folder in the Task Timeline view.
Exchange Server Only: Assigning and Tracking Tasks
If your computer is connected to a Microsoft Exchange Server network, you can use Outlook to assign a task to a co-worker and to keep track of the status of that task. This feature allows you to use Outlook to easily manage group projects as well as personal tasks. A person who accepts a task assignment becomes the task owner. (If you create a task for yourself, as described in the previous section, you're the owner.)
To create a task and assign it to another person, choose New Task Request from the Actions menu, or press Ctrl+Shift+U. Outlook will display the Task form, which you should fill out as shown in Figure 28-9, and then click the Send button. (Refer back to Figures 28-5 and 28-6 for descriptions of parts of the form that aren't explained in Figure 28-9.)
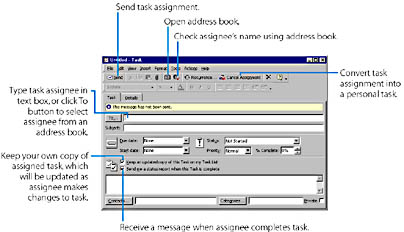
Figure 28-9. Assigning a task to another person in the Task form.
When you click the Send button in the Task form, the following sequence of events occurs:
- The assignee (the person who is sent the task and becomes its owner) gets a task-assignment message in his or her Inbox, and the task is added to the assignee's Tasks folder.
- The assignee opens the task-assignment message and clicks either the Accept or the Decline button on the form to take on or to refuse the task. If the assignee clicks Decline, the task is removed from the assignee's Tasks folder.
- You receive a message in your Inbox, indicating whether the task was accepted or declined.
- If you selected the Keep An Updated Copy Of This Task On My Task List option when you assigned the task, a copy of the task will be stored in your Tasks folder. Each time the assignee updates the task (for example, changes the task Status or the % Complete), your copy of the task will be updated to match the assignee's copy.
- If you selected the Send Me A Status Report When This Task Is Complete option when you assigned the task, you'll receive a message in your Inbox when the assignee sets the status of the task to Completed.
If you open your copy of the task in the Task form, you'll notice that the assignee is designated as the task owner. You can convert your copy to a task that's owned by you, and stop having it updated whenever the assignee makes a change to the task. To do this, click the Create Unassigned Copy button on the Details tab of the Task form. You can then either remain the owner, or assign the task to someone else.
NOTE
If a person has been assigned a task, that person can reassign it to someone else by clicking the Assign Task button on the Task form. If the new owner opens the task, the Update List box on the Details tab of the Task form will list the name of each person who has assigned the task to someone else and who has selected the Keep An Updated Copy Of This Task On My Task List option. That is, it lists each person who is storing a copy of the task that will be updated when the new owner modifies the task.
EAN: 2147483647
Pages: 228