The Microsoft Help Command
At the top of each Office application's Help menu there is a Help command that includes the name of the application (for example, "Microsoft Word Help"). If the Office Assistant is turned on—you'll learn how to turn this feature on and off later in this chapter—it will appear with its balloon somewhere within the application's window. If the Office Assistant is turned off, this command displays the Micro- soft Help window (like the command, the window's title includes the name of the application). As you can see in this illustration of the Microsoft Word Help window, the window contains a toolbar that has five buttons:
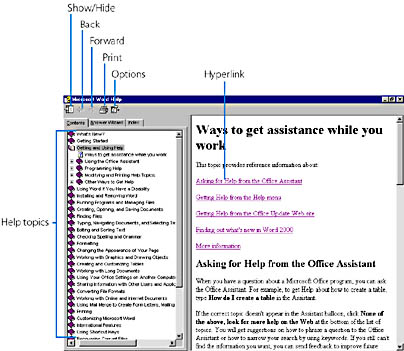
The Show/Hide button toggles the display of the pane on the left side of the window. This pane contains three tabs. The Contents tab contains a list of help topics in a familiar hierarchical structure. Scroll through the list to select a main topic, and click the box containing the plus sign to display a list of subtopics. When you find the subtopic you want, click it to display its information in the right pane. The Answer Wizard tab provides a text box into which you can type a question. Then click the Search button. Microsoft Help looks for and retrieves topics relevant to the question that you type. Select one of the topics that Help finds to display the information in the right pane.
The Index tab contains three numbered sections, and each helps you to pin down the information you're after. Section 1 provides a text box into which you can type a keyword; this text box operates similarly to the Answer Wizard tab. As soon as you type the first few characters, the list of keywords in section 2 scrolls to the first keyword that begins with those characters, if there is one. You also have the option of bypassing the text box in section 1 and selecting a keyword in the section 2 list. When you select a desired keyword, click the Search button to display a list of relevant topics in section 3. Then choose one of these topics to display information in the right pane.
While you have the Help window open, you can use the Back and Forward buttons to return to information you have viewed previously. The Print button is available to print the information displayed currently in the right pane. The Options button displays a menu from which you can select commands to toggle the display of the tabs, navigate to other pages or select other options, or open the Print dialog box to change printer settings.
The Office Assistant Feature
Closely linked to the Help system is the Office Assistant, a friendly search tool that uses animation, humor, and a database containing thousands of tips, techniques, and solutions to help you learn how the Office software works. (See Figure 1-8.) The Office Assistant acts as an on-demand genie that pops up when you need it to solve your problem or give you some advice. If you don't want the Office Assistant, fine—send her (or him? or it?) away until you need her again. (She won't bug you or get in your way.) Best of all, you can customize the Office Assistant to appear just the way you like, particularly if you don't care for the default character, Clippit.
You start the Office Assistant by choosing Microsoft Help from the Help menu (if the Office Assistant is turned on) or by clicking the Office Assistant button on your application's toolbar. As with the other Help features, the information provided by the Office Assistant is specific to the active application. For example, if you open the Office Assistant in Outlook, all the solutions provided will be related to Outlook. On the other hand, if you're in Word, the same question results in solutions specific to Word.
As you work in your application, the Office Assistant will periodically offer tips to streamline the commands you're using. The Office Assistant doesn't just blurt out its advice (how rude!), but instead advertises its services by discreetly motioning to get your attention or displaying a helpful balloon. For example, if the Office Assistant notices that you're starting to write a letter in Word, it will ask whether you want help. If you accept its offer, the Office Assistant will start the Letter Wizard and help you fill out the options in the Letter Wizard dialog box.
When you're finished using the Office Assistant, right-click it (use the right mouse button), and choose Hide, or choose Hide The Office Assistant on the Help menu, to give Office Assistant the afternoon off.
Customizing the Office Assistant
If you get bored with the default character, you can choose another electronic helper by right-clicking the Office Assistant and then selecting Choose Assistant from the shortcut menu that pops up. When you make this selection, the Office Assistant dialog box appears and displays the Gallery tab, as shown in Figure 1-9.
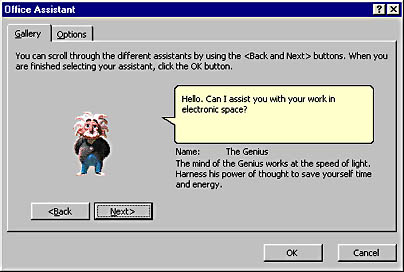
Figure 1-9. Pick a new Office Assistant with this dialog box.
Each time you click the Next button in this dialog box, a new Office Assistant appears, ready to do your bidding.
Finally, you can customize the capabilities of the Office Assistant by clicking the Options tab in the Office Assistant dialog box. The Options tab contains a collection of check boxes that enable and disable features in the Office Assistant. (See Figure 1-10.) Simply adjust the settings and, presto, the Office Assistant has a new personality! (Wouldn't it be great to be able to do this with people at work?) A few of the options we like are Only Show High Priority Tips, which stops the Office Assistant from recommending nonessential shortcuts, and Move When In The Way, which forces the Office Assistant to relocate on the screen if it's blocking a dialog box or important data. When you're done customizing the Office Assistant, click OK to close the Office Assistant dialog box.
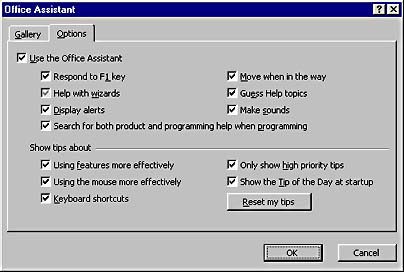
Figure 1-10. Control your Assistant's manners using this dialog box.
The What's This? Feature
Another useful Help feature in Office applications is an object called the Help pointer. The Help pointer appears when you choose What's This? from the Help menu or when you click the Help button that appears in the upper right corner of dialog boxes next to the Close button, which changes the mouse pointer to a question mark. After the transformation, your mouse works just like an alchemist's magic wand—when you move the Help pointer and click a menu item, toolbar button, or window element, the Help pointer displays a Help window showing you exactly what the object does. It's a Help feature designed for tactile people who want to poke and prod while they learn.
TIP
Call for Keyboard HelpYou can also use the Help pointer to get assistance using keyboard combinations. To try this useful feature, click the Help pointer on the toolbar, and then press the key or keys you want to learn about. For example, click the Help pointer and press Ctrl+B, the keyboard shortcut for bold formatting in Word. The Help system will display a Help article related to the keys you press.
![]()
Fixing Problems Using Detect and Repair
Finally, you should note the presence of a special command on the Help menu named Detect And Repair that can identify and fix problems in the Office 2000 software as they arise. Use this command if you experience application crashes when you use a particular program or see error messages that describe missing files or other worrisome conditions.
When you choose Detect And Repair, Office 2000 analyzes the files in your Office application to verify that they are the proper size and contain the necessary binary information. Detect And Repair can also fix corrupt or missing keys in the Windows Registry by reverting to internal application defaults that keep the program you are using from stopping unexpectedly. If Office 2000 locates a missing or corrupt file, it replaces the file from your installation source (typically the corporate network or your setup CD).
Figure 1-11 shows the dialog box that appears when you first choose Detect And Repair from the Help menu in an Office 2000 application. Select the optional Shortcuts check box if you want Office to rebuild any shortcuts you have in folders or on the Windows desktop, and then click the Start button to run the utility. Note that you might need to supply a setup disc or installation path during this process.
TIP
If All Else FailsIf the Detect And Repair command doesn't fix your problem, you have two additional recourses. First, try reinstalling the application you're having problems with by using the original Office 2000 CD-ROM or network setup. Second—and this is a good general tip—connect to the Microsoft Office Update Web site to see whether other users have had the same problems or whether Microsoft distributes periodic service updates or patches for your application. The URL for this service is http://www.microsoft.com/office.
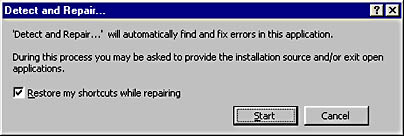
Figure 1-11. The Detect And Repair dialog box works to fix your applications automatically.
Exiting Office Applications
Whenever you're finished working with an Office application, you should close your documents or spreadsheets and exit the program before you shut down Windows and turn off your computer. If you don't exit applications properly, rest assured that you won't damage your system, though you might leave a few temporary files on your hard disk that will waste disk space. You could also lose the edits you made in your document since you last saved your document by using the Save command. Fortunately, however, all Office applications ask you to save your changes whenever you try to exit a program with an unsaved file open. (You'll learn more about saving documents in the next chapter.)
To exit an Office application, do one of the following:
- From the application's File menu, choose Exit.
- Press Alt+F4.
- Right-click the application name on the taskbar, and then choose Close from the shortcut menu. (This will quit the application if no other documents belonging to the application are open.)
If you have any unsaved changes in your document, you'll be prompted to save them. (If the Office Assistant is running, you'll see a balloon similar to the one shown in Figure 1-12.) If you click Yes when prompted to save, your changes will be stored under the current filename. (If you haven't established a filename, you'll be given a chance to enter one.) If you click No, all the changes you made since your last save will be discarded. If you click Cancel, the dialog box will close without any changes being made, and you'll return to your application.
Figure 1-12. The Office Assistant balloon containing Save options appears if you try to exit an application with unsaved changes.
EAN: 2147483647
Pages: 228