Using the DateTimePicker Control
Using the DateTimePicker Control
Some Visual Basic controls display information, and others gather information from the user or process data behind the scenes. In this exercise, you'll work with the DateTimePicker control, which prompts the user for a date or time by using a graphical calendar with scroll arrows. Although your use of the control will be rudimentary at this point, experimenting with DateTimePicker will give you an idea of how much Visual Basic controls can do for you automatically and how you process the information that comes from them.
The Birthday Program
The Birthday program uses a DateTimePicker control and a Button control to prompt the user for the date of his or her birthday. It then displays that information by using a message box. Give it a try now.
Build the Birthday program
On the File menu, click Close Project to close the MyHello project.
The files associated with the Hello World program close.
On the File menu, click New Project.
The New Project dialog box appears.
Create a new Visual Basic Windows Application project named MyBirthday.
The new project is created, and a blank form appears in the Designer.
Click the DateTimePicker control in the Toolbox.
Draw a date time picker object in the middle of the form, as shown below.
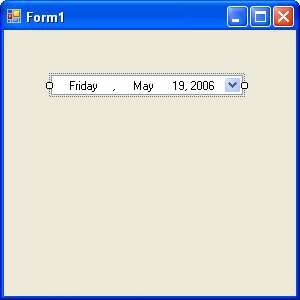
The date time picker object by default displays the current date, but you can adjust the displayed date by changing the object's Value property. Displaying the date is a handy design guide—it lets you size the date time picker object appropriately when you're creating it.
Click the Button control in the Toolbox, and then add a button object below the date time picker.
You'll use this button to display your birth date and to verify that the date time picker works correctly.
In the Properties window, change the Text property of the button object to Show My Birthday.
Now you'll add a few lines of program code to a procedure associated with the button object. This is an event procedure because it runs when an event, such as a mouse click, occurs, or fires, in the object.
Double-click the button object on the form to display its default event procedure, and then type the following program statements between the Private Sub and End Sub statements in the Button1_Click event procedure:
MsgBox("Your birth date was " & DateTimePicker1.Text) MsgBox("Day of the year: " & _ DateTimePicker1.Value.DayOfYear.ToString())These program statements display two message boxes (small dialog boxes) with information from the date time picker object. The first line uses the Text property of the date time picker to display the birth date information you select when using the object at run time. The MsgBox function displays the string value “Your birth date was” in addition to the textual value held in the date time picker's Text property. These two pieces of information are joined together by the string concatenation operator (&). You'll learn more about the MsgBox function and the string concatenation operator in Chapter 5, “Visual Basic Variables and Formulas, and the .NET Framework.”
The second and third lines collectively form one program statement and have been broken by the line continuation character (_) because the statement was a bit too long to print in this book.
NOTE
Program lines can be more than 65,000 characters long in the Visual Studio Code Editor, but it's usually easiest to work with lines of 80 or fewer characters. You can divide long program statements among multiple lines by using a space and a line continuation character (_) at the end of each line in the statement, except the last line. (You cannot use a line continuation character to break a string that's in quotation marks, however.) I use the line continuation character in this exercise to break the second line of code into two parts.The statement DateTimePicker1.Value.DayOfYear.ToString() uses the date time picker object to calculate the day of the year in which you were born, counting from January 1. This is accomplished by the DayOfYear property and the ToString method, which converts the numeric result of the date calculation to a textual value that's more easily displayed by the MsgBox function.
Methods are special statements that perform an action or a service for a particular object, such as converting a number to a string or adding items to a list box. Methods differ from properties, which contain a value, and event procedures, which execute when a user manipulates an object. Methods can also be shared among objects, so when you learn how to use a particular method, you'll often be able to apply it to several circumstances. We'll discuss several important methods as you work through this book.
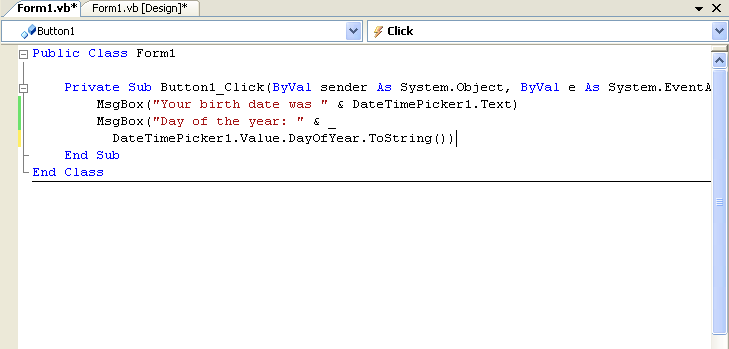
After you enter the code for the Button1_Click event procedure, the Code Editor looks similar to this:
Click the Save All button to save your changes to disk, and specify c:\vb05sbs\chap03 as the folder location.
Now you're ready to run the Birthday program.
Run the Birthday program
TIP
The complete Birthday program is located in the c:\vb05sbs\chap03\birthday folder.
Click the Start Debugging button on the Standard toolbar.
The Birthday program starts to run in the IDE. The current date is displayed in the date time picker.
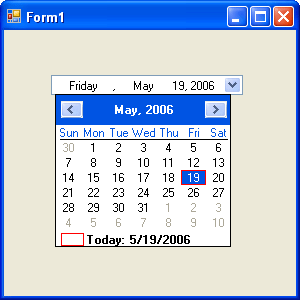
Click the arrow in the date time picker to display the object in calendar view.
Your form looks like the following illustration, with a different date.
Click the Left scroll arrow to look at previous months on the calendar.
Notice that the text box portion of the object also changes as you scroll the date. The “today” value at the bottom of the calendar doesn't change, however.
Although you can scroll all the way back to your exact birthday, you might not have the patience to scroll month by month. To move to your birth year faster, select the year value in the date time picker text box and enter a new year.
Select the four-digit year in the date time picker text box.
When you select the date, the date time picker closes.
Type your birth year in place of the year that's currently selected, and then click the arrow again.
The calendar reappears in the year of your birth.
Click the scroll arrow again to locate the month in which you were born, and then click the exact day on which you were born.
If you didn't know the day of the week you were born on, now you can find out!
When you select the final date, the date time picker closes, and your birth date is displayed in the text box. You can click the button object to see how this information is made available to other objects on your form.
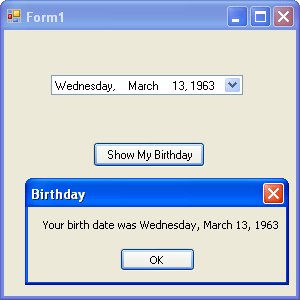
Click the Show My Birthday button.
Visual Basic executes your program code and displays a message box containing the day and date of your birth. Notice how the two dates match:
Click OK in the message box.
A second message box appears indicating the day of the year on which you were born—everything seems to work! You'll find this control to be quite capable—not only does it remember the new date or time information that you enter, but it also keeps track of the current date and time, and it can display this date and time information in a variety of useful formats.
NOTE
To configure the date time picker object to display times instead of dates, set the object's Format property to Time.Click OK to close the message box, and then click the Close button on the form.
You're finished using the DateTimePicker control for now.
A Word About Terminology
So far in this book I've used several different terms to describe items in a Visual Basic program. Do you know what all these items are yet? It's worth listing several of them now to clear up any confusion.
- Program statement
A program statement is a line of code in a Visual Basic program, a self-contained instruction executed by the Visual Basic compiler that performs useful work within the application. Program statements can vary in length (some contain only one Visual Basic keyword!), but all program statements must follow syntax rules defined and enforced by the Visual Basic compiler. In Visual Studio 2005, program statements can be composed of keywords, properties, object names, variables, numbers, special symbols, and other values. (See Chapter 2 and Chapter 5.)
- Keyword
A keyword is a reserved word within the Visual Basic language that is recognized by the Visual Basic compiler and performs useful work. (For example, the End keyword stops program execution.) Keywords are one of the basic building blocks of program statements; they work together with objects, properties, variables, and other values to form complete lines of code and (therefore) instructions for the compiler and operating system. Most keywords are shown in blue type in the Code Editor. (See Chapter 2.)
- Variable
A variable is a special container used to hold data temporarily in a program. The programmer creates variables by using the Dim statement and then uses these variables to store the results of a calculation, file names, input, and so on. Numbers, names, and property values can be stored in variables. (See Chapter 5.)
- Control
A control is a tool you use to create objects on a Visual Basic form. You select controls from the Toolbox and use them to draw objects with the mouse on a form. You use most controls to create user interface elements, such as buttons, picture boxes, and list boxes. (See especially Chapters 2 through 4.)
- Object
An object is a user interface element that you create on a Visual Basic form with a control in the Toolbox. In Visual Basic, the form itself is also an object. You can move, resize, and customize objects by using property settings. Objects have what is known as inherent functionality—they know how to operate and can respond to certain situations on their own. (A list box “knows” how to scroll, for example.) You can program Visual Basic objects by using customized event procedures for different situations in a program. (See Chapters 1 through 4.)
- Class
A class is a blueprint or template for one or more objects that defines what the object does. Accordingly, a class defines what an object can do but is not the object itself. In Visual Basic .NET 2003 and Visual Basic 2005, you can use existing Visual Studio classes (like System.Math and System.Windows.Forms.Form), and you can build your own classes and inherit properties, methods, and events from them. (Inheritance allows one class to acquire the pre-existing interface and behavior characteristics of another class.) Although classes might sound esoteric at this point, they are a key feature of Visual Studio 2005, and in this book, you will use them to build user interfaces rapidly and to extend the work that you do to other programming projects. (See Chapters 5 and 16.)
- Namespace
A namespace is a hierarchical library of classes organized under a unique name, such as System.Windows or System.Diagnostics. To access the classes and underlying objects within a namespace, you place an Imports statement at the top of your program code. Every project in Visual Studio also has a root namespace, which is set using the project's Properties page. Namespaces are referred to as object libraries or class libraries in Visual Studio books and documentation. (See Chapter 5.)
- Property
A property is a value, or characteristic, held by an object. For example, a button object has a Text property to specify the text that appears on the button and an Image property to specify the path to an image file that should appear on the button face. In Visual Basic, properties can be set at design time by using the Properties window or at run time by using statements in the program code. In code, the format for setting a property is
Object.Property = Value
where Object is the name of the object you're customizing, Property is the characteristic you want to change, and Value is the new property setting. For example,
Button1.Text = "Hello"
could be used in the program code to set the Text property of the Button1 object to “Hello”. (See Chapters 1 through 3.)
- Event procedure
An event procedure is a block of code that's executed when an object is manipulated in a program. For example, when the Button1 object is clicked, the Button1_Click event procedure is executed. Event procedures typically evaluate and set properties and use other program statements to perform the work of the program. (See Chapters 1 through 3.)
- Method
A method is a special statement that performs an action or a service for a particular object in a program. In program code, the notation for using a method is
Object.Method(Value)
where Object is the name of the object you want to work with, Method is the action you want to perform, and Value is an optional argument to be used by the method. For example, the statement
ListBox1.Items.Add("Check")uses the Add method to put the word Check in the ListBox1 list box. Methods and properties are often identified by their position in a collection or object library, so don't be surprised if you see long references such as System.Drawing.Image.FromFile, which would be read as “the FromFile method, which is a member of the Image class, which is a member of the System.Drawing object library.” (See Chapters 1 through 5.)
EAN: N/A
Pages: 168