The Data Sources Window
The Data Sources Window
The Data Sources window is a new (and hopefully timesaving) feature of the Visual Studio 2005 IDE. Its purpose is to display a visual representation of the datasets that have been configured for use within your project, and to help you bind these datasets to controls on the form. Remember that a dataset is just a temporary representation of database information in your program, and that each dataset contains only a subset of the tables and fields within your entire database file; that is, only the items that you selected while using the Data Source Configuration Wizard. The dataset is displayed in a hierarchical (tree) view in the Data Sources window, with a root node for each of the objects that you selected in the wizard. Each time you run the wizard to create a new dataset, a new dataset tree is added to the Data Sources window, giving you potential access to a wide range of data sources and views within a single program.
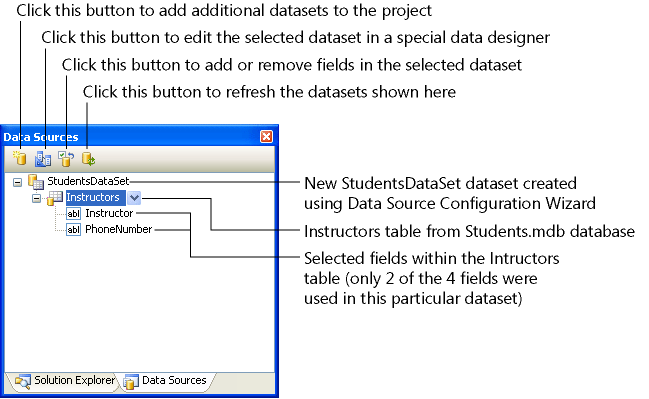
If you have been following the instructions for selecting fields in the Instructors table of the Students database, you have something interesting to display in the Data Sources window now. To prepare for the following exercises and display the Data Sources window, display the form again (click the Form1.vb tab), and then click the Show Data Sources command on the Data menu. (You can also click the Data Sources tab if it is visible below Solution Explorer.) When the Data Sources window is open, expand the Instructors table so that you can see the two fields that we selected. Your Data Sources window looks like this, with the important features identified:
The easiest way to display the information in a dataset on a form (and therefore for your users) is to drag objects from the Data Sources window to the Windows Forms Designer. (This is the Designer you used in earlier chapters, but I am calling it the Windows Forms Designer here to distinguish it from the Dataset Designer.)
Chapter 19, “Data Presentation Using the DataGridView Control,” describes how you can display entire tables of data on a form. In the remainder of this chapter, however, you'll experiment with dragging individual fields of data to the Windows Forms Designer to bind controls to select fields in the Students database. Give it a try now.
Use the Data Sources window to create database objects on a form
In the Data Sources window, click the plus sign (+) next to the Instructors node to display the available fields in StudentsDataSet.
Your Data Sources window looks like the previous illustration. In Visual Studio 2005, you can display individual fields or an entire table of data by simply dragging the desired database objects onto your form.
Click the Instructor field, which contains the name of each instructor in the Students database.
An arrow appears to the right of the Instructor field in the Data Sources window. Clicking this arrow displays a list of options related to how a database field is displayed on the form when you drag it.
Click the Instructor arrow.
The Data Sources window looks as shown on the next page.
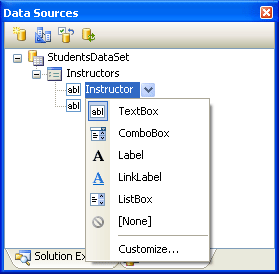
Although I haven't discussed it yet, most of the controls on the Common Controls tab of the Toolbox have the built-in ability to display database information. In Visual Studio terminology, these controls are called bound controls when they are connected to data-ready fields in a dataset. The list of controls you see now is a group of popular options for displaying string information from a database, but you can add additional controls to the list (or remove items) by clicking the Customize command. In this case, however, you'll simply use the TextBox control, the default bound control for string data.
Click TextBox in the list, and then drag the Instructor field to the middle of the form in the Windows Forms Designer.
As you drag the field over the form, a plus sign below the pointer indicates that adding this database object to a form is a valid operation. When you release the mouse button, Visual Studio creates a data-ready text box object and places a professional-looking navigation bar at the top of the form. The form looks something like this:
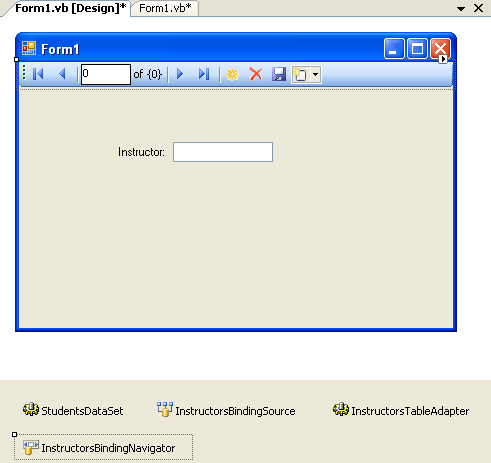
Visual Studio has actually created two objects for this Instructor field: a descriptive label object containing the name of the field, and a bound text box object that will display the contents of the field when you run the program. Below the form in the component tray, Visual Studio has also created several objects to manage internal aspects of the data access process. These objects include:
StudentsDataSet, the dataset you created with the Data Source Configuration Wizard to represent fields in the Students database
InstructorsBindingSource, an intermediary component that acts as a conduit between the Instructors table and bound objects on the form
InstructorsTableAdapter, an intermediary component that moves data between StudentsDataSet and tables in the underlying Students database
InstructorsBindingNavigator, which provides navigation services and properties related to the navigation toolbar and the Instructors table.
Several of these objects replace Visual Studio .NET 2003 features—for example, the table adapter object is a replacement for one or more data adapter objects in Visual Studio .NET 2003, which can hold data related to only one database table or query at a time. (For this reason, Visual Studio .NET 2003 projects sometimes require multiple data adapter objects, whereas Visual Studio 2005 projects require only one table adapter.)
Now you'll run the program to see how all of these objects work.
Click the Start Debugging button on the Standard toolbar.
The ADO Form program runs in the IDE. The text box object is loaded with the first Instructor record in the database (Delamarco, Stefan), and a navigation toolbar appears at the top of the form, as shown in the following illustration:
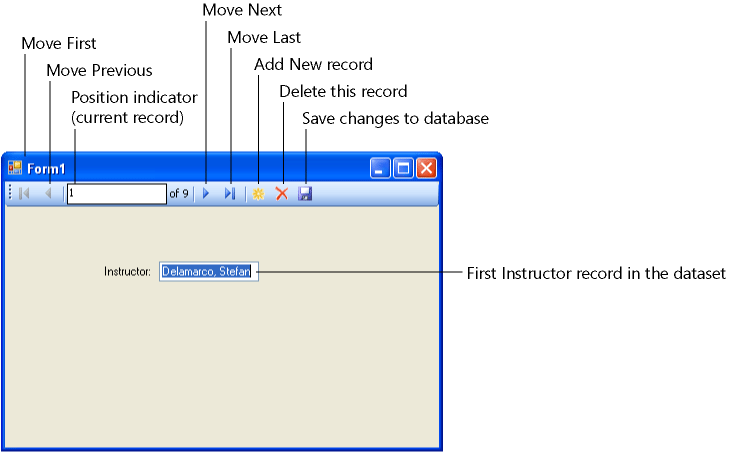
The navigation toolbar is an impressive addition to the Visual Studio 2005 database programming tools. It contains Move First, Move Previous, Move Next, and Move Last buttons, as well as a current position indicator and buttons that (when properly configured) add new records to the dataset, delete unwanted records from the dataset, and save a modified dataset to disk. You can change or delete these toolbar buttons by setting the Items property for the binding navigator object in the Properties window, which displays a visual tool called the Items Collection Editor. You can also enable or disable individual toolbar buttons.
Click the Move Next button to scroll to the second instructor name in the dataset.
The McKay, Yvonne record appears.
Continue scrolling through the dataset one record at a time. As you scroll through the list of names, notice that the position indicator keeps track of where you are in the list of records.
Click the Move First and Move Last buttons to move to the first and last records of the dataset, respectively.
Delete the last record from the dataset (Halvorson, Kim) by clicking the Delete button.
The record is deleted from the dataset, and the position indicator shows that there are now 8 records remaining. (Halvorson, Michael has become the last and current record.) Your form looks like this:

As I mentioned earlier, the dataset represents only the subset of tables from the Students database that have been used in this project—the dataset is a disconnected image of the database, not the database itself. Accordingly, the record that you deleted has been deleted only from the dataset that is loaded in memory while the program is running. However, to verify that the program is actually working with disconnected data and is not modifying the original database, you'll stop and restart the program now.
Click the Close button on the form to end the program.
The program terminates, and the IDE returns.
Click Start Debugging to run the program again.
When the program restarts and the form loads, the navigation toolbar shows that the dataset contains 9 records, as it did originally. In other words, it works as expected.
Click the Move Last button to view the last record in the dataset.
The record for Halvorson, Kim appears again. This final instructor name was deleted only from memory and has reappeared because the underlying database still contains the name.
Click the Close button again to close the program.
Congratulations! Without writing any program code, you have built a functioning database application that displays specific information from a database. Setting up a dataset has taken many steps, but the dataset is now ready to be used in many useful ways in the program. Although I selected only one table and two fields from the Students database to reduce screen clutter and focus our attention, you will probably want to select a much wider range of objects from your databases when you build datasets using the Data Source Configuration Wizard. As you can see, it is not necessary to create bound objects for each dataset item on a form—you can decide which database records you want to use and display.
EAN: N/A
Pages: 168