Dragging and Dropping Transitions
| You can place transitions in the timeline in three different ways:
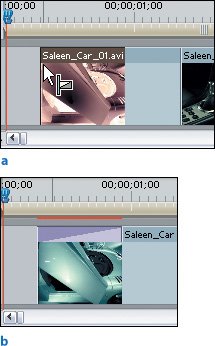
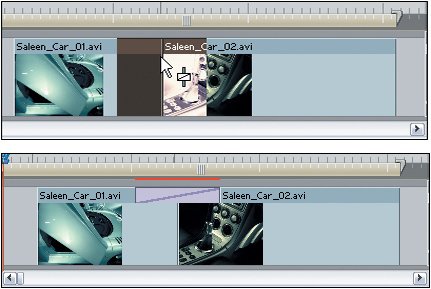
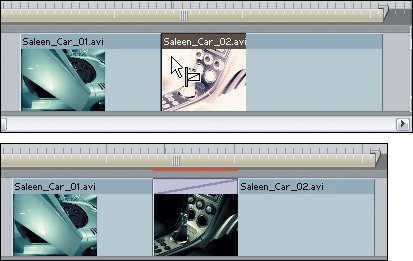
The method used depends on the surrounding media and the mouse position when you release the transition. Adding Transitions to a Single ClipWhen you are working with a single clip, such as when you fade up a clip from black, you'll want to use the starting or ending at the cut methods. Starting at the cut means that when you drop a transition into the timeline, the transition will start from the cut point at which you inserted it. For example, you want your project's first clip to fade up from black, so you need a transition to start at the cutat the start of that initial clip (Figures 7.10a and b). Grab the Cross Dissolve (Video Transitions/Dissolve), and drag it to the head of that clip. Because there is no adjoining media to the left of the first clip, you see a blue line on the left, indicating the transition's start, and the transition icon to the right, indicating where the transition occurs. Notice the darkened area that appears when you hold the transition over the head of the shot. This shows you the transition's duration. Release the mouse to add the Cross Dissolve to the clip. The clip will now have the transition "Band-Aid" covering its head. Figures 7.10a and b. A single-sided transition is being added to the head of the clip (a). Because there is no material before the shot, the cursor displays the transition icon for starting at the cut. The darkened overlay area represents the content that the transition will cover. In 7.10b, you can see the results Ending at the cut is opposite of starting at the cut. To fade a clip out, for example, drag the transition to the right edge of the last clip (Figure 7.11). This time the blue line is on the right and the transition icon on the left, indicating the transition ends at the cut point onto which you drop the transition. Figure 7.11. The opposite of Figure 7.10, this transition ends at the cut. The clip will fade down to the black empty space of the track Remember, to have a transition starting or ending at the cut, you cannot have any adjoining material near the clip. Any material directly to the left or right of the clip will be incorporated in the transition. For a clean starting or ending transition from or to black, for example, you need at least a one-frame gap of empty space to ensure the transition does not connect material. Adding Transitions Between Two ShotsTo create a balanced transition between two shots, center the transition at the cut. Centering is an option only when you are cutting between two shots. When you drag a transition over the cut point between two shots and hold the mouse directly over the center of the cut, the blue line appears in the middle of the transition icon. This means that the transition will have half of its duration on one side of the cut and half on the other (see Figure 7.12). Figure 7.12. Drag and drop a transition directly over the cut point between two clips for a balanced, centered transition that connects the two shots Premiere uses an equal number of frames from each shot to display the transition properly. If you have a 30-frame transition centered on the cut between shots 1 and 2, Premiere needs 15 additional frames from the head of shot 2 and 15 frames from the tail of shot 1. If you only had 10 frames extra from shot 2, Premiere adjusts the transition duration to 20 frames and uses 10 extra frames from each shot to ensure the transition remains centered. Sometimes you don't want or need such perfect symmetry in your transition, however, which brings us back to the techniques of starting and ending at the cut with two adjacent clips. Drag a transition to the left side of a cut between two shots to get the icon for a transition that ends on the cut (Figures 7.13a and b). The current cut point between the shots will be the end of the transition when you add it to the timeline. Premiere adds additional material from the second shot so that the transition occurs properly. If you had a 30-frame transition ending on the cut from shot 1 to shot 2, for example, Premiere needs an additional 30 frames from the head of shot 2 for the transition to display properly. If there is not enough material, say you only had 20 frames, then Premiere assigns the transitions duration to be 20 frames instead. Figures 7.13a and b. When you drag and drop a transition slightly to the left of the cut, you see the ending at the cut icon (a). The transition still applies to both clips and will complete at the current cut point with the image entirely focused on the incoming shot Drag just to the right of the cut between shots 1 and 2 to get the icon for a transition that starts on the cut (Figure 7.14). Using the default duration from the previous example, the transition would need 30 additional frames of tail material from shot 1 to start at the cut and transition to shot 2. Again, if fewer frames are available, Premiere will shorten the transition's duration accordingly. Figure 7.14. When you drag and drop just to the right of the cut between two clips, you see the icon for a transition that starts at the cut. With audio clips, transition placement functions the exact same way At some zoom magnifications, you may not have enough space to drag to the left or right of the cut to place a starting or ending at the cut transition. If you are zoomed out such that a few pixels are a few seconds, you will be able to target the center of the cut only. Not to worry, the Effect Controls panel can very easily adjust the alignment of a transition that has already been placed. Keyboard Shortcuts and Adding Your Default TransitionsIf all this dragging and dropping of transitions has your mouse a bit tired, you can assign your default transitions to the timeline with a few simple keystrokes: Ctrl+D to add a video transition, Ctrl+Shift+D to add an audio transition. To assign a default transition to the timeline, you must first target a track and then identify the location of placement using the position of the Edit Line. For a transition to be properly added, the Edit Line must be resting over clip content on the targeted track and in close proximity to or exactly at a cut point. You can apply default transitions to both audio and video clips in only three basic ways:
Using the keyboard shortcut to advance to the next edit point (Page Up and Page Down), you can quickly navigate to a cut point and then press Ctrl+D to add a video transition or Ctrl+Shift+D to add an audio transition. Just pay attention to which tracks are targeted and where the Edit Line rests. Now that you know how to position transitions, take a look at the Effect Controls panel where you can adjust transitions that are already in the timeline. |
EAN: 2147483647
Pages: 200


