6.2. Styles and Themes Styles let you create a customized collection of format settings, give that collection a name , and store it in a spreadsheet file. You can then apply these settings anywhere you need them. For example, you could create a style called Great Big Header that uses the Cambria font, pumps up the font size to 46 points, and colors the text bright red. Every Excel spreadsheet starts off with a collection of prebuilt styles. Microsoft designed these styles with two goals in mind: to give you quick access to most common and practical formatting choices, and to make great looking documents. To take a look at the styles waiting for you, choose Home  Styles Cell Styles. Figure 6-1 shows the gallery of options that youll see. Styles Cell Styles. Figure 6-1 shows the gallery of options that youll see.  | Figure 6-1. Excel's built-in styles are divided into separate categories according to how you might use them. The "Good, Bad and Neutral" category lets you separate the good news from the bad using the carefully shaded versions of the universal colors red, yellow, and green. The "Titles and Headings" category adds border formatting (Section 5.2.3) to make great titles. And the Themed Cell Styles category gives you a range of differently colored, differently shaded cells that are chosen to match harmoniously with one another based on the current workbook theme (Section 6.2.4). | |
You can apply more than one style to the same cell to get a combination of formatting options. For example, you could use the Currency style to get the right number format, and then pick the Bad style to flag a huge debt with a light red background fill. (Bad is simply the name of a prebuilt style that applies a light red background fill and a dark red font color.) If you apply more than one style and they conflict (for example, both styles use a different background color ), the style you applied last takes over. Styles use Excel's live preview feature, which gives you try-before-you-buy formatting. When you select a group of cells and then hover over one of the styles in the ribbon, your selected cells change instantaneously to reflect that style. Run your mouse over the different style options, and you see a quickly changing series of different formatting choices. To actually apply a style, click it.
Tip: Longtime Excel users will recognize the Number Format group of styles shown at the bottom of Figure 6-1. These styles are the only ones that Excel included in previous versions. The Number Format styles simply apply a different number format (Section 5.1.1), like Currency, Percentage, and so on. They don't change other appearance details. However, they're still useful. For example, you could use Currency style for all the dollar figures in your worksheet. Then, at some later point, you could modify that style (Section 6.2.2) to set a different currency symbol, alignment, or number of decimal places. This one change updates every cell that uses the Currency stylein this case, all the prices across your entire worksheet.
If this was all that styles offereda handy way to reuse good-looking formatting presetsthey'd still be quite useful. But wait, there's more: Excel styles come with two more invaluable features. First, you can create your own styles to reuse your own favorite formatting choices. Second, you can use themes to swap one set of styles for another. You'll learn how both these techniques work in the following sections. TIMESAVING TIP
A Quicker Way to Apply Styles | | The ribbon makes it fairly easy to work with styles. However, sometimes you may be in the middle of working with another ribbon tab and find it's just too inconvenient to jump back to the Home tab. If you're in this situation, you can make your life more pleasant by adding the style gallery to the Quick Access toolbar. To do so, choose Home Styles Cell Styles, right-click any style, and then choose Add Galley to Quick Access Toolbar. This adds a Cell Styles button to the Quick Access toolbar, where its available at all times. Click this button, and you see the familiar style gallery. If you get tired of the Cell Styles button on the Quick Access toolbar, right-click it, and then choose "Remove from Quick Access Toolbar". |
6.2.1. Custom Styles Styles really shine in complex worksheets where you need to apply different formatting to different groups of cells. For example, say you've got a worksheet that's tracking your company's performance. You're confident that most of the data is reliable, but there are a few rows that come from your notoriously hopeful sales department. To highlight these sales projections, you decide to use a combination of a bold font with a hot pink fill. And since these figures are estimated and aren't highly precise, you decide to use a number format without decimal places and precede the number with a tilde (~), the universal symbol for "approximately right." You could implement all these changes manually, but that'll take fourscore and seven years . Better to set up a style that includes all these settings, and then apply it with a flick of the wrist whenever you need it. Styles are efficiency monsters in a few ways: -
They let you reuse your formatting easily, just by applying the style. -
They free you from worry about being inconsistent because the style includes all the formatting you want. -
Excel automatically saves styles with your spreadsheet file, and you can transfer styles from one workbook to another. -
If you decide you need to change a style, you need just a few mouse clicks. Then, Excel automatically adjusts every cell that uses the modified style. Here's how you create a new style: -
Begin by moving to a cell in your worksheet that has the formatting you want to use for your style . The quickest way to create a new style is by using formatting you've already set up. However, you can also create a new style from scratch. In this case, you would simply move to a blank, unformatted cell in your worksheet. -
Select Home Styles Cell Styles New Cell Style . The Style dialog box appears, which lets you design your own styles. -
In the "Style name" box, type a name for your new style . For example, if you want to create a new style for column titles, enter the style name ColumnTitle. Each style name needs to be unique in your workbook. -
Choose the style options you want to set . Styles don't need to set every aspect of a cell. For example, you might want to create a style that applies new font and fill settings, but keeps the current number format (Section 5.1.1), alignment, and border details. When creating this style, you'd clear the Number, Alignment, and Border checkboxes, so these details aren't included in your style. Figure 6-2 shows an example. 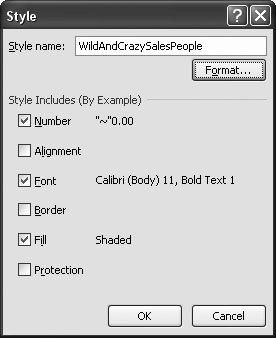 | Figure 6-2. Here, a new style, WildAndCrazySalesPeople, is about to be created. This style defines a number format as well as font and fill settings. If you don't want your style to include some of these settings, turn off the checkmark in the appropriate checkboxes. For example, if you want to create a style that applies a new font, fill, and border, but you want to keep the existing alignment and number format, turn off the Number and Alignment checkboxes. As a general rule, if you don't need to explicitly set a specific style characteristic, turn off the corresponding checkmark. | |
Tip: When you select many style checkboxes, you create a pumped-up style that does a lot at once. When you select only one or two style checkboxes, you create a less powerful style, but one that's more flexible. It can be used in a variety of cells that already have customized formatting, without changing the formatting characteristics you want to keep.
-
Click Format to specify the formatting options for the style . When you click Format, the familiar Format Cells dialog box appears. Use this dialog box to change formatting just as if you were formatting an individual cell. Click OK to close the Format Cells dialog box when you're finished. -
Click OK to close the Style window . Once you've created a style, applying it is just a matter of a few mouse clicks. Select the cell or cells you want to modify, choose Home Styles Cell Styles, and choose your style from the list (Figure 6-3). 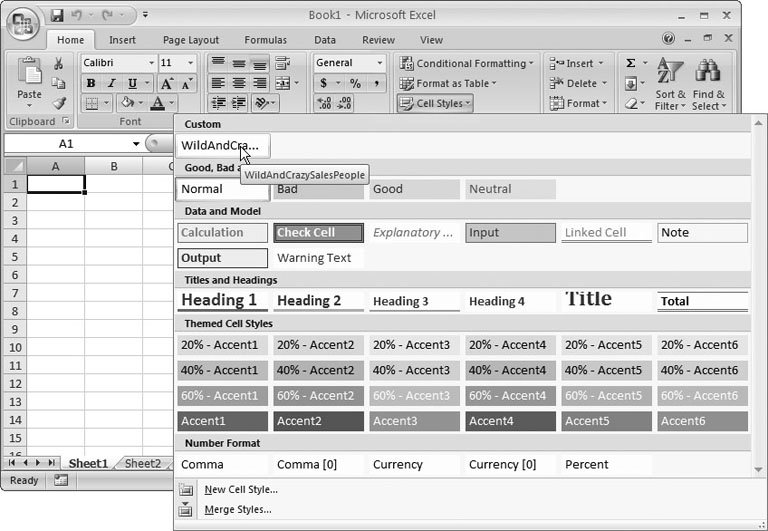 | Figure 6-3. The styles you create appear in a Custom group at the top of the list. (If you haven't created any styles, you won't see the Custom group at all.) | | 6.2.2. Modifying Styles Keep in mind that you can still modify the formatting of a cell after you've applied a style. But if you do find yourself overriding a style fairly frequently, and always in the same way, it probably indicates that your style isn't quite right. Either create more than one version of the same style, each with the appropriate settings, or clear some of the style checkboxes so that your style doesn't apply formatting settings that you commonly change. -
To modify a style, choose Home Styles Cell Styles, find the style you want in the gallery, right-click it, and then choose Modify. You wind up back at the familiar Style dialog box (Figure 6-2), where you can tweak it to your hearts content. You can use this approach to revise your own custom styles, or to change the built-in styles that Excel adds to every workbook. -
To duplicate a style, choose Home Styles Cell Styles, find the style you want in the gallery, right-click it, and then choose Duplicate. The Styles dialog box appears with the style youve chosen. Change the formatting as desired, choose a better name, and then click OK to add this style to the Custom category. -
To delete a style you don't want anymore, choose Home Styles Cell Styles, find the style, right-click it, and then choose Delete. 6.2.3. Transferring Styles Between Workbooks Once you've created a few useful styles, you'll probably want to reuse them in a variety of spreadsheet files. In order to reuse them, you need to copy the style information from one workbook to another. Excel makes this process fairly straightforward: -
Open both files in Excel . You need both the source workbook (the one that has the styles you want to copy) and the destination workbook (the one where you want to copy the styles). -
Go to the destination workbook . -
Choose Home Styles Cell Styles Merge Styles . The Merge Styles dialog box appears with a list of all files that you currently have open in Excel. -
Select the file that has the styles you want to copy into your active workbook, and then click OK . If there are any styles that have the same name, Excel prompts you with a warning message, informing you that it will overwrite the current styles with the styles you're importing. Click OK to continue. You can now use the styles that you've imported. These styles are now an independent copy of the styles in the source workbook. If you change the styles in one workbook, you don't affect the other workbook unless you merge the changed styles back into it.
Tip: If you want to automatically include your styles in new workbooks, consider creating a template that includes these styles. You can then create new workbooks based on that template. Chapter 16 has the full story.
TIMESAVING TIP
Turning Off Live Preview | | Most of the time, live preview is a great way for wishywashy spreadsheet writers to see formatting possibilities without committing. However, if you're using a heavily formatted workbook, you might find the live preview feature slows you down when you're scrolling through a lot of options. In this case, it might make sense to turn off live preview. To turn it off, choose Office button Excel Options, and then pick the Popular section. Under the "Top options for working with Excel, turn off the Enable Live Preview setting, and then click OK. Now you can zip around the ribbon, but you need to actually apply a formatting change (by clicking the appropriate button in the ribbon) before you see what it looks like. |
6.2.4. Themes: A Package of Styles As nice as the prebuilt styles are, they don't suit everyone. For example, the standard style colors favor subdued shades of red, gray, brown, and green, which make sense for the company accountant but aren't the most exciting choice for an urban hipster. To jazz things up, you can choose a different theme that features livelier colors. When you do, your entire worksheet gets an immediate faceliftyou don't need to track down each individual cell and reformat it. Technically, a theme is a combination of three ingredients : -
Fonts . Every theme has one font that's used for headings and another one that's used for everything else. These two fonts might be different sizes of the same typeface, or two complementary typefaces . -
Colors . Every theme has a palette of 12 complementary colors. The cell styles that appear under the Themed Cell Styles heading (see Figure 6-1) draw upon these colors for text and background fills. Best of all, these colors don't reflect the preferences of Cheeto-munching programmers. Instead, bona fide artsy types chose themin this case, professional designers on the Microsoft payroll. -
Effects . Effects are fine alterations that pretty up shapes and other hand-drawn graphics that you can create with Excel's drawing tools (Chapter 19). If you don't have any shapes on your worksheet, the effect settings don't do anything. To choose a theme, choose Page Layout Themes Themes to see a gallery of choices (Figure 6-4). The secret to understanding themes is realizing how changing the theme affects your worksheet. In other words, how does Excel apply the theme's fonts, colors, and effects to your worksheet? The following sections break it down. 6.2.4.1. Fonts Every workbook has a standard body font that it uses in every cell. Excel uses this standard font unless you explicitly choose a different font using the ribbon's Home Font section or the Format Cells dialog box. 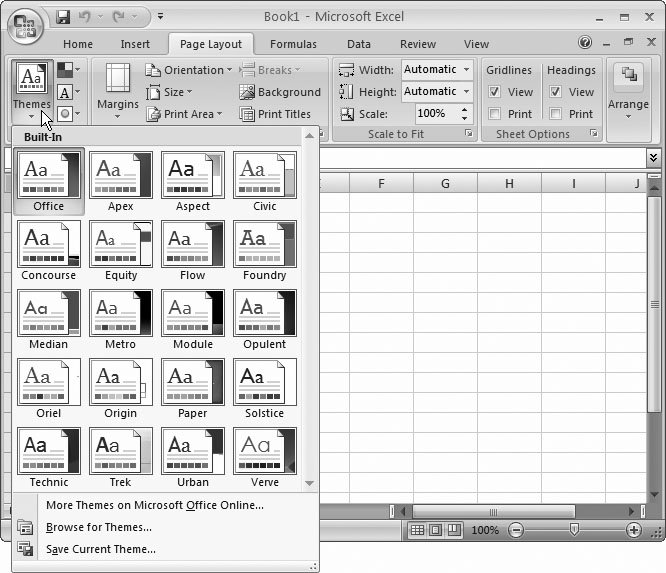 | Figure 6-4. Every workbook begins using the crowd -pleasing Office theme, but you have a long list of other options. You can even search Microsoft's Office Online Web site for hot new themes. As you hover over a new theme, your workbook adjusts itself automatically, thanks to the magic of Excel's live preview feature. | |
In a brand new Excel spreadsheet, everything you type starts out in easy-on-the-eyes 11-point Calibri font. If you apply a new theme, you get a new standard font. For example, switch to the traditionally styled Apex theme, and you'll get the elegant Book Antiqua font instead.
Note: All the fonts used in Excel themes are installed as part of Microsoft Office.
The same sort of magic works with the heading font , but it's more limitedin fact, the only style that uses the heading font is Title. If you use the Title cell style and switch from one theme to another, Excel updates your cell to use the heading font from that style. In some themes, the heading font is the same as the standard body font (as it is for the standard Office theme). In other themes, these two fonts are different, but complementary. For example, the Apex font uses the stylish Lucida Sans font for all titles.
Note: You might assume that the heading styles (Heading 1, Heading 2, Heading 3, and so on) use the heading font. Oddly enough, that's not how it works. All the heading styles use the body font. Title is the only style that uses the heading font.
If you're feeling a bit reckless, you can override the default font that Excel uses for all new workbooks. To override it, select Office button Excel Options, and then choose the Popular section. Under the "When creating new workbooks heading is a "Use this font" and a "Font size" setting where you can set the standard font and font size. Ordinarily, the default font isn't set to a specific font at allinstead, it's set to the special value Body Font. This tells Excel to apply the standard font from the current theme. Usually, this is the choice you want because it lets you quickly adapt your entire spreadsheet to a theme of your choosing. 6.2.4.2. Colors Every theme relies on 12 key colors. When you move from one theme to another, Excel swaps in the new set of colors. Excel alters any place where you've used the 12 theme colors. However, other colors aren't affected.
Note: Although there are only 12 base colors in a theme, Excel varies the saturation of the color to make it bolder or lighter, based on the style you use. For example, the Office theme includes a steel blue color that you can use at full strength (with the style named Accent 1), or lighten to a faint gray-blue mist (with the style named 20% - Accent 1).
To make this system a bit clearer, imagine a designer runs amok, formatting cells with different background fills. Some of these cells are filled with theme colors, while others are filled with custom colors. (Figure 6-5 shows the difference.) When you switch themes, the cells that have the theme colors are changed, while the other cells aren't. 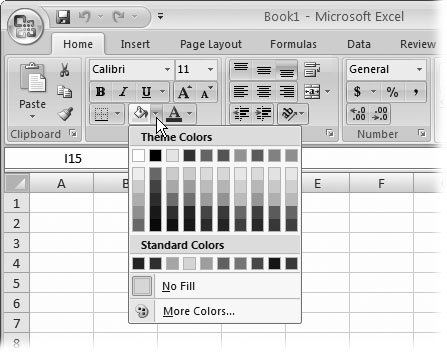 | Figure 6-5. When you set the background fill in a cell, you can pick one of the theme colors (at different saturations), you can use a standard color (which gives you the standard red-green-blue lineup), or you can click More Colors to pick a custom color of your own design. You have the same choices when picking the foreground color for your text. | |
Tip: You're always better off using the theme colors rather than picking a new custom color. That way you can give your workbook a facelift by switching from one theme to another, and the colors still match. On the other hand, if you choose custom colors that look nice with a specific theme, they're likely to clash horribly when you change to another theme.
Experienced Excel workers rarely waste time picking background and foreground colors out of the ribbon. Instead, they use styles. Any time you use one of the styles from the Themed Cell Styles category (Home Styles Cell Styles; see Figure 6-1), youre applying a theme-specific color. As a result, if you pick another theme, all the themed cell styles change to use the new color. The theme system works well because each color in a theme plays a specific role. In other words, some colors are intended for text, while others are designed to play the role of a complementary background; a few more add eye-catching accents. To see the intended purpose of each color, hover over it in the ribbon (Figure 6-6). 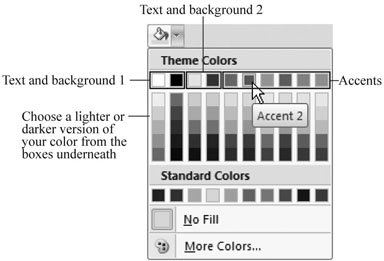 | Figure 6-6. Here, the mouse is over one of the six accent colors that are present in every theme. You can also choose from four colors that are intended for standard text and background fills (on the left). | |
6.2.4.3. Effects Effects are the simplest part of any theme because Excel applies them with no work on your part (all you need to do is switch themes, and then the Effects kick in). Excel automatically applies effects to any graphics you've created. You'll learn more about creating shapes and other illustrations in Chapter 19. 6.2.5. Modifying Themes Excel gives you the ability to use just part of a theme. For example, what if you want the casual fonts from the Office theme but want to use them in conjunction with the rich reds of the Opulent theme? The Excel designers might cringe at your combination, but there's no reason to hesitatefrom the Page Layout Themes Themes gallery, just choose the Office theme, and then, from the Page Layout Themes Colors list, pick the Opulent colors (Figure 6-7). 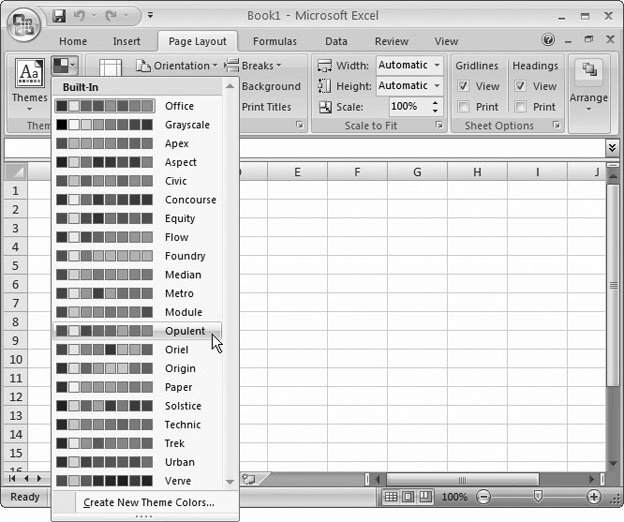 | Figure 6-7. Using the ribbon, you can apply just the colors (as shown here), just the fonts, or just the effects from a theme of your choosing. This technique lets you mix and match different theme parts (which is a bit of a no-no for the artistically minded). | |
A more interesting possibility is the way Excel lets you create a brand new custom theme with your own personalized combination of colors and fonts. Here's how: -
From the Page Layout Themes Themes gallery, choose the theme you want to use as a starting point . -
Themes Fonts Create New Theme Fonts. The Create New Theme Fonts dialog box appears (Figure 6-8). 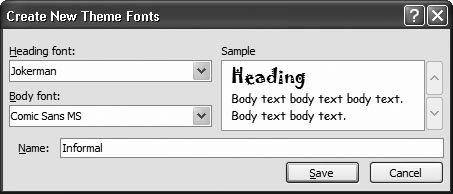 | Figure 6-8. The Create New Theme Fonts dialog box doesn't let you choose font sizes, but you can pick two complementary typefaces: one for body text and one for headings. Before you click Save, enter a descriptive new name. | | -
Choose your fonts, enter a name for your font combination (like "Informal"), and then click Save . Your font selection appears in the Page Layout Themes Font list so you can use it with any theme. -
Themes Colors Create New Theme Colors. The Create New Theme Colors dialog box appears (Figure 6-9).  | Figure 6-9. The Create New Theme Colors dialog box shows all 12 theme colors, and lets you adjust each one. Microsoft designed the first two colors to be used together as foreground and background colors. The second two colors offer an alternate foreground and background pair. The next six are accented colors for cell backgrounds to highlight important values, and the final two colors are used with Web-style links (Section 26.3). As you adjust colors, Excel updates the tiny preview pictures. | | -
Choose your colors, enter a name for your color combination (like "Wacky Office Temp"), and then click Save . Your new color palette appears in the Page Layout Themes Colors list, so you can use it with any theme. -
Themes Themes Save Current Theme. If you want to reuse your theme in other workbooks (or share it with friends ), you can save your fonts and colors as a .thmx theme file. To apply your custom theme later on, just choose Page Layout Themes Themes Browse for Themes, browse to your .thmx file, and then choose it. POWER USERS' CLINIC
Different Office Applications, Same Good Style | | Excel shares its theming system with Microsoft Word and PowerPoint. That means you can create a .thmx theme file in Excel, and then use it to set document colors in Microsoft Word, or vice versa. That way, you can create memos in Word, presentations in PowerPoint, and reports in Excel that share the same hot colors. In fact, you don't even need to create a .thmx file to use this feature (although it's always a good idea). Your theme settings are stored directly in your document file, whether it's an Excel spreadsheet (.xlsx), a Word document (.docx), or a PowerPoint slide deck (.pptx). To pull theme settings directly out of one of these files and place them in your current Excel spreadsheet, choose Page Layout Themes Themes Browse for Themes, and then select the file whose theme you want to use. |
|