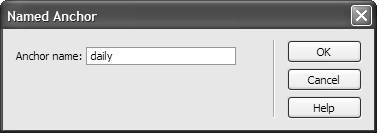
Adding Named Anchors


Normally, when a new Web page is displayed, it does so showing the very top of a page. Adding an anchor to a link allows you to choose to display the page starting at a given point on a page. In order to use an anchor, you'll need to create at least two things: the anchor itself, and then the link to that anchor.

To create an anchor:

1.
Open your document, and click in the spot in the file where you want the named anchor to be.

2.
On the Insert Bar, click on the Named Anchor button, and the Named Anchor dialog will appear ( Figure 7.14 ).

Figure 7.14. The Named Anchor dialog lets you create a new anchor on your page.


3.
Choose a name for the anchor that will be unique for this page. Remember also that this anchor is going to be part of a URL, so it can only contain characters that are valid: no spaces, ampersands, question marks, etc.

4.
Click OK. In the spot where you created the new anchor, an anchor icon will appear ( Figure 7.15 ). If you click on that anchor, the tag selector will show the anchor with its name, and the Property Inspector will allow you to modify the name ( Figure 7.16 ).

Figure 7.15. The part of the page shown here has two anchors: the selected one is blue, and the unselected one is yellow.


Figure 7.16. The Property Inspector for a named anchor.


To link to an anchor on the same page:

  • Follow the directions from "Creating Text Links" earlier in this chapter, but drag the Point To File icon to the Named Anchor icon on the page. The selected text will now be linked to the new anchor.

Tip

  • It's possible that the Point To File icon and the Point To File arrow can end up going to different spots on the page. The one that matters, in this case, is the icon itself, not the tip of the arrow.


To link to an anchor on another page:

  • If the two files are open in different windows , place the windows such that you can see both the link source and the link destination. Then, follow the directions for linking to an anchor on the same page, but drag the icon to the separate page.

    or

    If you're using Dreamweaver's tabbed interface, you won't be able to see both the link source and the destination at the same time, so you'll have to add the anchor part of the link manually. Follow the directions from "Creating Text Links" earlier in this chapter, and when that's complete, click in the Link field in the Property Inspector and add a # followed by the anchor name to the end of the existing link. So if you want to link to the chap07 anchor on the dw8vqs.html page, your link would be to dw8vqs.html#chap07 .


Macromedia Dreamweaver 8 for Windows & Macintosh Visual QuickStart Guide
Macromedia Dreamweaver 8 for Windows & Macintosh
ISBN: 0321350278
EAN: 2147483647
Year: 2005
Pages: 239

flylib.com © 2008-2017.
If you may any questions please contact us: flylib@qtcs.net