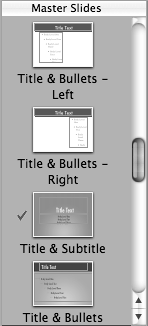
| Most of the time, you'll probably be happy with the styles and layouts in the master slides from the theme that you are using. But each presentation is different, and sometimes you want to change one or more of the slide masters to better fit the content of your presentation. You'll do this by making changes to one or more of the master slides in your presentation. It's important to understand that modifying a master slide changes it only for the presentation file you are currently working in; it doesn't modify the copy of the master slide that is in the theme file, and your changes also don't modify master slides of the same name in other themes. A big change in Keynote 2 is that a single presentation file can contain more than one theme, including all of the master slides within each theme ( Figure 3.5 ). Again, changing master slides in your presentation file does not change any of the master slides in the theme files. 
You'll find much more information about modifying master slides in Chapter 13, "Creating Custom Master Slides." To modify a master slide | 1. | Choose View > Show Master Slides to display the Master Slides Organizer.
| | 2. | Click the Inspector button in the Toolbar to display the Inspector window.
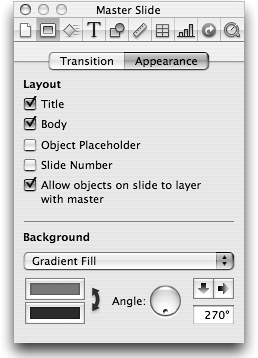
| | 3. | Select the slide master that you wish to change. The Inspector window changes to the Master Slide Inspector ( Figure 3.6 ).  | | 4. | Select elements on the master slide and modify them, or add new elements.
See Chapter 4 for more information on modifying text boxes, and see Chapter 5 for more information on modifying graphics. If you want to change the slide background, see the next section in this chapter.
| | 5. | When you're done making changes to the master slide, select another master slide to modify, or click on one of the slides in the Slide Navigator to continue editing your presentation.
|  Tips Tips -
Keynote only allows you to have one Body text box per slide, which is the text box that has bulleted text. You can create other text boxes on your slides, but they can't contain bulleted text. -
Unfortunately, Keynote can't automatically display the date or time on your slides, as PowerPoint can. Keynote also lacks the ability to insert headers or footers throughout your presentation, another handy PowerPoint feature.
| You can use either the Master Slide Inspector or the Slide Inspector to enable slide numbering in Keynote. In Keynote, all the slides are numbered sequentially from the first slide in the presentation to the last. When you select the "Slide Number" check box in the Appearance tab of the Master Slide Inspector, a number box appears on the slide master, and slides using that master will display the slide number ( Figure 3.7 ). If you want to turn slide numbering on or off for a particular presentation slide, use the "Slide Number" check box in the Appearance tab of the Slide Inspector. Note that you must turn slide numbering on for each master slide that you use in your presentation where you want the number to appear. You probably won't want slide numbering turned on for all master slides; for example, most presentations don't use slide numbers on the first slide. 
You can change the font and style of the slide numbering text box, but you can't control the numbering format. So if you have that urge to use Roman numerals for your slide numbers, you'll have to place them in your slide manually. |
| Objects in Keynote, whether they are text boxes or graphics, are layered. Each object has its own layer, and you can move each layer forward or backward independently. So, for example, you can move a text box either in front of or behind a graphic, depending on the effect you are trying to produce. Master slides can be set to either allow layering with objects in your presentation, or not, depending on whether the "Allow objects on slide to layer with master" option in the Layout section of the Master Slide Inspector is selected. If you want everything on your slide to sit on top of the master slide, turn this option off. Sometimes, you'll want this option on, though; that's how Keynote's photo cutout slides work. The cutout is a graphic with a transparent section. When you place a photo on the slide, then send it to the back, it goes behind the photo cutout layer, which frames the photo. |
|


 Tips
Tips 