Scenario 1: Cannot Authenticate
| In this scenario, several possible problems are reviewed to demonstrate why authentication might fail when using the VPN software client. Each case identifies a possible problem, one or more solutions. This scenario is based on the assumption that you have completed the preliminary troubleshooting steps and have a working Internet connection. Different reasons exist for why VPN authentication might fail, and they are reviewed in this scenario.
Case 1: Bad Group Name or Group PasswordIn this case, the possibility of a bad group name or group password is examined. Typically, the user receives the error "Remote peer is no longer responding" or "Failed to establish a secure connection to the security gateway." It is difficult to determine what the problem is based on solely on the connection error messages, because a single error can parent multiple problems. The group name and group password is not the same as the username and password used for authentication on a Remote Authentication Dial-In User Service (RADIUS) server. The group name and password are stored on the VPN concentrator, and on the VPN client. In essence, it is a way for the VPN administrator to group different user requirements into different client groups and eventually to apply group features or policies to all members of the group. For example, some users' NAT within their home local-area network (LAN). When they connect to the concentrator, it must recognize that the user is NATing and adjust. The concentrator can tell if the user is NATing or not, based on the group name and password used to connect. The group name and encrypted password are stored on the .pcf file that is located within the C:\Program Files\Cisco Systems\VPN Client\Profiles folder. The best way to re-enter a group name and password for a specific profile is to clone the connection entry because the password is encrypted in the .pcf file, which contains the necessary information for the client to establish an IPSec tunnel to the concentrator. Further analysis on what you can do with .pcf files is included in some of the later cases, but for now, refer to Step 3 in the previous section of this chapter. The best way to troubleshoot this type of case is to examine the log for multiple Internet Security Association and Key Management Protocol (ISAKMP)/Oakley retransmissions while trying to initiate a connection. Refer to Example 22-4. If multiple retransmissions exist, it is likely that the group password is corrupted. To re-enter the group name and group password, get the group password from the VPN administrator and clone the connection entry by highlighting the entry you want to clone, then go to Options, Clone Entry. Simply fill in the name of the entry, group name, and password. Example 22-4. Example of a Connection Attempt with a Corrupted Group Password49 00:30:30.482 12/26/01 Sev=Info/6 DIALER/0x63300002 Initiating connection. <Output Omitted> 56 00:30:36.430 12/26/01 Sev=Info/4 IKE/0x63000013 SENDING >>> ISAKMP OAK AG (Retransmission) to 10.0.0.1 57 00:30:41.448 12/26/01 Sev=Info/4 IKE/0x63000013 SENDING >>> ISAKMP OAK AG (Retransmission) to 10.0.0.1 58 00:30:46.465 12/26/01 Sev=Info/4 IKE/0x63000013 SENDING >>> ISAKMP OAK AG (Retransmission) to 10.0.0.1 ! After four attempts to initiate an ISAKMP/Oakley key exchange with ! no response, the client stops sending. 59 00:30:51.492 12/26/01 Sev=Warning/2 IKE/0xE3000079 Exceeded 3 IKE SA negotiation retransmits... peer is not responding 60 00:30:51.492 12/26/01 Sev=Info/4 CM/0x63100014 Unable to establish Phase 1 SA with server "10.0.0.1 " because of "DEL_REASON_PEER_NOT_RESPONDING" ! The concentrator will never allow a client to begin phase 1 if ! the group password is invalid. <Output Omitted> When multiple backup concentrators are listed in the .pcf file, and if the VPN client cycles rapidly through all the connection entries and returns with "Failed to establish a secure connection to the security gateway," both the group name and password might be corrupted. If that is the case, clone the connection entry and re-enter the group name and password. Case 2: Prompted Multiple Times for Username and PasswordIn this case, you have already tested your Internet connectivity and lowered your MTUs. You are about to connect, but after entering username and password at the VPN username and password prompt, you do not connect. Instead, you continually get prompted for your username and password. This problem can be one of two things: Either there is a problem with the RADIUS username and password, or there might be an issue with one of the DNE miniports. Bad Username or PasswordNinety-five percent of the time, a bad username or password is related to a bad RADIUS account. Unfortunately, versions below VPN client v3.5 do not identify why you have to re-enter your password, it just keeps prompting you. The solution to this problem is to contact your network administrator (RADIUS administrator) and request a reset of your username and password. When using the VPN client release 3.5.1, if the RADIUS Expiry option is selected on the VPN 3000 concentrator as the IPSec authentication method for the group, the VPN concentrator can provide enhanced login failure messages to the VPN client describing specific error conditions. These conditions include the following:
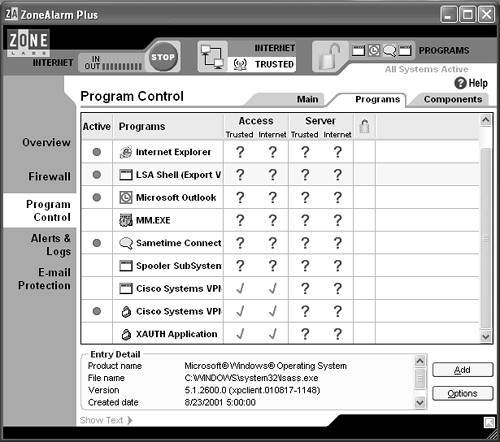
The "password expired" message appears when a user, whose password has expired, first attempts to log in. The other messages appear only after three unsuccessful login attempts. For more information on VPN client release 3.5.1, see www.cisco.com/univercd/cc/td/doc/product/vpn/client/rel3_5_1/351_3kcl.htm. Problem with the DNE MiniportTo troubleshoot the issue, DNE first must be explained. DNE is a network driver interface specification (NDIS) compliant module, which resides under the NDIS module of the Windows OS and is essentially an extension of NDIS functionalitysee more about DNE architecture under www.deterministicnetworks.com/dne.asp. DNE has solved numerous well-known problems when using competitive NDIS intermediate drivers, and it is available for Windows, Linux, HP-UX, and Solaris versions. DNE appears as a network device driver to all protocol stacks, and as a protocol driver to all network device drivers. It supports all known network protocols and network adapter types. Every physical device listed under the Device Manager of Windows OS, has a supporting DNE driverone for every LAN adapter (NIC card), USB driver, or wide-area network (WAN) protocol (Internet Protocol [IP], Point-to-Point Tunneling Protocol [PPTP], Layer 2 Tunnel Protocol [L2TP]). If any physical adapter or protocol has ever been installed and then later removed from any particular system, the DNE supporting driver still exists until it is removed manually. If the DNE extension is installed, the newly installed physical driver or protocol obtains a newly populated DNE driver. The DNE extension includes DNE plugins, which can be invoked when inbound or outbound packets match prespecified filters. A DNE plugin written for one operating system usually requires only to be recompiled to run on other operating systems. The number of filters is not defined; there can be thousands of them. The DNE plugins provide frame or packet inspection (including MAC-level), to modify, delete, insert, or redirect them. The redirect function is especially important when redirecting packets from a virtual VPN IP to the ISP's IP address. In DNE-related issues, the user has a valid RADIUS account but still is unable to authenticate. The user gets prompted for username and password multiple times, and cannot authenticate. For this case, you should always check the Windows Device Manager for bad DNE miniports. To check DNE functionality, first open the Windows Device Manager by right-clicking My Computer, and select properties. From the Properties window, select the tab labeled Hardware, then click Device Manager. Scroll down to the Network Adapters and expand the window by clicking the + next to it. From there, you should see a list of your network adapters. Remove any extra Ethernet adapters that are bound to a DNE miniport with a red cross through it. There must be at least one functioning DNE miniport bound to each adapter, so make sure not to remove them all. After removing all the extra disabled DNE miniports, try the connection again. Case 3: Firewall SoftwareSeveral different firewall software solutions are available for home users, but the three leaders are ZoneAlarm, Black Ice, and Norton Personal Firewall. Cisco recommends using Zone Lab's ZoneAlarm with the Cisco VPN 3000 client because of its compatibility with the VPN client. Although Cisco recommends ZoneAlarm, we also show you how to configure NetworkIce's BlackICE, another popular software firewall. Despite what firewall client you choose, you must allow all VPN applications and port numbers. There are a couple of reasons why Cisco endorses ZoneAlarm, besides the fact that it is compatible with the Cisco VPN client. One major reason is its ease of use, by using applications instead of port numbers to block data. So you see what applications are trying to access your computer, and you can then make better decisions on whether to block them or not. ZoneAlarm Pro is compatible with Microsoft Windows 95/98/Me/NT/2000 and XP. A majority of Cisco employees that use firewall software use ZoneAlarm. NOTE As of December 2001, Cisco embedded ZoneAlarm stateful firewall into the new release of the Cisco VPN 3.5 client. For more information, visit www.zonelabs.com/store/content/home.jsp. ZoneAlarm ConfigurationGetting the VPN client to work with ZoneAlarm is actually pretty simple. When ZoneAlarm is first installed, it blocks everything and is in stealth mode; no one on the Internet can see you. As you start bringing up applications that need to access the Internet, it asks you if you would like each application to access the Internet. The first time you try to connect with the VPN client, you are prompted three times to permit access. First, for the cvpnd.exe, second for the ipsecdialer.exe, and lastly for the Extended Authentication (Xauth) application (VPN user authentication). After you approve the application, they are placed into ZoneAlarm's programs, see Figure 22-4. From there, you will need to grant Trusted and Internet Access in ZoneAlarm Plus and Allow Connect in ZoneAlarm Pro. This will allow the VPN client to traverse through ZoneAlarm freely. Figure 22-4. Allowing the VPN Client to Pass Through the ZoneAlarm Software Firewall
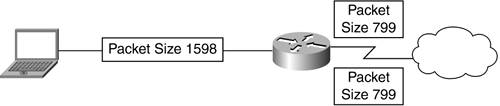
Network ICE BlackICE Defender ConfigurationNetwork ICE BlackICE Defender is a traffic monitoring security product. If you properly configure it, BlackICE Defender can work with the VPN client. It must be configured in Trusting, Nervous, or Cautious mode, and if you use Nervous or Cautious mode, you must add the public IP address of the VPN concentrator to the list of trusted addresses. You can configure the VPN client to work with Paranoid mode when using Tunnel-everything mode. Split Tunneling requires BlackICE to be in Trusting, Nervous, or Cautious mode. The Cisco VPN client firewall has the following requirements for BlackICE (BlackICE Defender 2.5 or greater, or BlackICE Agent 2.5 or greater). For BlackICE Defender 2.5, copy the BICTRL.DLL file from the Cisco installation release medium to the BlackICE installation directory on the VPN client PC. This is a mandatory step for making a connection with BlackICE. BlackICE Defender version 2.9 and greater includes the BICTRL.DLL file in the Network ICE distribution medium, so you do not need to copy it from the Cisco installation release medium. Some types of firewall software require you to enter specific port numbers to access the Internet. The port numbers that the VPN client requires to be open are covered in Scenario 5, Case 1. Case 4: MTU Set HighIf the user has gone through Case 1 and verified that the Internet connectivity and routing is functioning, the next step is to check the MTU. In this case, you analyze why the user cannot authenticate when trying to initiate an IPSec tunnel with the MTU set at 1500. One of two things can happen: Either the user cannot authenticate at all, or the user can pass data successfully. If the user can authenticate but cannot pass any data, see Scenario 2, Case 1. The size of the MTU is an integral part for a successful VPN connection. The MTU for the most common encapsulation of IP over an Ethernet transmission link (www.faqs.org/rfcs/rfc894.html) is 1500 bytes. By convention, the MTU includes the entire IP datagram, including all IP headers, but excludes link encapsulation headers. See Chapter 21, "Remote Access VPN Troubleshooting," for details. IPSec causes major issues with the MTU setting because it lengthens each IP packet by one, or possibly by two IP headers. The length of these headers depends on the type of IPSec protocol that you are using; however, the headers cannot exceed 80 bytes per packet. If an application emitted a 1500-byte packet that must travel though an IPSec tunnel, the added IPSec headers require fragmentation of each packet. See Figure 22-5. Most believe that the only downside to fragmentation in a worst-case scenario is some minor performance issues; however, fragmentation can cause the inability to pass data or the failure to authenticate with VPN. Figure 22-5. Fragmented Packets Traversing Through the Network
The best way to handle this problem is to avoid fragmentation completely. By lowering the interface MTU, your interface does not emit packets that need to be fragmented after IPSec encapsulation for transport through Ethernet-size-capable routers and links, as shown in Figure 22-6. Figure 22-6. MTU Emitting 1400-Byte Frames and Not Requiring Fragmentation
To illustrate the nuances surrounding lowering an MTU, the text discusses the following issues:
Determining What MTU Will WorkRemember that 1400 is not always the correct number; you might have to decrease the MTU even further, but 1400 is an excellent starting point. The MTU size depends on your ISP's equipment because your packets must traverse across their routers. To determine what the MTU size is on your connection, at the DOS prompt, type the following: C:/>ping -f -l [packetsize] [www.your_isp.com] where
If you exceed the MTU of the ISP, you receive the message "Packet needs to be fragmented, but DF set." If you receive this message, you must decrease the size of the packet and repeat the ping again. Continue this process until you receive a successful echo reply from the remote host. Assume that the first successful echo reply message is when the packet sizeis set to 1372. In calculating the MTU, remember that when you specify -l <n>, the IP packets that you generate are actually <n> + 28 bytes long. So when you apply the MTU size on your interface card, the size is 1372 + 28 = 1400. Applying the MTU Size to the PCA few ways exist to apply the MTU to your PC. The most common and simplest way is to use the SetMTU application that comes with the Cisco VPN client. See Figure 22-7. You can also adjust the MTU in the registry, or use applications such as TweakMaster (Rose City Software), but both are substantially more difficult and risky. TweakMaster is similar to the Cisco VPN SetMTU application, and if you are interested you can download it at www.pattersondesigns.com. Figure 22-7. The SetMTU Application
Adjusting the MTU Size in the RegistryIn some circumstances, you might find that MTU adjustment applications such as the Cisco VPN client Set MTU or TweakDUN application do not have the capabilities of lowering the MTU on some interfaces. In that case, you have the option of adjusting the MTU in the registry, which is all the MTU applications really do. This next section describes in detail how to lower the MTU in the following versions of the Windows operating system:
Windows 9xThere is an optional parameter in the registry called MaxMTU that can be associated with adapter bindings. Adding this optional key influences the outbound MTU, as seen by the IP protocol stack, and the announced maximum segment size (MSS) during Transmission Control Protocol (TCP) setup. If MaxMTU is missing from a binding, the default MTU for the adapter (1500 for Ethernet) is assumed. If you see fragmentation problems, set MaxMTU on your active TCP network interface to 1400. Remember to reboot after you make any registry changes because they do not take affect until the PC has rebooted. NOTE When adjusting settings in the registry, fairly minor changes in your networking configuration can cause the parameter to disappear. Please read the documentation suggested in the following links. The location of the MaxMTU in the Windows 9x registry is as follows: HKEY_LOCAL_MACHINE\System\CurrentControlSet\Services\Class\netTrans\000 n You can learn more about it at http://support.microsoft.com/support/kb/articles/q1584/74.asp. The location of the MaxMTU in the Windows NT registry is as follows: HKEY_LOCAL_MACHINE\SYSTEM\CurrentControlSet\Services Key: Adapter Name \Parameters\Tcpip For Windows 2000 and later, the MaxMTU value is located under the following key: HKEY_LOCAL_MACHINE\SYSTEM\CurrentControlSet\Services Key: Tcpip\Parameters\Interfaces\ID for Adapter NOTE There is a bug in the SP1 version of W2K, and MaxMTU does not work. Either upgrade to SP2, or delete MaxMTU from the registry. See http://support.microsoft.com/support/kb/articles/q120/6/42.asp for more information. Windows NT/2000You might prefer to follow the directions from Microsoft's web site. However, some easy steps to manually set the MTU value in Windows 2000 are described in the following list. This method is designed for Windows 2000, but it is similar for other Windows operating systems. You should only perform this process if you suspect that the Cisco VPN client SetMTU application is not functioning correctly. For example, if you still observe MTU-related issues, despite the fact that you have lowered the MTU, this is a good way to confirm that the MTU is set to your intended value. The steps are as follows:
If you are unsure of what adapter you are lowering the MTU on, try dropping the MTUs down on all adapters listed. It does not hurt your uplink to have the MTU set to 1400 instead of 1500. If there is no MTU field for that adapter, you can add one by highlighting the adapter, then go to Edit, and Add Value. Choose REG_DWORD from the drop-down menu, name it MTU, and press OK. Windows XP OnlyThis example demonstrates how to lower the MTU on a PPPoE adapter. First, locate the following key: HKLM\SYSTEM\CurrentControlSet\Services\Ndiswan\Parameters\Protocols\0
To do so,
Case 5: MTU Set LowThe last case discussed how lowering the MTU reduces problems with the IPSec connection; however, too low an MTU can inhibit the ability to authenticate. Cisco's remote access team has encountered many cases where the user was familiar with the MTU issue, and lowered their MTU to 576 without trying a higher number such as 1400. These users were trying to save time on reboots (you have to reboot each time you make an MTU change) by lowering it to 576, assuming that the lower the MTU the better the VPN works. This assumption is incorrect for two reasons: First, too low an MTU can inhibit the overall performance of your Internet connection, and second, it can cause the Xauth to fail during VPN authentication. |


EAN: 2147483647
Pages: 235