New Features in ISA 2004
| ISA 2004 is as different from ISA 2000 as ISA 2000 was from Proxy 2.0. ISA 2004 offers many new features, all of which are well documented on Microsoft's website. This section highlights a few new features that SBS administrators will appreciate the most. ISA Management MMCThe face-lift of the ISA Management MMC is the first thing that you'll notice (see Figure 23.1). It's now organized into three vertical panels. On the left is the navigation panel, in the center is the display of the item you've selected, and on the right is the task pad or toolbox. Getting around is easy, and the MMC is well organized. Figure 23.1. The new MMC for Internet Security and Acceleration Server 2004. ISA NetworksArguably the most important new feature of ISA 2004 is that it no longer trusts the internal network. Stateful inspection will be performed on all traffic in your network regardless of the source or destination. ISA 2000 only knew two networks, internal and external, and it completely trusted the internal network. In ISA 2004 you'll notice that by default SBS recognizes five networks: internal, external, LocalHost, VPN clients, and VPN quarantined clients, and it doesn't trust any of them. Having removed the LAT (Local Area Table), ISA is now free to handle unique relationships between the various networks. Each network that you specify can have a unique set of policies to handle the traffic for that network. One policy can be applied to several networks, or the policy can be applied to only one network. A couple of examples can be seen in the default configuration of the Firewall Policy (see Figure 23.2). Figure 23.2. The Firewall Policy rules are numbered. Policy is applied from the top down.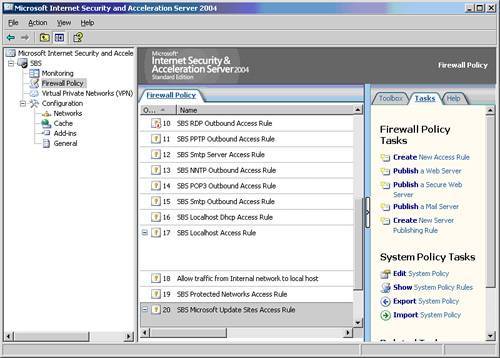
The policy Traffic Vetween VPN Client and Internal Networks allows VPN clients to access the internal network. If you look at the From and To columns, you'll notice that this policy applies to both the internal network and the VPN client network. Looking down the column you'll see other examples. Take particular notice of the network types All Protected Networks and All Networks (and LocalHost). These are known as network sets. Network sets represent more than one network and are there to simplify administration by grouping networks, much like groups in Active Directory. Two network sets are created by default. The ISA 2004 Help file describes them as follows:
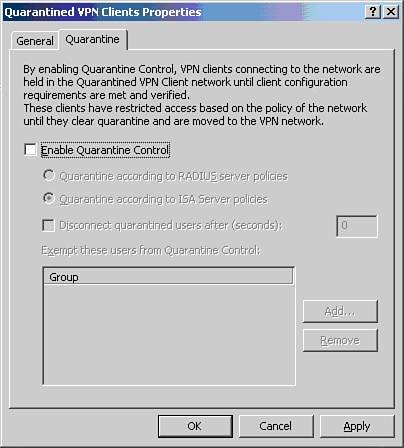
Remember one important thing about these preconfigured groups: Any new network you create will automatically be added to them. For this reason, use them with caution. For example, if you create a new network object called Wireless Network, it will automatically become part of the All Networks (and LocalHost) network set. Is this what you really want? Maybe, but maybe not. Say that you have traveling consultants come to your office with laptops, and they need Internet access. You only want the Wireless Network to get out to the Internet but not have access to anything on the internal network. If you have used the network set All Networks (and LocalHost) in a moment of laziness when you created a rule for access to your SQL Server or NAS device, you've also just allowed Wireless Network users to access those things too. VPN QuarantineAnother new feature is VPN Quarantine. ISA 2004 is fully integrated with the Windows Server 2003 VPN Quarantine feature. This allows you to create a sandbox for your VPN users to sit in while they are checked for a match with your VPN security policy. Your VPN security policy can require patches and virus protection, but beware that Microsoft hasn't provided much for the small business consultant to work with here. There are no wizards, no templates, just a development platform waiting for scripts that you'll have to write by hand. In sum, it's ugly at this point but still worth noting. As if just to tempt you, Microsoft has made it easy to enable VPN Quarantine even if you don't yet have the VPN security policy set up. You can enable VPN Quarantine, and all your VPN clients will be Quarantined and then disconnected when the time to comply with your VPN security times out. Figure 23.3 shows the VPN Quarantine Clients Properties configuration options. VPN Quarantine is a wonderful idea whose time is near. Many small businesses have sales staff working from hotels, cars, and home on PCs that are out of their direct control, but vendors have yet to step up and create the add-ins necessary for small business to use this feature easily. Figure 23.3. VPN quarantine settings. Apply or Discard?After you get started customizing the configuration of ISA 2004 Server, you'll quickly notice the presence of Apply and Discard buttons at the top of the ISA Management screen as shown in Figure 23.4. Even though you have made your changes and selected OK at the end of the change, you still have options. Doing nothing lets the changes remain dormant until you reboot or make a decision. Clicking Apply will apply your changes to new sessions only. Clicking Discard will undo your changes. Figure 23.4. Click the Apply button for your changes to take effect. Click Discard to cancel your changes.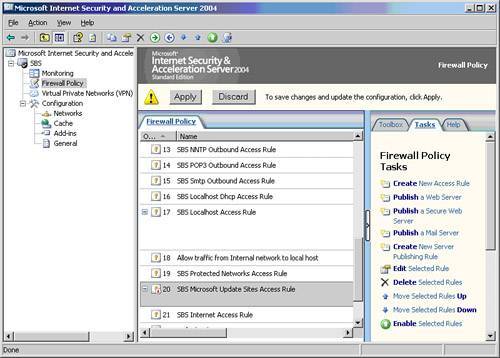 Note To have your changes apply to all sessions immediately you'll need to restart the Firewall Service or disconnect the sessions in the Sessions tab in Monitoring.
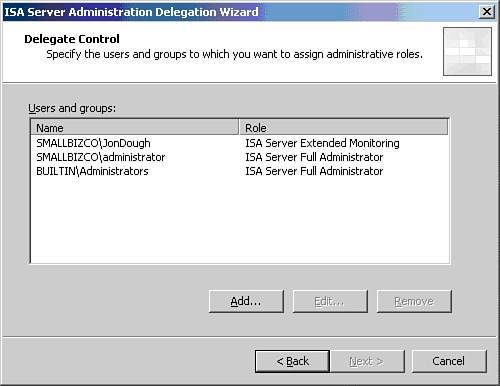
Administration DelegationAnother new feature is administration delegation, which is found under Configuration, General. You are now able to offer the business owner or other interested individual monitoring access to the ISA Server without running the risk that he will reconfigure something. ISA 2004 recognizes three different levels of admin: ISA Server Basic Monitoring, ISA Server Extended Monitoring, and ISA Server Full Administrator. From the ISA Server Help file, Table 23.1 shows what each level of delegation authorizes.
Administrators who have Extended Monitoring role permissions can configure all report properties with the following exceptions:
Most business owners, if they are interested in what the firewall is doing, are going to want to run reports from ISA 2004. Perform the steps in the following sections to set up administration delegation for extended monitoring and install the remote administration client on the person's desktop. Assign Administrator Delegation
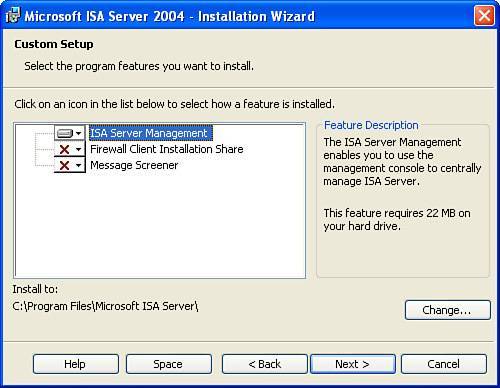
Install the Remote Administration ClientNow that you've designated who can monitor ISA you'll want to install the Management tool on the workstation that the admin will be using. Follow these steps:
|
EAN: 2147483647
Pages: 253