Accessing Exchange from the Macintosh
| As in the Windows world, people use many different email clients with the Macintosh platform. Two clients interface with Exchange directly (Outlook 2001 and Entourage 2004), whereas the rest must rely on POP3 or IMAP services to connect with the Exchange server. For example, all versions of Entourage prior to Entourage 2004 and Outlook Express for the Mac connect to an Exchange server using IMAP according to best practices. Other third-party mail clients generally use POP3 to connect to a mail server, but a few support both POP3 and IMAP. This section covers configuring both the Macintosh mail clients and the Exchange services on SBS to allow a variety of Mac-based mail clients to interact with the Exchange server in SBS 2003.
Enable IMAP on SBSExchange 2003 does not enable POP3 and IMAP by default as Exchange 2000 did. To allow Macintosh email clients to make an IMAP connection to the Exchange server, the IMAP service must be started and set to automatically start when the server boots. To do this, open the Services control panel, double-click on the Microsoft Exchange IMAP4 service, change the Startup Type to Automatic, click Apply, click Start, and then click OK. Caution When enabling IMAP services on the SBS 2003 server, you need to enable port 143 inbound on all firewalls if you want external clients to collect email using IMAP. Internal clients can connect as soon as the IMAP services are enabled, but you need to follow the instructions in Chapter 7, "Routing and Remote Access Service, VPN, and Firewalls," to enable inbound IMAP connections through the RRAS firewall, or review Chapter 24, "Internet Security and Acceleration Server 2004 Advanced Administration," to manually create a server publishing rule in ISA 2004 for IMAP. Outlook ExpressOutlook Express 5 is the latest release of Outlook Express for the Mac. Although it is an OS 9 product, it can be run under Mac OS X in Classic mode. Because Outlook Express 5 is an older product (it has not been updated since October 2002), it should really be used only as a stopgap measure to interact with the Exchange server for email until another, more robust mail client can be installed and used. If Outlook Web Access can be accessed from the Mac, it would be a better choice than Outlook Express in most cases.
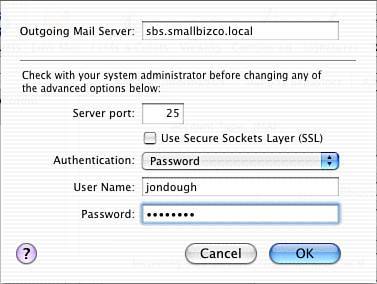
Follow these steps to add an IMAP profile to Outlook Express:
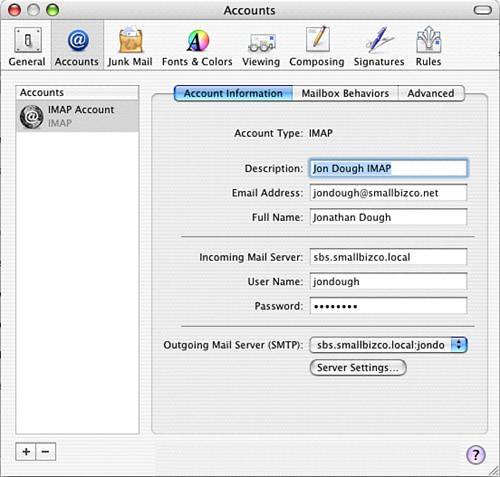
After the account has been configured, it displays in the folder list in the left pane of the Outlook Express interface. To start the initial connection with the Exchange server, click the Send & Receive button in the button bar. When the transaction completes, an expansion arrow appears next to the account folder. When this folder is expanded, Outlook Express displays the Inbox and a listing of all the unread messages. Figure 17.14 shows the default status of all the folders on the Exchange server in the Outlook Express configuration. By default, Outlook Express IMAP connections only connect to and download messages in the Inbox. Outlook Express downloads all the names of the folders for the mail account, but it does not download the headers of any messages in any of those folders until the folder is subscribed. To subscribe to a folder, select that folder in the right pane and click the Subscribe button in the button bar. At that point, Outlook Express adds the folder to the list in the left pane and downloads the mail headers for any items in that folder. Figure 17.14. Outlook Express for Macintosh can make an IMAP connection to the Exchange server.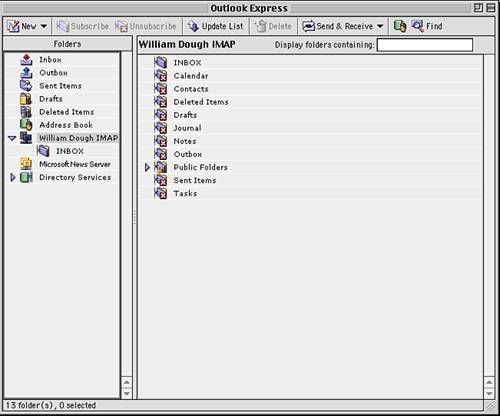 Mac OS X MailMac OS X includes an email application, called Mail, with the OS. During the initial Macintosh setup, the user is prompted to configure Mail to connect to the .Mac mail service, but additional accounts can be added to Mail, including IMAP connections to Exchange on SBS. Follow these steps to add an IMAP configuration to the Mail application in Mac OS X:
When Mail finishes making the IMAP connection and has transferred all the information from the mail server, the main application window should appear as shown in Figure 17.17. Messages in the Exchange Inbox appear in the Inbox tray in the left pane. Sent messages appear in the Sent Items tray. Figure 17.17. The IMAP connection in Mail pulls the mail folder information from the Exchange server.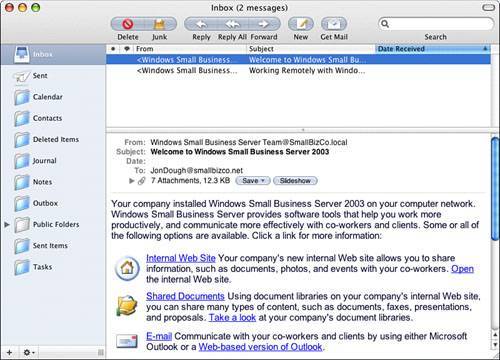 When you expand the mail service tray (usually listed at the bottom of the left pane), you see all the folders from the Exchange server account. However, because IMAP only handles mail items, you do not see the Outlook calendar when you select the Calendar folder. Instead, you see a mail item that contains an ICS file attachment. Double-clicking on the ICS attachment launches iCal and attempts to add the calendar item into the iCal schedule. Entourage XWhen Microsoft introduced Office X for Mac OS X, it dropped the Outlook product in favor of a new mail and calendaring tool called Entourage. Although Entourage had the look and feel of the other Office applications under OS X, it lacked one significant functionExchange support through MAPI. In fact, until Microsoft released Office Update 10.1.4, Entourage could not connect to an Exchange server other than as a POP3 client. The Exchange compatibility promised in Office Update 10.1.4 only delivered IMAP and LDAP functionality to connect to the Exchange server, not true MAPI connectivity as with other Exchange clients. A full discussion of the pros and cons of the Entourage X mail client has been documented in the Entourage Special Report at MacWindows, http://www.macwindows.com/entourage.html. Note If you are using Entourage X in your environment, make sure that Entourage has been updated to Office Update 10.1.6. Updates can be downloaded from http://www.microsoft.com/mac/downloads.aspx. Follow these steps to set up Entourage X to communicate with your SBS Exchange server:
After the account is set up, Entourage connects to the Exchange server, downloads all the folder and mail information, and displays the contents of the Exchange mailbox as shown in Figure 17.19. Figure 17.19. The Entourage Mail window displays the folders and mail items for the user's mailbox on the Exchange server.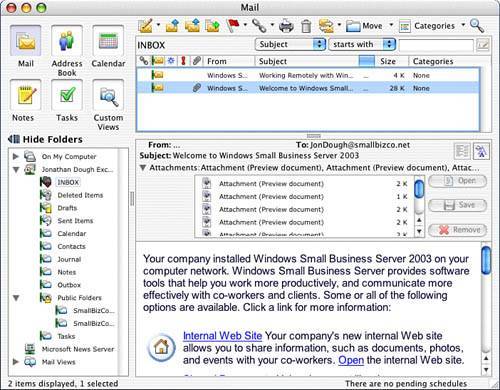 ExchangeMaking an Exchange-aware connection to the mail server is advantageous because the Exchange connection allows you to access more than just mail items and calendar items represented as mail objects. With a full Exchange connection, a mail client can access the Contacts and Public folders on the server and have a better interaction with calendar items. This section looks at three ways to have the full Exchange mail experience from the Macintosh.
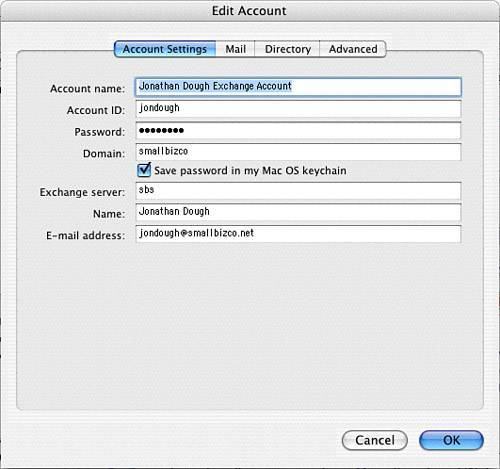
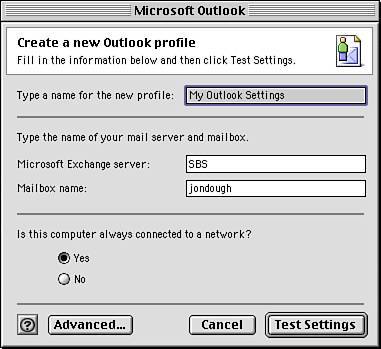
Outlook Web Access (OWA)The only real difference between Outlook Web Access (OWA) on a Macintosh and a PC is that the Macintosh can only access the Basic version of OWA. When the OWA interface is loaded from a Macintosh, the user is presented with the familiar logon screen, except the only options available are selecting from a Public or Private computer. The option to select from Premium and Basic is not even displayed. The Basic version of OWA lacks several features of the Premium version. Most notably visible when the OWA interface is fully loaded is the lack of a preview pane. To read a message, the user must click on the message header, and the message contents are displayed in the main web frame instead of opening in a separate web browser window. Other features missing from the Basic version are the interface to add and edit mail routing rules, spell checking tools, and the ability to modify the appearance of the OWA interface. The biggest challenge to running OWA from a Mac was explained earlier in the chapter. If the SBS installation is using the default self-signed SSL certificate, Internet Explorer for the Mac cannot be used to access OWA. Safari, Netscape, and Firefox are browsers that can interact with OWA from a Mac when the self-signed certificate is used. Each of these programs has its own way of handling the self-signed certificate and will generate a warning when the self-signed certificate is encountered. With Netscape and Firefox, the certificate can be installed into the program's certificate store to avoid the warning each time OWA is accessed. Safari uses the Mac OS X certificate store to check, so the steps earlier in the chapter on installing self-signed certificates into the Mac OS X certificate store will avoid the warning in Safari each time OWA is accessed. Outlook 2001Outlook 2001 was the last Macintosh mail client released by Microsoft that fully integrates with Exchange. Fortunately, Outlook 2001 is still available as a free download from the Microsoft website (http://www.microsoft.com/mac/downloads.aspx#Outlook) and will run under both Mac OS 9 and earlier and all versions of Mac OS X that have Classic installed and enabled. Like its PC-based counterpart, Outlook 2001 makes a MAPI connection to Exchange for full functionality. As such, the configuration to connect Outlook 2001 to the Exchange server is very similar. Remember that if the Mac is running Mac OS 9.2 and the internal domain includes .local, you will need to add the SBS server to a Hosts file on the Mac for proper name resolution. See the steps to do this in the "The .local Issue" section earlier in the chapter. Follow these steps to configure Outlook 2001 to communicate with the SBS server. These steps assume that this is the first time Outlook 2001 has been run on the Macintosh:
Entourage 2004With the release of Microsoft Office 2004, people who want to use Entourage to connect to an Exchange server are going to be pleased with the enhancements made to Entourage and the ease with which it can interact with Exchange 2003. This section specifically covers connecting Entourage 2004 to an SBS 2003 server, but the steps can be extrapolated to any Exchange 2003 server that publishes OWA. Note SBS owners can get a copy of Entourage on CD by calling 1-800-360-7561 (in the U.S. and Canada) and asking for part number Q56-00005. You need to provide the agent with your SBS product key to validate ownership. To acquire the Entourage CD outside the U.S. and Canada, contact Microsoft's supplemental part fulfillment group. Several steps need to be completed for Entourage 2004 to be able to communicate with an SBS 2003 server running Exchange 2003. Verify Proper DNS Resolution to ServerOpen a web browser (not Internet Explorer) and go to https://ServerFQDN/exchange using the full internal DNS name, not the server IP address. If you can log in and use OWA, continue to the next section. Otherwise, you will need to review the earlier sections of this chapter to troubleshoot why the connection is failing. Configure Entourage to Connect to SBS Exchange Using the Setup AssistantThe account settings in Entourage can be configured in two ways. Follow these steps to use the Entourage Setup assistant:
Configure Entourage to Connect to SBS Exchange Using a Manual ConfigurationThe other method for configuring Entourage to connect to the Exchange server avoids the use of the Setup Wizard and lets you configure the account manually. Follow these steps to accomplish this:
Configure Local and Remote Access to Exchange 2003 with Entourage 2004Mobile users with PowerBooks or iBooks face an interesting challenge when trying to use Entourage to read email when in the office or on the road. Using traditional Entourage configuration for connecting to the server while on the local network will not allow a connection while out of the office. Configuring Entourage to use the public name of the server to get it working while out of the office usually causes problems when trying to connect while on the local network. The answer to this riddle is technically not a Macintosh or even an Entourage solution but is still worth mentioning in this context. For a PowerBook, configure Entourage to use the public URL of the OWA server for connections. Then configure the internal DNS server on SBS to respond with an internal IP address when a lookup for the public URL is made. To do this, open the DNS Management Console and create a new lookup zone (see Chapter 5, "DNS, DHCP, and Active Directory Integration," for more information on setting up new DNS lookup zones). Give the zone the public domain name for your OWA server. For example, if your OWA server can be reached at mail.smallbizco.net, you would set up the lookup zone for smallbizco.net. Next, create a Host record for the server in the new lookup zone and point it to the internal IP of the SBS server. In other words, set up mail to point to 192.168.16.2 if your public server name is mail and your SBS server's internal IP address is 192.168.16.2. Then, whenever the PowerBook is connected to the local network, it will get the 192.168.16.2 address when it looks up mail.smallbizco.net in DNS, and it will get the public IP address for your server when it is connected to the public Internet. Using this single configuration allows the user of the PowerBook to keep a single cache of her Exchange mail data instead of dealing with two profiles. Caution If you do set up this split DNS zone, you need to populate the internal DNS lookup zone with all addresses for all public names. In other words, you also need to create a www record if you have a public server that responds to www.smallbizco.net. Otherwise, when your internal machines do a DNS lookup on www.smallbizco.net, the lookup will fail, and the machines will not be able to connect to any sites in the smallbizco.net domain. |
EAN: 2147483647
Pages: 253