Setting Up the Show
Start by taking a look at the basic setup for the slide show you re producing. Choose Set Up Show from the Slide Show menu. The Set Up Show dialog box, shown in Figure 11-2, appears.
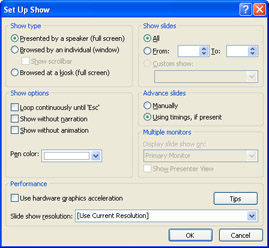
Figure 11-2: You make some basic choices for the way your presentation will operate in the Set Up Show dialog box.
| Note | In Chapter 10, you made some initial choices in the Page Setup dialog box about the size of the slides you were creating. In the Set Up Show dialog box, you choose the type of presentation you will give, and choose settings (pen color , slide advance, and slide selection) that will be used in the actual presentation. |
In the Show Type area, choose the form in which you ll be giving the presentation. Will you be presenting in front of an audience? Will someone be sitting at a computer, viewing the presentation on a monitor? Will the presentation be running on a terminal in a training room at your corporate office? Each of the options in the Show Type area adds unique features to the presentation, depending on what you re trying to do. The first option is the default selection ”this is the normal, full-screen view. The second option, Browsed By An Individual, adds commands and navigational tools to help people move through the presentation in a way that s most comfortable for them. The third option, Browsed At A Kiosk, creates the presentation as a continuous loop that restarts automatically after five minutes of inactivity. Click the option that best fits how your presentation will be used.
The Show Options area enables you to control whether your presentation loops continuously, or goes from start to finish and then ends. If you want the presentation to loop, click the check box to enable the feature. Additionally, you can choose to run the presentation without narration or animation, if you re trying to keep the file sizes small and the special effects to a minimum. Finally, the Show Options area allows you to set the Pen color (click the down arrow and choose the on-screen color you want). You ll use the pen to draw on the screen while you present the slide show, circling or underlining important concepts.
In the Show Slides and Advance Slides areas, you specify which slides will be included in your presentation and how they will advance from one to the next. If you want the slides to change automatically, leave Using Timings, If Present selected (this is the default setting). If you want to give the user the ability to move on to the next slide by clicking a button or pressing a key, select the Manually option.
| Note | Many of the discussions in this chapter ”including setting slide transitions and rehearsing timings ”are based on the idea that you have elected to advance the slides automatically. If you choose the manual method, the slide show s users will control when the pages advance. |
The final options in the Set Up Show dialog box enable you to display the show on multiple monitors and improve system performance. If you have multiple monitors set up on your system, you can click the Show Presenter View check box to display a toolbar of Presenter tools, which enable you to display slide thumbnails, navigation tools, and speaker notes. If you have a graphics accelerator card in your system, clicking the Use Hardware Graphics Acceleration check box may accelerate the display of slides in your slide show. Once you re finished setting up the show, click OK to close the dialog box and return to Slide Sorter view.
EAN: 2147483647
Pages: 238