Creating Match Em Up
Creating Match 'Em Up
Well, we've finally done it. We've covered the subject of arrays and we're ready to do something with them. Let's get right down to the business of building our next game: Match 'Em Up .
The Idea
Most people are familiar with the idea of a memory matching game. It consists of a set of tiles that have pictures on them. Each picture appears on only two tiles. These tiles are all placed on a table with the picture side facing down. The player flips over two tiles. If the tiles match, the player leaves them turned face up and moves on. If the tiles don't match, the player flips them face down again and makes another move. The object is to get all the tiles facing up in as few moves as possible.
That's the idea behind Match 'Em Up . Now that I know what I want to do, it's time to e-mail Rachel, my artist, and ask her for some art.
Creating the Library Assets
I figure that all I need are pictures for the tiles. Guesstimating my stage and tile size , I figure a 4 — 4 block of tiles will work. That means I'll have 16 tiles with 2 tiles per picture, for a total of 8 pictures.
You can see exactly what Rachel sent me if you go into the Chapter 05 folder on the CD and then go into the Art Assets folder. Also in the Chapter 05 folder are the usual two .fla files that you can use to develop along with me. One is called Match 'Em Up unfinished .fla, and it contains only the imported art and library assets, but no script. The other is just called Match 'Em Up.fla, and it contains the fully developed source code, ready for publishing.
After receiving the graphics from Rachel in .ai (adobe illustrator) format, I cut them apart and export them as .swf (a nice feature of Illustrator). From there, I create a new movie and import the graphics into a set of symbols labeled tile 0 through tile 7 . Finally, I copy one of the tiles into a new symbol called tile blocker and black it out. I'm planning to use this blacked-out tile to pose as the face-down version of the tiles. I export everything for ActionScript using its symbol name as the linkage identifier.
Now that my tiles are imported and I have a flipped over the tiles, I'm ready to start thinking about implementation.
Script Organization
What do we need in terms of functionality to make this game work? The main game algorithm is pretty simple. It will play out something like the following:
-
Create two of each tile instance on the board.
-
Create 16 tile blocker instances on the board. (Tile blockers are used to hide tiles that are "flipped over.")
-
Lay out the tiles in a 4 — 4 block on the stage.
-
Shuffle the tiles randomly .
-
Flip all the tiles face down.
-
Wait for the player to make a move by flipping two tiles.
-
If the flipped tiles match and all tiles are flipped, the player wins. Go to step 4.
-
If the flipped tiles match but not all tiles are flipped, go to step 6.
-
If the flipped tiles do not match, flip them back over and go to step 6.
As you can see, this is a pretty simple algorithm. With this basic outline in hand, we can begin the implementation. Please note that if you skip forward to the complete code listing later in this chapter, you can see the code in its full context. Sometimes it can be hard to follow the code because I list it in small pieces with explanations of each piece. The complete code listing can help you follow difficult parts of the code.
Implementation
As you might guess, we're going to be using arrays as well as dynamic clip instances in this implementation. Because we're placing the tiles in a 4 — 4 block on the stage, the natural data structure to keep them in will be an array. We'll be using dynamic movie clips as well.
The implementation can be broken up into a few basic parts, including the following.
-
Game setup script
-
Tile shuffler
-
Player clicking on the tile test
Because this implementation is quite small, let's get right into the code.
Game Setup Script
We need to populate our game with some tiles and some tile blockers. That's easy enough. I've decided to use two separate arrays for these ”one for each kind. Both arrays will be two-dimensional and consist of four rows and four columns .
The creation of these tiles is simple enough. We'll use a nested for loop like our previous multidimensional examples. The following script gets us started:
tile_array = new Array(); tile_depth=0 blocker_array = new Array(); solution_count=0 for(i=0;i<4;++i){ tile_array[i] = new Array(); blocker_array[i] = new Array(); for(j=0;j<4;++j){ //create new tile //create new tile blocker } } I've also added two variables . tile_depth is going to manage the depth of each tile so that we don't have overlap. To keep track of how many matches have been made on the board, we also need a variable ”in this case, solution_count .
So far we've created two arrays and made them 4 — 4 multidimensional. From here, we'll add script to the inner for loop that sets up each tile. There are quite a few things to do at this point, so let's look at them one at a time.
Create a New Tile
Before we talk about the exact code to create the tiles, look at the library for this game. Notice that all the tiles are given names like tile1 , tile2 , and tile3 . That is so that we can easily construct the names of the different tiles when we create them. By using a variable to indicate the tile number, we can concatenate that onto a string like "tile" to generate the correct tile name.
We have eight possible tile types, and we need to make two of each. Obviously, that requires us to use attachMovie twice for each tile in our library. There are several ways to accomplish this logic. We need a counter that counts once every other iteration of our inner loop. This solution might seem somewhat confusing at first, but if you ponder it for a bit, you'll see the elegance . This is how I create 16 tiles, two of each type:
tile_type = Math.floor((tile_depth++)/2); attachMovie("tile "+tile_type, "t"+i+j, tile_depth); First I create a new variable named tile_type . This variable is given a value from Math.floor that will be the truncated result of dividing a counter ( tile_depth ) by 2. Notice that the counter is incremented with the postincrementation operator, which causes the division to occur before the incrementation. The result of this line is that tile_type equals 0 the first two times through the loop, 1 the next two times, 2 the two times after that, and so on. That's exactly what we need for the attachMovie function.
The second line in the previous script actually attaches the movie using the newly created tile type in the first argument. The name given in the second argument is trivial; it could have been anything. We will not be using the name to refer to this tile in the future; instead, we'll place the tile in our array and access it through that. Finally, notice that the final argument, depth , is calculated using the counter variable from the first line. Clever, eh?
Let's go ahead and put this tile in the array with the following script:
tile_array[i][j] = this["t"+i+j];
As you can see, this is an assignment into our tile array. I use the array notation instead of eval just to get you used to that style. Notice that I'm constructing the name with the literal string "t" concatenated with the loop variables as usual.
Create a New Tile Blocker
Next we'll need to create the tile blocker over the top of the old tile. Because we're already inside a double for loop, we might as well do it here. Plus, we'll be able to use the existing tile_depth variable to set our blocker's depth. Consider the following script, which will be added to the nested loop:
attachMovie("tile blocker", "blocker"+i+j, tile_depth+100); blocker_array[i][j] = this["blocker"+i+j]; Again, we're simply using attachMovie to create a new blocker clip. Notice how the depth is being set. I'm using the same depth as before but adding 100 to it, which will cause all 16 of my blocker tiles to be on top of the 16 tiles with images.
| Tip | Because I know I'm not going to have more than 16 image tiles on the board at a time, I can use the depth + 100 technique to set blocker depths. If the number of image tiles was variable depending on the game, I couldn't do this because I could run into a situation in which there were more than 100 image tiles and they could start getting attached at depths where blockers exist. In a case like that, I would organize both types of tiles into empty movie clips so that their depths would be local. |
Set Up Each Tile
At this point, we need to do some work on the image and blocker tiles. The art came in large, so I want to scale down the images to fit the stage better. We also need to move the tiles across the stage so that they are in the right positions . Right now, they are all stacked at (0,0) in the upper-left corner of the stage. Let's add some script that will do these operations for us:
tile_array[i][j]._xscale = blocker_array[i][j]._xscale = 60; tile_array[i][j]._yscale = blocker_array[i][j]._yscale = 60; tile_array[i][j]._x = blocker_array[i][j]._x = j * h_space + h_space/2; tile_array[i][j]._y = blocker_array[i][j]._y = i * v_space + v_space/2;
As you can see, I'm using double assignments to get both the tiles and the blockers scaled and positioned correctly. The clips are getting scaled to 60 percent and spaced using some variables I haven't defined yet.
The h_space and v_space variables are used to position the clips. They depend on the size of the stage and the size of the tiles. To obtain these values, I simply did some tests and fiddled with the numbers until things looked right. Notice that the horizontal spacing variable, h_space , is multiplied by the inner loop variable, j . The result is added to half the horizontal space, and finally is used to scale and then shift the tile. Remove either part, and you'll see what I mean. I defined these two constants at the top of my script as follows :
h_space = 150; v_space = 125;
You should now be able to test the movie and see something like Figure 5.22. All the tiles are in place with their blockers in front of them. You can't interact with them yet, but that's coming soon.
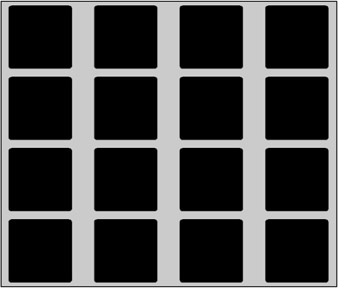
Figure 5.22: The tiles are all scaled and in place with their blocker on top.
In the future, we're going to have our game in a state in which some of the tiles are flipped (solved) and some are not. We're going to need to keep track of the state of each tile to know if it's been solved. When the user clicks on a solved tile, nothing should happen. To handle this data, we're going to attach a variable to each tile called solved and give it an initial value of false . The following script sets that up when it is added to the inner for loop:
tile_array[i][j].solved = false;
We must do one final task inside the nested for loop we've been working in. Later when the player clicks on two tiles, we need to compare the tile types to see whether we should leave them turned up. We need to be able to tell the type of tile later. That's a simple enough problem; we can just attach a copy of the tile_type variable to each tile. Later when we need to access the tile, we can simply look at the property. The following code completes the inner for loop by keeping track of each tile's type in a property of the tile:
tile_array[i][j].mytype = tile_type;
This completes the setup. From here, we're ready to build a tile-shuffling algorithm.
The shuffleTiles Function
Because shuffling tiles will happen once at the beginning of the game and then again any time the player solves the game, we need to encapsulate the logic so that we can reuse it. That means making a function ”in this case, the shuffleTiles function.
How are we going to shuffle the tiles around? Well, there are a vast number of solutions to this problem, some of which are more efficient than others. Because we're only going to shuffle the tiles once in a great while, the player won't notice the speed it takes to shuffle them. For that reason, I prefer an easy solution to an efficient one.
To shuffle all the tiles, I'm simply making some logic that causes two tiles to have their positions swapped. Then I execute this logic 200 times with random tiles. That should ensure I get a good mix, and the implementation will be simple. To pick two random tiles, we need to generate two random rows and two random columns. Let's set up a loop to get started:
function shuffleTiles(){ for(i=0;i<200;++i){ //pick two random tiles by index r_col1 = getRandom(0,3); r_row1 = getRandom(0,3); r_col2 = getRandom(0,3); r_row2 = getRandom(0,3); } } This function definition will get us into a 200-iteration loop and create four random numbers using our get_random_int function from Chapter 4. To use this function, you can simply cut and paste it from the old movie to the new one. If you remember, the script for this function is as follows:
function getRandom(minimum, maximum){ return Math.floor(Math.random() * (maximum - minimum +1) + minimum); } The four random numbers are stored in some new variables called r_col1 , r_row1 , r_col2 , and r_row2 . They stand for random column 1, random row 1, random column 2, and random column 2, respectively.
We have picked two random tiles and we're ready to do the swap. That will require first changing the tiles' positions on the stage and then changing the tiles' positions inside tile_array . When we want to swap two variables, we have to use a third temporary variable, which I generally name temp . The following script, when added inside the for loop, does the swapping of the two random tiles:
tempx=tile_array[r_col1][r_row1]._x; tempy=tile_array[r_col1][r_row1]._y; tile_array[r_col1][r_row1]._x = tile_array[r_col2][r_row2]._x; tile_array[r_col1][r_row1]._y = tile_array[r_col2][r_row2]._y; tile_array[r_col2][r_row2]._x = tempx; tile_array[r_col2][r_row2]._y = tempy; temp=tile_array[r_col1][r_row1]; tile_array[r_col1][r_row1]=tile_array[r_col2][r_row2]; tile_array[r_col2][r_row2]=temp;
The first six lines use the variables tempx and tempy to swap the stage coordinates of both clips. Notice the way I'm using the random number generated earlier to access the array location containing the clips. The final three lines swap the references contained in the array so that our array continues to match the stage position of the tiles.
Now that we have our shuffling routine defined, let's make sure it is called when the game starts. Add a call to it just after the initial for loop setup to start the game with the following script:
shuffleTiles();
That completes the shuffling implementation. If you would like to test this script, you can remove the setup line that attaches the tile blocker clips. After that single line is commented out, you can test your movie. You should see all the image tiles shuffled randomly about the stage, as in Figure 5.23.
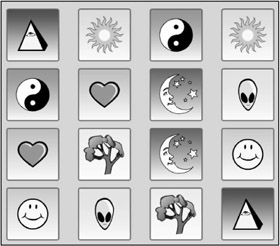
Figure 5.23: The shuffleTiles function mixes up all the tiles. By removing the blocker attachment line, you can see this random shuffling of tiles.
Detecting the User's Mouse Clicks
We can detect the user's mouse clicks in several ways. We could test for an onMouseUp event on the _root timeline and then hit test all our clips to see which one was clicked. (Hit testing was first described in Chapter 3, "Programming Interactivity: Mouse Chaser .") We could also define an onRelease handler for each of the tiles and let them handle it with a function like we did in the Mouse Chaser game. Each solution poses its own set of problems. After pondering both possibilities, I settled on the former of the two. Instead of giving individual onRelease handlers to each tile, I would rather use one onMouseUp handler on the main movie timeline and have it handle everything by hit testing the entire array to see which tile was clicked.
| Note | You might be saying, "But it would be easier to use the individual onRelease handlers to avoid the excessive hit testing." It's true that we could avoid the hit testing by letting Flash do it for us, which is what the onRelease handlers would do. But because we are not moving the blockers during the shuffle process, this solution presents its own problems. To make the correct blocker disappear when the user clicks using the onRelease method, we would have to store the array position of each tile with the tile as well as move the blocker tiles during shuffle. Neither solution is perfect; I just chose the first one. |
I'm going to do a little trick that I haven't performed before. I'm going to attach an event handler to the main movie timeline instance. Because the script we write goes into the first frame of the main timeline, if we attach a handler to this , we'll essentially be attaching a handler to the main movie instance. Consider the following script, which begins the implementation of the mouse-click tester:
this.onMouseUp = function(){ for(i=0;i<4;++i){ for(j=0;j<4;++j){ if(tile_array[i][j].hitTest(_root._xmouse,_root._ymouse)){ //more code goes here return; } } } } Notice what we have here. First, the onMouseUp handler is attached to this . Then we go into a double for loop that iterates over the entire tile array, hit testing each tile with the mouse pointer. As soon as we find one that was clicked, we return. This return statement keeps us from wasting time by hit testing other tiles after the correct one has been found. Now all we need to do is add the actual click-handling code inside the inner for loop, but before that return statement.
What do we need to do when the user clicks a tile? Well, that depends on the situation that the user clicked it in. If no tiles are currently turned over, we turn over the current tile and do nothing else. If the user has clicked his first tile this move and this is the second choice, we must compare the two tiles for type to determine whether it's a successful pick. If the user picked correctly, we need to test for a solved game. If not, we need to turn over both tiles.
At this point, you might see the need for a few more variables. In fact, we need several. We need to keep track of how many picks the user has made in this turn. Sometimes that number will be 0 when the user is picking his first tile, but after that it will be 1 because the user has already flipped one tile and is now choosing his second. To handle this situation, I add a new variable called picked_count to the top of my script. I initialize it to 0; then when the user clicks on his first tile, I increment it. The following script is added to the top of the script:
picked_count=0;
From there, we implement a test to see which tile the user is picking. This script goes inside the onMouseUp handler we've been developing, inside the inner for loop, but before the return statement, as indicated earlier:
if(picked_count == 0){ //more code goes here (user first choice) } else if(picked_count == 1){ //more code goes here (user second choice) } This handles the hit testing of each tile. That test is followed by a conditional that branches depending on the value of picked_count . Actually, that's not quite enough. We need to handle some special cases. For example, if the user is making his first choice but the tile he's choosing is already face up because it's been solved earlier in the game, we don't want to execute the if conditional. We can solve this by adding another test to the if conditional and using a logical operator to bind it to the existing test, as I have done in the following script. This code serves as a replacement to the above if statement:
if(picked_count == 0 && tile_array[i][j].solved==false){} As you can see, we are now testing both the value of picked_count as well as the value of the currently clicked tile's solved variable. Remember that we're using this variable to determine if a tile has already been solved. If it has been solved, its solved variable will be true . If it hasn't been solved, its solved variable will be false and we can proceed with the conditional's code block.
But yet again, that's not all. Our test for the user's first pick is fine, but our test for the second pick needs some work like the first one did. If the user is making his second pick (the else if part of the previous conditional), we want to make sure he's not clicking on an already solved tile. We also want to make sure the user is not clicking on the same tile he chose for his first choice (clicking the same tile twice).
Our else if is going to need more testing added in with logical operators like our if did. Consider the following script that does so:
else if(picked_count==1 && tile_array[i][j].solved==false && (i!= first_choice_i j!= first_choice_j)){} Notice that we are first checking to see whether picked_count is 1, but we are using a logical AND operator to test that the currently clicked tile is not solved. The third part of the condition uses an OR operator to make sure that at least one of the indexes on the currently clicked clip is different from one on the originally (first choice) clicked clip. The variables first_choice_i and first_choice_j are going to be set inside the first choice conditional block in just a moment, during the code that handles the first choice event.
From here, we need to implement both conditional blocks. Then this function will be finished.
User Picks His First Tile
When the user is making his first choice, picked_count will be 0, so the first part of our conditional is executed. The script that goes inside the if needs to do the following:
-
Increment picked_count to 1.
-
Store the i and j values of the first pick.
-
Make the blocker for this tile invisible.
The first thing we need to do is increment picked_count . That's easy enough:
picked_count = 1;
Now we need to record the currently picked clip's indexes for use in our second pick. Again, that's easy enough:
first_choice_i = i; first_choice_j = j;
These are the variables being tested in the second pick conditional. There they are assigned the current array indexes.
Finally, we need to make the tile flip over. That is done easily enough by replacing the _visible property of the blocker clip with the following script:
blocker_array[i][j]._visible = false;
That concludes the first choice portion of the conditional. It's time to move on to the second part: the user's second choice.
User Picks His Second Tile
When the user has already picked one tile and he picks a second, picked_count will be 1, so the second half of our conditional executes. That assumes the user is picking a tile that hasn't been solved already and isn't the same tile he chose in his first pick. Assuming that all those conditions are passes and the user has made a valid choice, we need to do the following:
-
Set picked_count to 0.
-
Check to see whether the types are the same between the two tiles the user chose.
-
If the types match, mark both tiles as solved and reveal the second choice tile.
-
If the types don't match, hide the first choice tile.
Resetting picked_count is simple enough:
picked_count = 0;
Now we need to test the types to see if the user made a correct match. The following test uses the first_choice_i and first_choice_j variables along with the current index variables to do this:
if(tile_array[i][j].mytype==tile_array[first_choice_i][first_choice_j].mytype){ //match code goes here } else{ //mismatch code goes here } As you can see, the if block executes if the types are the same, and the else block executes if they are different. Let's fill out both blocks now.
Inside the if block, we need to handle a correct match. That means we need to mark both tiles as solved and reveal the second choice. (The first choice was revealed when it was chosen earlier.) We can perform these tasks with the following script:
tile_array[i][j].solved=true; tile_array[first_choice_i][first_choice_j].solved=true; blocker_array[i][j]._visible=false;
That's simple enough. Let's do the else block ”the one that executes if the tiles don't match. To implement this one, we need to hide the first choice. We can accomplish that by using this script:
blocker_array[i][j]._visible=false;
At this point, we're finished with the onMouseUp handler. But it's been a complicated implementation, so I want to give you the entire code in one block so that you can see it all together:
this.onMouseUp = function(){ for(i=0;i<4;++i){ for(j=0;j<4;++j){ //test to see if the user is clicking this tile if(tile_array[i][j].hitTest(_root._xmouse,_root._ymouse)){ //if this is the user's first pick (and it's a valid pick) if(picked_count == 0 && tile_array[i][j].solved==false){ picked_count = 1; first_choice_i = i; first_choice_j = j; blocker_array[i][j]._visible=false; //show tile image } //if this is the user's second pick (and it's a valid pick) else if(picked_count==1 && tile_array[i][j].solved==false && (i!= first_choice_i j!= first_choice_j)){ picked_count = 0; //if they match if(tile_array[i][j].mytype == tile_array[first_choice_i][first_choice_j].mytype){ tile_array[i][j].solved=true; tile_array[first_choice_i][first_choice_j].solved=true; blocker_array[i][j]._visible=false; } //if they don't match else { //hide first choice blocker_array[i][j]._visible=false; } } return; } } } } As you can see, this bit has been somewhat complicated. The majority of the game logic is in that event handler. At this point, every piece of our game is implemented, and it's time to check out what we have.
Go ahead and test your movie. You should see something like Figure 5.24. The game should now be working and the event handler should be responding to your mouse clicks. Thoroughly test your game to make sure everything works like you think it should.
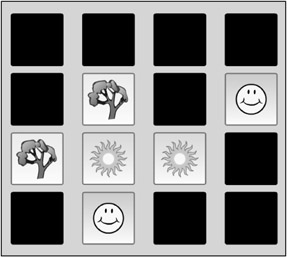
Figure 5.24: The game is working correctly, but perhaps not as well as we would like.
Testing
If you've been working along with me, you should have encountered some problems during testing. The first thing I noticed when I tested was that when the user clicked on his second choice, if it wasn't a match, the game immediately flipped both choices face down, giving me no time to see what my second choice was. That was not my intention when I dreamt up the game idea. I would like it if the user's second choice could be seen for a moment before the tiles went back face down.
The second problem I found was that when I made all eight matches and solved the game, the game just sat there with all the tiles exposed. I would prefer it if the game reset and reshuffled after being solved .
Resetting the Game
The first problem should be easy enough to fix. We can just use a variable that will count the number of matches during the game. If that number gets to 8, we know that we've solved the entire set and it's time to reset.
Inside the mouse-click handler, in the part of the script that handles the user's second choice, if we increment a variable named solution_count , we can use this variable to test the number of matches our user has made.
Inside the onMouseUp handler, at the end of the //if they match conditional block, add the following line of script:
++solution_count;
This gives us our counter for testing for a solved game. At this point, we could simply test to see if the solution count is equal to 8, and if so, reset the game. But I can already tell from our other issue that it's not going to be that simple. Instead, we want to set up an event handler to activate once every frame. We'll use this to test for the game being solved. The beauty of doing it that way is that in the next section, we can use this same handler to deal with our pause.
Pausing After Second Choice
Before creating the new handler, we need to make more changes to our existing script. First, we now have a new state our game can be in. Initially, we could only be in a state of "letting the user pick first" or "letting the user pick second." Now we need a third state of "waiting while displaying a failed match." To implement this new state, we can use our existing state variable, which was called picked_count . All we need to do is change our onMouseUp handler so that when the user makes his second choice, the game goes into a state of picked_count = 2 . That's simple enough; consider the following modification to our onMouseUp handler.
First we go to the code that deals with the second choice again. An if statement tests for a match, and just before the match test, we are setting picked_count to 0. Remove that line and add the following line inside the if block:
picked_count = 0;
Now, only when the user gets a successful match does picked_count go back to 0. We can add the following line of script to the else block that follows the former if block. (The else block handles choices that do not make a match.)
picked_count = 2;
While we're at it, we need to make another change to this block of code. We need to store the second choice indexes like we did with the first because we'll need them both after the second delay when both tiles are flipped face down again. We can add the following script right after the script you just typed:
second_choice_i = i; second_choice_j = j;
That was simple enough. We've stored the second choice information as we did with our first choice. Now let's make another change inside that else block that will reveal the second choice instead of hiding the first choice. See the line that reads blocker_array [first_choice_i][first_choice_j]._visible = true; ? Change it to the following script:
blocker_array[i][j]._visible = false;
Now when the user clicks his second choice, it's displayed. If you test your movie at this point, you'll see this happening. The problem is that the incorrect match is never flipped back over; instead, the game is paused forever.
We're ready for our new event handler that will activate every frame. We'll use this handler to test whether we're ready to flip both tiles back over ( picked_count==2 ) as well as test for a solved game ( solution_count==8) . We can implement an every-frame event handler easily enough. Let's attach one to the main timeline like we did with the onMouseUp handler. Consider the following script:
this.onEnterFrame = function(){ if(/*one second has elapsed if(solution_count = = 8){ //reset game } else if(picked_count = = 2){ //hide both choices } } Again, attaching the handler to this makes it a member of the main timeline ( _root ).
Our task is to first fill in the //reset game and //hide both choices areas. Resetting the game is going to be easy. We just need to hide all the tiles under their blockers, mark them as unsolved ( solved = false ), set the solution_count to 0, and shuffle all the tiles. The following script, when placed inside the reset game block from earlier, does this:
for(i=0;i<4;++i) for(j=0;j<4;++j){ blocker_array[i][j]._visible=true; tile_array[i][j].solved=false; } solution_count=0; shuffleTiles(); As you can see, this script uses a double for loop to set each tile's blocker to _visible and its solved property to false . Then solution_count is reset to 0 and the shuffleTiles function is called. That completes the reset game routine. Our next task is to implement the hide both choices block from earlier. The following script does that:
picked_count=0; blocker_array[first_choice_i][first_choice_j]._visible=true; blocker_array[second_choice_i][second_choice_j]._visible=true;
We are simply resetting picked_count and making both blockers visible.
That leaves us with one final task: the implementation of the 1-second delay. That solution requires something we haven't talked about yet: timers.
The getTimer Function
Flash MX and later have a powerful timing tool called setInterval that we will talk about in the next chapter. Using setInterval effectively is important, but I don't want to get into it now. Instead, I want to use the timer tool that has been around since Flash 4: the getTimer function. Don't worry, though; the timer function we're going to talk about ( getTimer ) will still be used in our games because it has some functionality we don't get with the new setInterval function. To properly program Flash games, you'll need both tools.
getTimer is a simple function that tells us the number of milliseconds that have passed since the main movie began to play. It has the following general form:
number getTimer();
As you can see, it's a global function (it's not called on a reference), it takes no arguments, and it returns a number that represents the number of milliseconds that have passed since the movie began.
Creating a 1-second pause is a simple task with this tool. All we really need to do is check the time when the user makes his second selection. Then, inside our event handler, we can check the current time. We subtract the current time from the stored time, and if the difference is more than 1,000 milliseconds, our 1-second pause has elapsed.
The groundwork for this logic has already been laid inside our new onEnterFrame handler. We just need to fill in the if statement that occurs there and then store the time inside the onMouseUp handler when the user makes his second choice.
The following script is a replacement for the if statement in our onEnterFrame handler, which previously read as follows:
if(/*one second has elapsed since we got to picked_count==2*/){ It should now read like this:
if(getTimer() > time_at_last_pick+1000){ The time_at_last_pick variable is defined in our next step. It's the variable we use to record the time when the user makes his second choice. The expression adds 1,000 to the time at last pick, and if that is smaller than the current time, obtained with a call to getTimer , the statement is true and the block executes. The block is implemented in an earlier section, so all that's left is to store that time as last picked.
Inside the onMouseUp handler, there is an if statement that should read like this:
else if(picked_count==1 && tile_array[i][j].solved==false && (i!= first_choice_i j!= first_choice_j)){ This code tests to see whether the user is making his second pick. As the first line inside this if statement's code block, add the following script:
time_at_last_pick = getTimer();
This records the time at which the user makes his second pick. Now the onEnterFrame handler, which executes every frame, goes into its primary if block when it has been more than 1 second since the last time the user made a second move. That's actually a lot more often than it needs to, but it won't hurt. Inside that if are the two additional conditionals that test for the actual second move being made ( picked_ count = = 2) and a solved game ( solution_count == 8).
Test the movie again. It should be working perfectly and should look similar to Figure 5.25. What follows is a complete code listing for the game including all the modifications we made during this testing section.
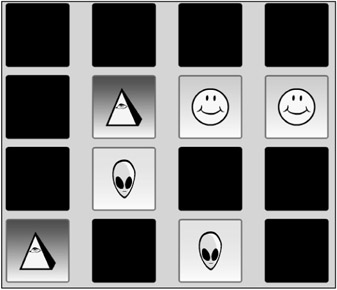
Figure 5.25: After implementing a pause and a reset game routine, our matching game is running like a dream.
Complete Code Listing
What follows is a complete code listing for Match 'Em Up . Use this listing to see the code in context.
//number of picks made this move, can be 0, 1, or 2 picked_count=0; //horizontal and vertical spacing between tiles on the stage h_space = 150; v_space = 125; //create arrays for tiles and their blockers tile_array = new Array(); tile_depth=0 blocker_array = new Array(); //initialize the number of matches solution_count=0 //create and initialize each tile and blocker for(i=0;i<4;++i){ tile_array[i] = new Array(); blocker_array[i] = new Array(); for(j=0;j<4;++j){ //increment counter every other iteration tile_type = Math.floor((tile_depth++)/2); //attach tile attachMovie("tile "+tile_type, "t"+i+j, tile_depth); //place tile in tile array tile_array[i][j] = this["t"+i+j]; //create blocker attachMovie("tile blocker", "blocker"+i+j, tile_depth+100); //place blocker in array blocker_array[i][j] = this["blocker"+i+j]; //scale tiles and blockers tile_array[i][j]._xscale = blocker_array[i][j]._xscale = 60; tile_array[i][j]._yscale = blocker_array[i][j]._yscale = 60; //move tiles and blockers tile_array[i][j]._x = blocker_array[i][j]._x = j * h_space + h_space/2; tile_array[i][j]._y = blocker_array[i][j]._y = i * v_space + v_space/2; //assign tile type tile_array[i][j].mytype = tile_type; //new game; no tiles have been solved tile_array[i][j].solved = false; } } shuffleTiles(); //trap for mouse clicks this.onMouseUp = function(){ for(i=0;i<4;++i){ for(j=0;j<4;++j){ //test to see if user is clicking this tile if(tile_array[i][j].hitTest(_root._xmouse,_root._ymouse)){ //if this is user's first pick (and it's a valid pick) if(picked_count == 0 && tile_array[i][j].solved==false){ picked_count = 1; first_choice_i = i; first_choice_j = j; blocker_array[i][j]._visible=false; //show tile image } //if this is user's second pick (and it's a valid pick) else if(picked_count==1 && tile_array[i][j].solved==false && (i!= first_choice_i j!= first_choice_j)){ time_at_last_pick = getTimer(); //if they match if(tile_array[i][j].mytype == tile_array[first_choice_i][first_choice_j].mytype){ picked_count = 0; tile_array[i][j].solved=true; tile_array[first_choice_i][first_choice_j].solved=true; blocker_array[i][j]._visible=false; ++solution_count; } //if they don't match else { picked_count = 2; second_choice_i = i; second_choice_j = j; //show second choice blocker_array[i][j]._visible = false; } } return; } } } } //function to activate once each frame this.onEnterFrame = function(){ //if it's been more than 1 second since the last 2nd pick if(getTimer() > time_at_last_pick+1000){ //if the game is solved, reset it if(solution_count==8){ for(i=0;i<4;++i) for(j=0;j<4;++j){ //hide tile blocker_array[i][j]._visible=true; //mark unsolved tile_array[i][j].solved=false; } //reset solution count solution_count=0; shuffleTiles(); } else if(picked_count==2){ picked_count=0; blocker_array[first_choice_i][first_choice_j]._visible=true; blocker_array[second_choice_i][second_choice_j]._visible=true; } } } //function to shuffle the tiles on the stage function shuffleTiles(){ //iterate 200 times for(i=0;i<200;++i){getTimer() //pick two random tiles by index r_col1 = getRandom(0,3); r_row1 = getRandom(0,3); r_col2 = getRandom(0,3); r_row2 = getRandom(0,3); //swap position of two tiles tempx=tile_array[r_col1][r_row1]._x; tempy=tile_array[r_col1][r_row1]._y; tile_array[r_col1][r_row1]._x = tile_array[r_col2][r_row2]._x; tile_array[r_col1][r_row1]._y = tile_array[r_col2][r_row2]._y; tile_array[r_col2][r_row2]._x = tempx; tile_array[r_col2][r_row2]._y = tempy; //swap tile references in the array temp=tile_array[r_col1][r_row1]; tile_array[r_col1][r_row1]=tile_array[r_col2][r_row2]; tile_array[r_col2][r_row2]=temp; } } //function to generate a random integer between minimum and maximum inclusive function getRandom(minimum, maximum){ return Math.floor(Math.random() * (maximum - minimum +1) + minimum); } EAN: 2147483647
Pages: 161