The Button Menu
Now that we have covered buttons states, button events, and movie playback control, we have all the tools we need to create any sort of button we might like. To demonstrate , we're going to develop a button with a great deal of internal functionality. This functionality is used to give the user feedback about the button and its current and previous states. Let's get to it.
The goal is to create a set of buttons, like a menu, that will respond to mouse events. Figure 4.16 shows the final result so that you can get a feel for what we're working toward. We want all the standard button feedback states: up, over, and down. In addition, we want a couple of extra states. Our new button is going to have an "already clicked" state, as can be seen in many Web pages. When the user first sees the buttons, the buttons will be one color or shape, but after the user presses the buttons, they change to let the user know he has already been to that menu choice before. We also want an "active" state whereby the buttons can indicate which menu choice is currently being displayed.
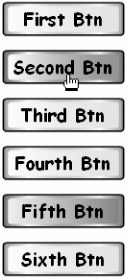
Figure 4.16: When we are finished, our button menu will look like something like this.
Within the CD that accompanies this book, inside the Chapter 04 directory, is a file called emptybutton.fla. This file contains a pre-made button symbol with no code attached. You can use this button to avoid building your own timeline with labels and such. Open this file now and let's look at what is already there.
The Button Symbol
As you will notice when you first open the emptybutton.fla file, there is nothing on the stage. There is only one symbol in the library, and its name is button . It has already been exported for ActionScript. Edit this symbol and take a look at its timeline.
You should see three layers , shown in Figure 4.17. As with the buttons you've seen so far, each layer plays an important role in the behavior of the button. Let's look at each button individually.
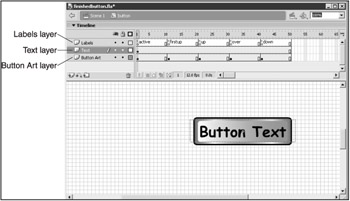
Figure 4.17: The example button has three layers in its timeline ” one for labels, one for button art, and one for the button's text field.
The Labels Layer
There are several things to notice in this layer. The first is that I have given each button state 10 frames instead of just 1, as I did in the past. That's to allow the labels to easily show up on the timeline and to make room for any animated art or tweening that needs to be done in the future.
The next thing to look at is the labels. In the past, we used _up , _down , and _over as our labels. We had to use those because only those specific labels are picked up by Flash to do the automatic state changing. In this example, we want to add additional states to our button, so we can't rely on Flash to do the state changing for us. Instead, we'll control the play-head manually. Because of that, I have left off the underscore on the frame labels so that Flash does not try to do anything automatically.
There are also two new states (each with a new label). In addition to up , over , and down , we have firstup and active . The two new states will be used to demonstrate which button is active and which buttons have already been clicked.
| Note | Because there are no tweens or animations being done in this example, our button will remain stopped at all times. Because of that, this same example could have been done with 1 frame per state instead of 10, but 10 makes the labels easier to read, and more importantly, I will be using this symbol as a template for many buttons in future games . Sometimes the buttons will have animation in these extra frames. By leaving the states with 10 frames, I have to do less alteration later to customize the buttons. |
The Button Art Layer
Select the different keyframes to look at the different button art for each state. In this case, all I've done is change the color and gradient of the button. I haven't changed the position, size , or shape at all, but I could have. The layer where all this is taking place is the Button Art layer.
Further, notice that the active and down states have the same color with just the gradient changed. That's to give a more fluid feel to the button. The pattern of state changes is as follows : A button starts off light green ( firstup ). When the user rolls over, the button becomes orange ( over ). When the user presses the button, it becomes red ( down ), but it also has its gradient changed to give a "push-down" feel. When the user releases the button, it remains red but changes its gradient back to normal ( active ). When another button is released and becomes active, this one becomes inactive and turns green ( up ). This new green is a darker shade than the original green to indicate that the button has already been active (pressed) at least once.
The Text Layer
The final layer, labeled in Figure 4.17, is named Text and contains only one keyframe. That's important to realize. Unlike the previous two layers, this one is not divided into states. Instead, it has one big state that lasts for the entire timeline. That's because I don't want the text to change at all during playback. But it would be simple enough to break this layer up into states and change text color, size, font, whatever we want.
The only instance in the layer is a dynamic text field. But if you select it, you'll notice that it does not have its Var field filled out. That means the text field is not linked to any ActionScript variable. Instead, we have given it an instance name. Notice on the property inspector that the text field has been given an instance name of mytext . This allows us to manually set the text when we create the button.
Now that you've looked at the symbol that we're going to use as our button, it's time to add the script that actually controls it.
The Button Implementation
The implementation of this button menu is more complex than Chapter 3's game. And even though this menu isn't a game in itself, it's complex enough to develop that we should break it up into pieces and attack each one individually like we do with the games. So let's do that. What exactly do we need to create our button menu, given that we have our button symbol set up and waiting for us?
-
Create a set of buttons on the stage. This involves the attachment (instantiation) of a variable number of button instances.
-
Initialize the properties of each button. This requires setting some of the properties like position and scale as well as attaching some of our own variables to each instance for later use.
-
Move each button to form the menu. This involves moving each button down slightly more than the previous one so that the buttons form a column.
-
Attach event handlers to each button. Because the buttons will all act the same way, they will share most of their event handlers with each other. By defining each event handler once, we can attach the handlers to multiple button instances so that each button behaves the same way.
-
Attach a unique activity function to each button. This function will be responsible for performing any work that we want our button to handle that is specific to that particular button. In other words, if one button were designed to reset the game, we would attach a function to do so to the button's activity function.
-
Add text to the text field contained in each button so that the user knows which button is which.
-
Stop the button from playing and then change each button's state to firstup so that it is ready to be used.
With this list as our guide, let's take a shot at the implementation of each piece one at a time. The complete script has been attached to the buttons in another .fla file on the disk called finishedbutton.fla (also in the Chapter 04 folder). Feel free to use this for reference, although I suggest you actually enter the code yourself into the emptybutton.fla version.
Create the Buttons
Because the button symbol has already been linked to export for ActionScript, all we have to do is attach it. Because we have a set of buttons to be created, I prefer a loop so that the number of buttons to be made can be altered easily. The following code should get us started by attaching a set of buttons:
number_of_buttons = 6; //set up each button for(i = 0; i < number_of_buttons; ++i){ //attach button instance var currentButton = attachMovie("button", "button"+i, i+1); } We're simply attaching six buttons using a for loop. Notice again the way we're naming the buttons in the attachMovie call. The loop index, i , is being used in the name so that each button has a unique name ( button1 , button2 , and so on). Also notice that I have the number of buttons to create as a variable and not a literal. That way, we can change it one place ”the first line of the script ”and the rest of the script should still work correctly.
I'm using a variable currentButton to store the return value from attachMovie . That way I can use this temporary reference to set the button properties instead of making several calls to eval .
Initialize the Buttons
The first thing we'll want to do is initialize each button inside the existing for loop as it's created. Each button will have properties set the same for all the buttons in our menu, so it would be easiest to use our existing for loop to set them up.
There are some variables that we're going to need to attach to each button. They will be used to handle the new states. We will give each button a property that tells us if the button has been pressed once already. We will also give each button a property that tells us if that button is currently active. The following lines should be added to the end of the existing for loop's body, right after the attachMovie call:
//button has never been pressed currentButton.virgin = true; //button is not active currentButton.active = false;
What's going on here? Well, we're adding a property called virgin and setting its value to true . This property is designed to indicate when the button has been pressed at least once. Later in our code when a button is clicked, it will have its virgin property set to false .
The second line adds a property called active , which it sets to false . This variable will be used to indicate whether a particular button is currently active.
Move and Scale the Buttons
Now that the buttons are instantiated and have some of their properties set up, it's time to place them where we want them. I've created the button symbol to be quite large, so the first thing we're going to do is scale down the instances of it. Then we'll stagger them vertically to form a column. The following script implements these two actions when it is added to the end of the existing for loop:
//scale down button currentButton._xscale = currentButton._yscale = 50; //move button currentButton._x += 100; currentButton._y += 50*i+75;
Here, the button is scaled down horizontally and vertically by 50 percent. Then it is moved 100 pixels to the right. Finally, it's moved down by 75 pixels plus 50 pixels times the loop index. This creates the staggered effect on the button position by moving each button 50 pixels further down than the previous one.
If you test your movie now, you should see something like Figure 4.18, where all the buttons are in a column. They are not yet responsive , their timelines are currently playing instead of stopped, and their text is not yet set ”but it's a start.
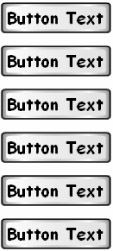
Figure 4.18: The buttons are in a column now, but their timelines are being played repeatedly, their text is not set, and they are unresponsive to the mouse.
Attach Handlers
As I've said before, our buttons will share event handlers. For that reason, we can set those up inside the for loop as well. This is done by defining a set of functions that will be attached to the event handler references of each button. The actual definitions of the functions are given later, but for now, just realize that we'll be implementing the following functions soon. In fact, it's perfectly valid to refer to a function you have not yet defined, as long as you define it later in the same script.
The following lists the set of functions we're going to use as our event handlers. Notice how they are named in a similar way to the actual event handler names :
-
buttonPress
-
buttonRelease
-
buttonRollOver
-
buttonRollOut
| Caution | You can attach a function to something that exists anywhere in the same frame the function is defined in. That means that you can refer to a function that has not been defined yet, as long as you define it later in the same frame. |
As I said, these four functions will be defined later in this same script. For now, we're simply going to attach them to the event handlers of the buttons we're creating. The following script goes at the end of the current for loop:
//assign button handlers currentButton.onPress = buttonPress; currentButton.onRelease = buttonRelease; currentButton.onRollOut = buttonRollOut; currentButton.onDragOut = buttonRollOut; currentButton.onRollOver = buttonRollOver;
I'm being kind of tricky here. I know from past experience which handlers we're going to need to define. They include onPress, onRelease , onRollOut , onRollOver , and onDragOut . But I also know that the implementation of onDragOut and onRollOut will be identical. For that reason, I only define the buttonRollOut function and attach it to both the onRollOut as well as the onDragOut handlers for each button.
If this part is a bit complicated, you can look ahead to the definition of those four functions. You can also refer back to this section after you get to those definitions.
Attach activity Function
What good are buttons if they don't actually do something when pressed? No good at all. What we need to do is give each button the ability to do something special. If a button is supposed to start a new game, that's the special activity for that button. We encapsulate this unique activity in a function called activity . This is how it works.
We will, very shortly, define a set of six functions, one for each button. These six functions will capture the unique activity of one button, and they are named for the button to which they are related . The six unique functions are as follows:
-
button0Activity
-
button1Activity
-
button2Activity
-
button3Activity
-
button4Activity
-
button5Activity
Like I said, we'll actually define these functions soon, but not yet. Just notice how they are named. We will attach each function to its corresponding button using our existing for loop. This single line, added to the end of the for loop, does the trick:
//assign button activity function currentButton.activity = eval("button"+i+" Activity"); Pretty slick, eh? Notice how I'm using eval first to refer to the button name, but then I use it again to refer to the unique activity function for each button. So the second half of that line contains an eval that will be returning references of the form button0Activity , button1Activity , button2Activity , and so on. Each one is attached to the activity property of the button, making each one accessible directly without considering which button is being used. That's convenient because when it's time to perform the functionality for a button that was just pressed, all we have to do is add this.activity(); to the onPress handler, and the correct function will be called for whichever button was pressed. This might seem confusing, but it will make more sense when you see the code for the event handlers.
Stop Buttons from Playing and Set State to firstup
The only things left to do, other than define the functions we've already attached, are to stop the buttons from playing constantly (changing states every frame) and to set them up with the correct first state. The following code, which goes inside our big for loop, does both:
//stop button's playhead currentButton.stop(); //force a rollOut event currentButton.onRollOut();
The first thing we do is call stop on the button. That freezes the playhead in the first frame of the button's timeline. Of course, that might or might not be the correct first state for the button. (In this case, frame 1 is the active state, which is not the correct first state.) So we force the button into the first state ”in this case, firstup . We could have done this manually, but it's more convenient and a better design to use a function we have already made to do this (or will actually make soon). If we simply force Flash to run the onRollOut event, the button will go into the correct first state.
Add Text to Each Button
That almost completes the generic initialization of the buttons. The only other thing we need to do is place text inside each button to give it a description. Although it's possible to use the for loop to do this, it will rarely be convenient to do it this way in the future. Because I knew I'd want to reuse as much of this code as possible in later games, I went ahead and set up the text for each button outside the for loop for maximum reusability. The following code gives data to the text field contained in each button:
//assign button text for each unique button button0.mytext.text = "First Btn"; button1.mytext.text = "Second Btn"; button2.mytext.text = "Third Btn"; button3.mytext.text = "Fourth Btn"; button4.mytext.text = "Fifth Btn"; button5.mytext.text = "Sixth Btn";
Now here comes something important that we haven't talked about yet. Remember when we discussed the button symbol? I created a dynamic text box and gave it an instance name of mytext ; but I did not fill out the Var field to tie it to a variable. Instead, I'm setting the text by using the instance name. This will work because the text field will never change value during the life of the program. If we wanted the button names to change at run-time for some reason, we would have to use a variable in the Var field. In other words, using the Var field allows us to tie the text in the text field to some variable and let Flash take care of updating what's in the text field. We can manually update the text in the text box like I did in the preceding example, but it's not a good way to do it if the value needs to change with some variable. We would have to manually change the text each time the variable changed instead of letting Flash do it.
To set up text inside a text field instance, we refer to the instance name of the field followed by the text property using dot notation. Therefore, when I refer to button0.mytext.text , I am creating a path through button0 , into its text field instance that I named mytext , and into its property called text , which represents any text held in that field. The text property is a built-in property of the TextField object. When we discuss objects more formally in Chapter 6, this will become clearer. For now, simply realize that if you create a text field instance inside a movie clip and name it, you can change the text using the following general form:
myMovieClip.myTextField.text = "hello world";
| Caution | The text property is a built-in property of the TextField object. By assigning a string to the text property, you can change the text in a dynamic or input TextField instance. This differs from the way it was done in Flash 5. If you have experience in Flash 5, don't be confused by this change. |
If you test the movie at this point, you should see all the buttons on the stage in a column, as in Figure 4.19.
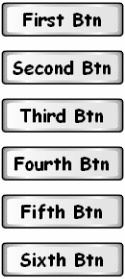
Figure 4.19: After initialization, the buttons should appear in a column with the appropriate text in each.
None of the buttons actually does anything yet because we haven't defined the handler functions. Also, notice that each button has the text we assigned it in the last piece of code.
That concludes the setup of the buttons. All that's left to do is to define the four event handlers and the six-button activity functions.
Implement Handlers
As I described earlier, the event handlers for the buttons are assigned from functions we haven't defined yet. After we define those four functions, the handlers will work properly. The following four sections break down each function one at a time.
The buttonRollOver Function
The buttonRollOver function serves the onRollOver event. Let's have a look at it.
First, recall that our button has five states now: firstup , up , down , over , and active . We need to make a map from all the states the button could possibly be in to each state the button would go to if an onRollOver event occurred. We're going to use what is called a state transition table to illustrate this mapping of state changes.
Let's begin with the onRollOver event's transition table, shown in Table 4.2.
| |
| State Before onRollOver | State After onRollOver |
|---|---|
| firstup | over |
| up | over |
| over | can't happen |
| down | can't happen |
| active | active |
| |
| Note | State machines are covered in Chapter 7, "Real-Time Programming: Shoot 'Em Up ," where I will delve deeply into their theory and implementation. At this point, we're going to skip a serious discussion of them and simply define some state transition tables. |
From each state, we see the next state our button will move into on an onRollOver event. Notice that some of the entries are labeled "can't happen." We know that if we have an onRollOver event, we couldn't already be in the over state, so the over to over transition is meaningless. And for the same reason that we couldn't have been in the down state if we got an onRollOver message, so the down to over transition is meaningless. That means there are only three possibilities. Either we are in the firstup state, the up state, or the active state. If we are active, the button remains red and unselectable. We don't want to allow our user to click the same button twice and have the functionality be executed twice. Therefore, the active states transition to active (no change). If we are in either of the up states, we change to the over state.
What we end up with is an algorithm that says the following:
| Tip | If we wanted to, we could easily change our script so that a button could be clicked multiple times. In this default case, I chose to disallow this. That's because this project is designed as a template for a button menu, which is most often used to load content from the server into another frame of the browser. In that case, we don't want to execute the same load if the user doubleclicks the button or clicks the button twice in a row. For that reason, when the button is active, none of our event handler functions will do anything if that button is clicked. |
-
if button is active, do nothing
-
else if button is inactive, go to state over
That algorithm can be easily implemented with the following script:
function buttonRollOver(){ if(!this.active) this.gotoAndStop("over"); } We first check to see whether the button is active; if it's not, we issue our gotoAndStop function. Simple enough, I hope.
The buttonPress Function
The buttonPress function serves the onPress event. When the button is clicked, we generally want to move it into the down state. We don't want to actually execute the button's activity yet; we'll save that for the onRelease function. If we make another state transition diagram for the onPress event, we get Table 4.3.
| |
| State Before onPress | State After onPress |
|---|---|
| firstup | can't happen |
| up | can't happen |
| over | down |
| down | can't happen |
| active | active |
| |
Therefore, in this case, the only states we can be in where we will receive an onPress event will be the over and active states. All the others imply a state from which the user cannot directly cause an onPress event. (If the button is up, the mouse is not over it. How can the user click the mouse on a button that the mouse is not over?) That makes the algorithm for this handler extremely simple. We do nearly the same thing we did last time. We simply test for an active button and move into the down state if we are not active. The following script implements this:
function buttonPress(){ if(!this.active) this.gotoAndStop("down"); } The buttonRollOut Function
The onRollOut event is a bit more complicated than the previous handlers. If the user rolls out of the button and the button has never been pressed before, it should move into the firstup state. However, if the button has been clicked before, it should move into the up state. Finally, if the button is active, it should remain in the active state. The rest of the transitions are not defined because we cannot be in either the up or the down state when the user rolls out of the button. That forms the basis for Table 4.4.
| |
| Before onRollOut | After onRollOut |
|---|---|
| firstup | can't happen |
| up | can't happen |
| over | firstup or up |
| down | can't happen |
| active | active |
| |
Like before, we first need a test to see if the button is active, and then we need another test to see if the button has been clicked. This information is kept in the active and virgin properties of the button, so the implementation is done with the following script:
function buttonRollOut(){ if(!this.active){ if(this.virgin) this.gotoAndStop("firstup"); else this.gotoAndStop("up"); } } | Tip | Notice the way my logic is built in the previous example. I have an if and an else nested inside an if . I could have used one long string of if and else if , but that would have been harder to read and harder to modify later. Keeping your code as clear as possible will help you a great deal in the long run. |
As you can see, the first thing we do is test for an active button. If we are active, we do nothing. If we are inactive, we test to see if the button has been clicked before. If it hasn't, we move to the firstup state; if it has, we move to the up state.
The buttonRelease Function
This final function, buttonRelease , serves the onRelease handler. This is the handler where all the magic happens, so it's going to be the most complicated. The state transitions, however, are simple. The only states we can be in when this event occurs are the active state and the down state. That gives us the transition table found in Table 4.5.
| |
| Before onRelease | After onRelease |
|---|---|
| firstup | can't happen |
| up | can't happen |
| over | can't happen |
| down | active |
| active | active |
| |
The complexity comes in because when this state transition occurs, some of the button's properties ”including active and virgin ”need to change. In addition, whatever button might have been active before needs to be set to inactive now. That translates into the following algorithm:
-
if the button is active, do nothing
-
else if the button is not active, make all other buttons inactive and put them all in their up or firstup states. Remove this button's virginity, execute its activity function, make it active, and move it into the active state.
That seems simple enough, and it is. It translates into the following script:
function buttonRelease (){ if(!this.active){ //make all buttons inactive and move them into their up states for(i=0; i<number_of_buttons;++i){ eval("button"+i).active = false; eval("button"+i).onRollOut(); } //remove virginity this.virgin = false; //activate activity this.activity(); //set active property this.active = true; //go to active state this.gotoAndStop("active"); } } In this one, we're first checking for active . If the button isn't active, we use a for loop that makes every button's active property false and then calls the onRollOut method on each button to force it into its up or firstup states. After that, we set the virgin property to false , call the activity function, set the active property to true , and move into the active state.
If you test your movie, now that the handler functions have been defined, you should see something close to Figure 4.20. The buttons should be responding to the mouse, although they will not perform specific actions when pressed. Play around with them and make sure they are going into their correct states when clicked.
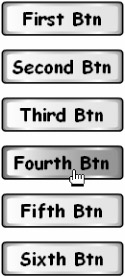
Figure 4.20: The buttons should now be responsive to the mouse. However, they don't have activity functions yet, so they won't do anything when clicked other than change appearance.
Implement activity Functions
The final piece of implementation is the six activity functions. We defined their names earlier, and because none of the buttons in this example do anything, we can implement some simple functions for them. The following script represents the default implementation of all the buttons:
function button0Activity(){ trace("button 0"); } function button1Activity(){ trace("button 1"); } function button2Activity(){ trace("button 2"); } function button3Activity(){ trace("button 3"); } function button4Activity(){ trace("button 4"); } function button5Activity(){ trace("button 5"); } Because we don't have anything for these buttons to do, they just trace a simple message with their button number. In the future, we would remove the trace call and replace it with some script that handles the real work to be done by the button.
Complete Code Listing
What follows is a complete code listing of the Button menu. Use this script to get an idea of the global layout of the code.
number_of_buttons = 6; //set up each button for(i = 0; i < number_of_buttons; ++i){ //attach button instance var currentButton = attachMovie("button", "button"+i, i+1); //button has never been pressed currentButton.virgin = true; //button is not active currentButton.active = false; //scale down button currentButton._xscale = currentButton._yscale = 50; //move button currentButton._x += 100; currentButton._y += 50*i+75; //assign button handlers currentButton.onPress = buttonPress; currentButton.onRelease = buttonRelease; currentButton.onRollOut = buttonRollOut; currentButton.onDragOut = buttonRollOut; currentButton.onRollOver = buttonRollOver; //assign button activity function currentButton.activity = eval("button"+i+" Activity"); //stop button's playhead currentButton.stop(); //force a rollOut event currentButton.onRollOut(); } //assign button text for each unique button button0.mytext.text = "First Btn"; button1.mytext.text = "Second Btn"; button2.mytext.text = "Third Btn"; button3.mytext.text = "Fourth Btn"; button4.mytext.text = "Fifth Btn"; button5.mytext.text = "Sixth Btn"; //function to handle onRollOver events function buttonRollOver(){ if(!this.active) this.gotoAndStop("over"); } //function to handle onPress events function buttonPress(){ if(!this.active) this.gotoAndStop("down"); } //function to handle onRollOut events function buttonRollOut(){ if(!this.active){ if(this.virgin) this.gotoAndStop("firstup"); else this.gotoAndStop("up"); } } //function to handle onRelease events function buttonRelease (){ if(!this.active){ for(i=0; i<number_of_buttons;++i){ eval("button"+i).active = false; eval("button"+i).onRollOut(); } this.virgin = false; this.activity(); this.active = true; this.gotoAndStop("active"); } } //functions to handle unique activity of all buttons function button0Activity(){ trace("button 0"); } function button1Activity(){ trace("button 1"); } function button2Activity(){ trace("button 2"); } function button3Activity(){ trace("button 3"); } function button4Activity(){ trace("button 4"); } function button5Activity(){ trace("button 5"); } Reusable Scripts
As I've said all along, we'll be using symbols and code from this example to jump-start our buttons in the future. By building code with reusability in mind, you can greatly decrease your development time as you complete more projects. That will be one of the things we keep our eyes on in all of the projects in this book.
On the other hand, if you try, you can usually build too much reusability into your code. A script that will almost never be used again, and if so only in a highly modified form, should not be made to be as reusable as possible. Generally, introducing reusability into your code makes it harder and slower to develop. I could have built even more reusability into this button example, but it probably would have been wasted .
Finally, reusable code in Flash is generally less efficient than code developed for one specific application. In future games, there will be pieces of script that we must make sure are highly optimized. In those cases, we will throw reusability out the window.
EAN: 2147483647
Pages: 161