Properties
Properties are similar to variables except that they already exist before you ask for them. Most are tied to Flash in a special way such that if you alter the value of one of them, something in your movie will change. You have already seen a few properties used in Chapter 2, but now it's time to take a good look at them. Flash defines a ton of properties for each type of stage object. For now, we'll focus on the properties of a movie clip instance.
| Note | Technically, any variable that is attached to an object (movie clips are actually one type of object) can be referred to as a property . In this chapter, I refer to properties generally as the built-in variables for a clip. The same is true of functions that are attached to objects. They are usually called methods . |
What follows is a breakdown of the most commonly manipulated properties. This is far from a complete list, but I'm starting with the frequently used ones. We'll talk about the more obscure properties in later chapters as we need them. If you want to see the full list, simply open the Reference window in the Actions panel and click on Properties.
The _alpha Property
As you have seen in previous examples, the _alpha property represents an amount of transparency that a movie clip has. You can do all kinds of neat stuff with this property now that you are programming interactivity. For example, when the user's mouse comes close to an object, you can slowly make it more transparent, and as the user 's mouse moves away, you can make it less transparent. All you have to do is set the _alpha property to whatever value you want (in this case, the distance from the mouse pointer), and Flash takes care of the rest.
Remember from our discussion of scope that if you refer to a property of a movie clip with script that is attached to the clip itself, you can refer to the property directly. That's why in our transparent ball example earlier we simply dropped the following line of code inside one of the ball clips to change its transparency (we put this line in an enterFrame handler):
_alpha = 50;
On the other hand, if you wanted to put script in the main timeline that would change the transparency of ball1 on the stage, we would have to qualify the scope of the property, as follows:
ball1._alpha = 50;
| Note | The _alpha property should contain a value between 0 and 100, which indicates the percentage of opacity. That means at 0, the movie clip will be completely transparent, or invisible, and at 100, it will have no transparency applied at all. |
Notice the way we use dot notation to refer to the alpha property when we are changing it from the main timeline? That's because _alpha is a property of the movie clip, so its scope is that of the movie clip. To refer to that property outside the clip, we must use dot notation to qualify the scope.
The _x and _y Properties
These two properties represent the position of a movie clip on the stage. You can move a clip around by simply setting its _x and _y properties to the position you want it to be in. To demonstrate , move one of the balls into the upper-left corner of the stage and attach the following script to it:
onClipEvent(enterFrame){ _x++; _y++; } Now when you test your movie, you'll see the ball you gave the script to moving across the stage and finally going out of sight. That's because we incremented its position properties inside the enterFrame handler which, if you remember, is called once every frame.
Because we're on the subject of stage position, it's worth talking about the coordinate system used to describe them. A default movie has a stage size of 550 — 400 pixels. The position of an object on the stage is based on a Cartesian plane, as it is in algebra. The difference is that the point (0,0) is located in the upper-left corner of the stage. As you go right on the stage, the x value gets bigger, but as you go down, the y value gets bigger. Likewise, if we are talking about a point at the lower-right corner of the stage, its x value would be 550 and its y value would be 400. Take a look at Figure 3.8 to see a diagram of the default stage. The axis along with several points are marked with their corresponding (x,y) coordinates.
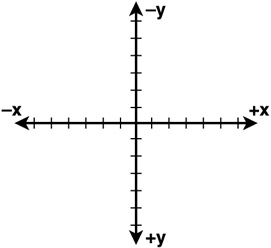
Figure 3.8: The stage is a Cartesian plane with the origin in the upper-left corner. Positive x goes right, and positive y goes down.
| Tip | It might seem strange to have positive y going down, but it makes sense when you're thinking about a document. When you're reading a letter, for example, you begin at the upper-left corner and read down the page. If you want to divide up a document like that with x and y coordinates, it makes sense to start the y at the top left and make it grow larger as you move down. That's in contrast to high school algebra where positive y goes up. |
| Tip | You can use coordinates outside the range of the stage. When you do, your clips move off the stage and are invisible to the user. This is often useful for making your clips move in from off-stage. By placing them outside at first and then sliding them in when they are needed, you can get the effect of movement. Side-scrolling games are a good example of this. |
At this point, I should mention something that pertains to the position of a movie clip. Edit the ball movie clip in your library and notice the little black plus symbol somewhere around it. It should look something like Figure 3.9.
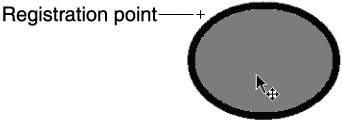
Figure 3.9: The black plus symbol is the clip's registration point. When you position a clip with the Info Panel or by setting its _ x and _ y properties, its registration point is placed exactly at the prescribed position.
This plus symbol marks the registration point for the symbol, which means that its exact position on the stage is determined by this registration symbol. You'll generally place your art inside a movie clip so that the registration point is either dead center or in the upper-left corner, depending on your needs. You can use the Info Panel to position your art exactly where you want it with respect to the registration point. Then when you drag an instance of the clip onto the stage and set its position to some coordinates, its registration point will be placed exactly at those coordinates.
One final point about the position properties: They are relative to the parent of the clip they are attached to. That's extremely important to realize. If you have a clip inside a clip, the inner clip's _x and _y properties will be relative to the outer clip. In other words, you can move the outer clip, and the inner clip's position properties will not change, even though it's moving about the screen. We'll see this again in Chapter 4 when we look at empty movie clips as a container for several other child clips.
| Tip | If you need the coordinates of a child clip relative to the stage, you can get them by using the built-in global function localToGlobal . You can look up this and its complement function, globalToLocal , in Appendix A, "ASCII Character Chart," or in the ActionScript Dictionary. |
The _xscale and _yscale Properties
Another pair of properties you've seen are _xscale and _yscale . When you instantiate a new clip on the stage, _xscale and _yscale are initially set to values of 100. They represent a percentage of scaling that you apply to the clip. Therefore, if you want to stretch a clip on the stage, you must determine the percentage of stretch you want and then apply it to the scale property.
| Tip | You can use negative numbers on the scale properties to get a mirror image of a clip. Set the value of _xscale to 100 for a horizontal mirroring. |
You can use _xscale and _yscale together to change the relative size of a clip on the stage. If you set them both to values of 200, for example, your clip doubles in size. In contrast, you can set _xscale and _yscale to 50 to shrink a clip to half its size.
The _width and _height Properties
This pair of movie clip properties controls the size of a movie clip in pixels. They are tied to the _xscale and _yscale properties respectively, so altering the _height automatically alters the _yscale property. Let's see an example of this. Delete the two balls from the stage and instantiate a fresh ball from the library and name it ball . Add this script to the main movie timeline:
trace(ball._xscale); ball._width *= 2; //double the width of the ball instance trace(ball._xscale);
Notice that at first, the _xscale is at its default value of 100, but after doubling the _width property, the _xscale property has become 200. The same relationship exists between the _height and _yscale properties.
Should you change a movie clip's size with the scale properties or the absolute properties? The answer is whichever is more convenient at the time.
The _visible Property
The _visible property is simple. It's a boolean, which means it can take only true and false as its values. Any movie clip is set to true by default. You can, of course, set it to false , and your movie clip will become invisible. To later make it visible again, change _visible back to true .
Take note that this is not the same as setting the _alpha to 0. The _alpha property and the _visible property are not tied together in any way. Therefore, if you make a clip invisible both ways, you'll have to undo both things to make it visible again.
Also, please note that making a clip invisible with the _visible property is preferable. If you reduce the _alpha , Flash still tries to render the clip, which chews up CPU. If you instead use _visible , Flash is saved the expense of rendering the clip.
The _rotation Property
This is another simple property that pretty much does what it says. You use the _rotation property to rotate a movie clip on the stage. The actual value is between 180 and 180 at all times (indicating degrees), but you can enter any value you like, and Flash will adjust it into the correct range for you. As an example, let's create some rotating text.
Remove the balls from the stage and create a new symbol called message . Inside it, place a text field with some text of your own choosing, perhaps your name. Now return to the main movie timeline, instantiate the message clip onto the stage, name the instance myMessage , and with the instance selected, attach the following script:
onClipEvent(enterFrame){ trace(_rotation); //output current rotation value _rotation += change++; //add to rotation and increment change } After you test this code, you should see your message rotating faster and faster, as shown in Figure 3.10. Notice the output. The actual value of the _rotation property never leaves the range of 180 to 180. Also notice that the center of rotation is the registration point for the movie clip. If you edit the clip in the library and move the art relative to the registration point, the center of rotation moves as well.

Figure 3.10: We rotate a clip by adding to its _rotation property. Flash automatically converts the _rotation into the range of 180 to 180.
EAN: 2147483647
Pages: 161