Where Does the Script Go?
Well, that's a silly question because we already know that the script goes in the Editor window of the Actions panel, right? Well, yes and no. Although the script is typed into that window, the script that you type there is actually attached to something in your movie. As you select different frames in the timeline and instances on the stage, any script attached to them will show up in the panel. You can add script in many different places, depending on when you want the script to execute. The placement of code will be a topic of much discussion for us.
For starters, you can attach script to any frame of your main movie timeline. You can also attach script to movie clip instances. Further, you can attach script to frames in the timelines of movie clips in your library. Various other odds and ends can have script attached, and we'll see many of them in the chapters to come.
The Actions panel allows you to write and edit scripts that are attached to different things, such as frames and instances on the stage. If you select a movie clip instance on the stage, for example, and a script is attached, it appears in the Actions panel. If you then select some other movie clip instance on the stage that does not have a script attached, the Editor window of the Actions panel appears blank, like it is now. Let's look at some of the places your scripts can be attached one at a time.
Frame Scripts
The most common location to put a script is in any keyframe in any timeline. In other words, if a particular event needs to occur precisely during frame 5 of some movie, you can add some script that causes the event to attach to frame 5 in the movie's timeline, assuming you have added a keyframe to frame 5. When the Flash Player gets to frame 5 in the timeline, the script is executed. Let's look at some specific examples.
Create a new movie (a new .fla document) and then create a new symbol called ball. Draw a circle inside the ball clip and then drag an instance of the ball clip onto the stage. With the ball instance selected, open the Properties panel and find the data field that says <Instance Name> in it. This field allows you to name the ball instance, which is important because the ball needs a name so that we can affect it with ActionScript. Click on the Instance Name field and enter ball1 , as in Figure 2.3.
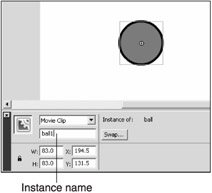
Figure 2.3: By naming a movie clip on the stage, you can affect it with ActionScript that is attached to a frame in the same timeline that the clip exists in.
You'll now want to change the name of Layer 1 to something more appropriate, such as Balls . Select the 10th frame in the Balls layer and right-click. Select Insert Frame to add empty frames between frame 1 and frame 10 of the Balls layer. Now add a new layer to your timeline and name it Actions . Select the 5th frame in Actions and right-click. Select Insert Keyframe from the menu. You have just inserted a keyframe into the Actions layer of the timeline, and that keyframe remains highlighted. If you open the Actions panel now and start typing ActionScript, any script you write is then attached to frame 5 of the Actions layer of the timeline of your main movie. Simple, right?
| Tip | When you are typing script into the Actions panel, the title bar for the panel tells you what type of object (movie clip instance, button instance, or frame) you are attaching script to. If you are adding script to a frame, the title bar will say Actions - Frame; if you are adding script to a movie clip instance on the stage, the title bar will say Actions - Movie Clip. |
Open the Actions panel and type the following script into the Editor window:
ball1._xscale = 200;
That script causes the instance on the stage that you named ball1 to immediately stretch its width by 200 percent. Don't worry about why the script does that; we'll get to that stuff later. For now, just realize that the script makes our ball instance fat when it's executed. Notice that a lowercase A has appeared in frame 5, as in Figure 2.4. This signifies that ActionScript has been attached to that frame.
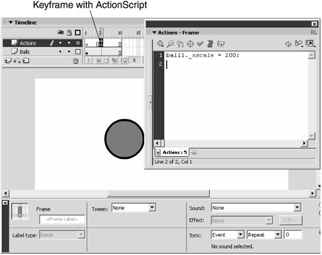
Figure 2.4: ActionScript has been attached to frame 5 of the Balls layer.
| Note | It's important to understand the difference between a symbol name and an instance name. The symbol in your library has a name ”the name given when you create the symbol. When you instantiate the symbol by dragging it onto the stage, you can use the Properties panel to give the instance a name as well. These names are separate, but I generally name my instances either identically to my symbol name or the symbol name followed by a number. For example, a symbol in the library named ball might have instances on the stage named ball1 , ball2 , ball3 , and so on. |
If you test the movie at this point, you should be able to see the ball sitting on the stage for a moment. Then it should grow twice as wide suddenly and remain that way. Now select frame 1 of the Actions layer and type the following script into the Actions panel:
ball1._xscale = 100;
Test your movie and watch the ball instance get instantly fat and skinny as the movie plays over and over. You can see that by attaching some simple script to one frame of the main movie timeline, we can affect movie clip instances on the stage; however, that is not our only option. We can attach frame scripts to the timelines contained within the movie clips as well.
Frame Scripts in Movie Clips
As you know, movie clips have a timeline that is similar to the main movie timeline. As such, you can attach script to these movie clip timelines. Let's go through another example to illustrate this operation. We're going to add some script to the timeline of the ball symbol that will make it's size jump up and down as the movie plays.
| Note | Every movie clip symbol in your library has a timeline, just like your main movie. If you edit the movie clip, you can manipulate its timeline in the same way you can the main timeline. You can add keyframes, symbol instances, script, and so on. When Flash plays a movie, the main timeline begins to play. When a new movie clip instance appears on the stage, its own timeline begins to play. Each plays one frame at a time. |
Select frame 1 of the Balls layer and drag another ball instance onto the stage. Use the Properties panel to name it ball2 . If you test the movie right now, you'll see ball1 changing sizes like before, but ball2 is just sitting there. The script you've already written tells ball1 to change its size, but ball2 is told nothing in that script. If we want to make ball2 change sizes like ball1 is, we should add more script to frames 1 and 5 of the Actions layer, right? Well, we could, but that would be a bad idea. We might decide later that we want 200 balls changing sizes on the stage, and that would mean adding 200 lines of script to frames 1 and 5. That would be a lot of hard work to add script for each. Instead, we can add some script to the timeline of the ball from which all instances are made (the one in the library). That script can change the size of the ball, and because the movie clip in the library contains the script, it affects all instances created from it ”namely, ball1 and ball2.
Right-click on the ball movie clip inside your library and choose Edit. Change the layer name from Layer1 to ball and then create a second layer named Actions . Add empty frames to the Balls layer from frames 2 “10 by right-clicking on frame 10 in that layer and selecting Insert Frame. Now add keyframes to both the first and fifth frames in the Actions layer. Select frame 1 in the Actions layer and enter the following script:
_xscale = 100;
Now select frame 5 in the Actions layer and enter the following script:
_xscale = 200;
Go back to your main timeline by clicking on the Scene button at the top of the stage. Then delete the Actions layer in the main timeline by right-clicking on it and selecting Delete Layer. Test your movie, and you should see both balls changing size, despite the fact that you have removed all script from the main movie timeline. The only script remaining in the movie is attached to the timeline of your ball movie clip. All instances of that clip on the stage get a copy of that timeline with the scripts attached, and when the movie plays, the instances obey.
Instance Scripts and Event Handlers
We can attach script to movie clip instances. Yes, strange as this should seem to you, we can attach scripts to movie clip instances on the stage. The instances ball1 and ball2, for example, could each have separate scripts attached to them that would make each behave differently. This presents a problem; instances on the stage contain a timeline that is an exact copy of the symbol they were created from. After the instances are created, we cannot alter the individual timelines of those instances. The only timeline we can edit is that of the clip in the library, and then all instances would get the new script. To allow us to attach script to an instance that already exists on the stage, we must use something other than a timeline script; we must use event handlers.
An event handler is a bit of script that sits and waits on a special event to occur. When that event occurs, any handlers that are waiting for it will be executed. Flash defines a series of event handlers for movie clip instances. They include but are not limited to the following:
-
load. This handler is called once when the instance enters the stage.
-
unload. This handler is called once when the instance leaves the stage.
-
enterFrame. This handler is called once every frame that the instance exists on the stage.
-
mouseDown. This handler is called once each time the user presses the mouse button.
-
mouseUp. This handler is called once each time the user releases the mouse button.
-
mouseMove. This handler is called once each frame if the mouse has been moved since the last frame.
-
keyDown. This handler is called once each time the user presses a key on the keyboard.
-
keyUp. This handler is called once each time the user releases a key on the keyboard.
We can use these event handlers to cause movie clip instances on the stage to react to various events that occur. For example, any script that we place inside the enterFrame handler is invoked once per frame. To the user, this appears to be a nearly constant behavior. For example, if we added some script to ball1 inside the enterFrame handler that added one percent to the ball's width, our ball would soon grow so large that it would take up the entire stage. Now let's try out event handlers to see how they really work.
First edit the ball movie clip in your library and delete the Actions layer. Doing so removes the script we just wrote so that it won't interfere with the script we are about to write. Now go back to the main movie timeline.
Click on one of the balls on the stage and you'll see the blue rectangle surround it. This rectangle tells you that the instance is selected. If you type script into the Actions panel with an instance selected, the script will be attached to the instance. Type the following script into the Actions panel with the ball selected:
onClipEvent(enterFrame){ _xscale = _xscale + 4; } Again, don't worry about the onClipEvent , the curly braces, or any of that. We'll get to them soon enough. Just realize that we are going to make the ball instance get 4 percent fatter each frame by using the enterFrame event handler.
Now select the other ball instance and enter the following script into the Actions panel:
onClipEvent(load){ _alpha = 50; } Notice that this script uses the load event handler. That means the script inside it will be executed only once when the instance first appears on the stage. Go ahead and test your movie now. You should see one ball instance that grows fatter and fatter until it stretches off the stage; the other instance should be 50 percent transparent now, as in Figure 2.5.

Figure 2.5: Each ball has its own event handler that does something different.
Because we're now well on our way to writing games using ActionScript (although it might not seem like it), we should take the time to talk about one panel that we've neglected thus far: the Output panel.
EAN: 2147483647
Pages: 161