Publishing Features Overview
Publishing refers to the act of creating content such as a new page in your site or modifying content such as a block of text or a picture. By using built-in publishing tools explained throughout this chapter, you can quickly and easily modify your web content without the need for code. With SharePoint 2007’s Publishing feature, you can publish web content for pages and content approval workflow material right from the browser or use tools such as the Enhanced Text Editor to edit text right on the page. SharePoint has various templates, such as the Collaboration portal and the Publishing portal, that have the Publishing feature already enabled. However, you can enable the Publishing feature on a regular team site, such as a blank site, at any time to give it the publishing capabilities.
Creating a Publishing Portal
If you are planning to create a site that is going to be highly customized and feature many pages of content, you may select the Publishing portal as the site template for your site collection. Like the Collaboration portal template, you can only select this template as a top-level site within a site collection. In the next example, you create a Publishing portal that acts as sample site for the remainder of this chapter.
| Tip | See Chapter 1 for a discussion of what a portal is and what it can do for you. |
Try It Out-Create a Publishing Portal Site
In this example, you create a new site collection that acts as a host for your company’s public Internet site. This site contains news articles, company information pages, as well as information on various ski products and services in multiple languages. In the past, creating a public-facing Internet site required in-depth knowledge of HTML and other related technologies.
-
From the Central Administration site of your SharePoint environment, select the Application Management tab.
-
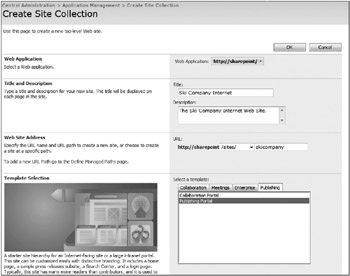
Select Create Site Collection from the SharePoint Site Management category. The Create Site Collection window appears, as shown in Figure 13-1.

Figure 13-1 -
Select the appropriate web application for your site collection. This is typically the web application hosted on port 80.
-
Enter a title for your website. For this example, enter Ski Company Internet.
-
Enter a description for your website. For this example, enter the following for your description:
Important The Ski Company Internet Website.
-
For the site URL, ensure that the “sites” path is selected from the drop-down menu and enter skicompany for the URL name.
-
Select the Publishing Portal template from the Publishing tab as shown in Figure 13-1.
-
Select yourself as the Primary Site Collection administrator.
-
Click the OK button.
How It Works
A publishing portal is created with many of the initial lists and libraries that you will need to get started on your website. Figure 13-2 shows an example of how the Internet site will look upon creation.

Figure 13-2
The Publishing Portal’s Lists and Libraries
As mentioned in the last Try It Out, a publishing portal comes with lists and libraries to get you started, including the ones shown in the following list. In addition to these lists, the site collection contains two subsites for Press Releases and Search. You can create new subsites to represent the various sections of your company website. So although you may think of a company website as a single site, in actual fact it contains multiple subsites. As you create each subsite, the navigation updates to reflect your changes. The navigation controls allow visitors to your site to browse the various sections in a seamless and intuitive manner that does not make them feel as though they are actually visiting multiple sites.
-
Documents: This library stores documents and files to which your website’s various content pages link. You can add columns, content types, or views to suit your specific requirements. By default, this has versioning and content approval enabled, as well as columns for the publishing start and end dates. A version of this library is created in each publishing subsite for files and documents unique to that site.
-
Form Templates: Chapter 10 discussed how to activate InfoPath Form templates to a site collection from the Central Administration site. When this happens, a content type is created, and the Form template publishes into the Form Templates library on the top-level site of the site collection. This is a useful location for storing central templates used by InfoPath forms utilized throughout your site collection.
-
Images: This system-generated library stores images for display in the current site that has ver-sioning and content approval enabled. A version of this library is created in each publishing subsite for images unique to the site.
-
Pages: This holds the various pages you create for the content of your website including the default page. It has a series of special content types that allow you to create site content and pages. You can learn more in an upcoming section.
-
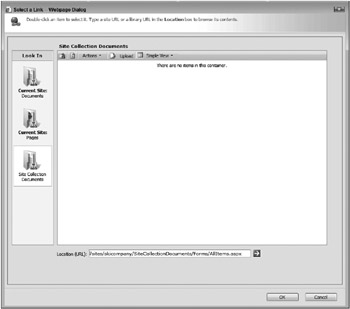
Site Collection Documents: This document library acts as a centralized store for documents and files that are required and accessed throughout the site collection. Various publishing controls, such as the Enhanced Text Editor or Publishing hyperlink, can access documents in this library. You can select Site Collection Documents from the left menu when editing either of these controls, as shown in Figure 13-3.

Figure 13-3 -
Site Collection Images: This document library stores the images that a site collection requires. Like the Site Collection Documents library, this is available directly via the interface when you use the various image publishing controls.
-
Style Library: This system-generated library contains many of the style elements that your site requires, including custom XSL styles and CSS files; however, you can also add your own style sheets, which you can reference from within the site collection.
-
Content and Structure Reports: This system list contains special queries within each list item that helps to generate the reports available on a publishing site from the Site Actions menu. Reports are helpful for identifying tasks and content that exists throughout the publishing site collection.
-
Reusable Content: You may need to display content in multiple Web Parts or locations that is pulled from a single centralized source. This system-generated list contains content that you can display within specific Web Parts. You can opt to link it back to the source so that as content updates in the list, the Web Parts also automatically update.
-
Workflow Tasks: This system-generated task list tracks the workflow tasks that are created as a result of the various publishing workflows.
In addition to the seamless navigation experience that SharePoint offers users between sites, it also has support for creating portals in multiple languages. In the next section, you see how to take a company website and configure it so that content users can view it in multiple languages.
EAN: 2147483647
Pages: 131