Troubleshooting Tips and Techniques
| Troubleshooting PC hardware problems can seem daunting to the uninitiated, but in reality it is much simpler than it seems. Most problems can be diagnosed and corrected using few, if any, special tools and can be accomplished by anybody who can apply simple deductive reasoning and logical thinking. PCs have become more complicated and yet simpler all at the same time. More and more complex internal circuits mean that there are potentially more things that can go wrongmore ways the system can fail. On the other hand, today's complex circuits are embedded into fewer boards, with fewer chips on each board and more serial interconnections using fewer pins (fewer wires). The internal consolidation means that isolating which replaceable component has failed is in many ways simpler than ever before. An understanding of the basics of how PCs work, combined with some very simple tools, some basic troubleshooting tips, and logical thinking and common sense, will enable you to effectively diagnose and repair your own systems, saving a tremendous amount of money over taking it to a shop. In some cases, you can save enough money to practically pay for an entire new system. The bottom line with troubleshooting PC problems is that a solution exists for every problem, and through simple practices combined with deductive reasoning, that solution can easily be found. Note This section lists basic and general system troubleshooting procedures and guidelines. For specific procedures for troubleshooting a component in the system, use Appendix C, "Troubleshooting Index," as a quick reference for finding the chapter or section dedicated to that part of the PC. Modern PCsMore Complicated and More ReliableConsider this: The modern PC is an incredible collection of hardware and software. Focusing specifically on the hardware, between 50 and more than 400 million transistors exist in modern processors. In addition, nearly 8.6 billion transistors are in 1GB of RAM; hundreds of millions of transistors exist in the motherboard chipset, video processor, and video RAM; and millions more are in the other adapter cards or logic boards in the system. Each of these billions of interconnected transistors must not only function properly, but also operate in an orderly fashion within strictly enforced timing windows, some of which are measured in picoseconds (trillionths of a second). When you realize that your PC will lock up or crash if any one of these transistors fails to operate properly and on timeand/or any one of the billions of circuit paths and interconnections between the transistors or devices containing them fails in any wayit is a wonder that PCs work at all! Every time I turn on one of my systems and watch it boot up, I think about the billions upon billions of components and trillions upon trillions of machine/program steps and sequences that have to function properly to get there. As you can now see, many opportunities exist for problems to arise. Although modern PCs are exponentially more complicated than their predecessors, from another point of view they have become simpler and more reliable. When you consider the complexity of the modern PC, it is not surprising that problems occasionally do arise. However, modern design and manufacturing techniques have made PCs more reliable and easier to service despite their ever-increasing internal complexity. Today's systems have fewer and fewer replaceable components and individual parts, which is a bit of a paradox. The truth is that, as PCs have become more complex, they have also become simpler and easier to service in many ways. Industry-Standard Replaceable ComponentsThe use of industry-standard components is one of the key features of a PC. This means that virtually all the parts that make up a system are interchangeable with other systems in some manner. This also means that the parts are plentiful, inexpensive, and generally very easy to install. A typical PC contains the following replaceable components, most of which are made to industry standards for design and form factor:
Although some of the more well-optioned systems might have even more components than listed here, you can see that most PCs have fewer than 20 replaceable "parts." Some can have as few as 1015, depending on how many options are present and how they are integrated. From a hardware troubleshooting or repair perspective, one of these components is either improperly installed (configured) or defective. If it's improperly installed or configured, the component can be repaired by merely reinstalling it or configuring it properly. If it's truly defective, the component must simply be replaced. When a PC is broken down to the basic replacable parts, you can see that it really isn't that complicated, which is why I've spent my career helping people to easily perform their own repairs or upgrades and even build entire systems from scratch. Reinstall or Replace?When dealing with hardware problems, the first simple truth to understand is that you do not usally repair anythingyou reinstall or replace it instead. You reinstall because the majority of PC hardware problems are caused by a particular component being improperly installed or configured. I remember hearing from IBM many years ago that it had found that 60% or more of the problems handled by its service technicians were due to improper installation or configuration, meaning the hardware was not actually defective. This was, in fact, the major impetus behind the plug-and-play revolution, which has eliminated the need to manually configure jumpers and switches on most hardware devices. This has thus minimized the expertise necessary to install hardware properly and has also minimized installation, configuration, and resource conflict problems. Still, plug and play has sometimes been called plug and pray because it does not always work perfectly, sometimes requiring manual intervention to make it work properly. You replace because of the economics of the situation with computer hardware. The bottom line is that it financially is much cheaper to replace a failed circuit board with a new one than to repair it. For example, you can purchase a new, state-of-the-art motherboard for around $100, but repairing an existing board normally costs much more than that. Modern boards use surface-mounted chips that have pin spacings measured in hundredths of an inch, requiring sophisticated and expensive equipment to attach and solder the chip. Even if you could figure out which chip had failed and had the equipment to replace it, the chips themselves are usually sold in quantities of thousands and obsolete chips are usually not available. The net effect of all of this is that the replacable components in your PC have become disposable technology. Even a component as large and comprehensive as the motherboard is replaced rather than repaired. Troubleshooting by Replacing PartsYou can troubleshoot a PC in several ways, but in the end it often comes down to simply reinstalling or replacing parts. That is why I normally use a simple "known-good spare" technique that requires very little in the way of special tools or sophisticated diagnostics. In its simplest form, say you have two identical PCs sitting side by side. One of them has a hardware problem; in this example let's say the memory module (DIMM) is defective. Depending on how and where the defect lies, this could manifest itself in symptoms ranging from a completely dead system to one that boots up normally but crashes when running Windows or software applications. You observe that the system on the left has the problem but the system on the right works perfectlythey are otherwise identical. The simplest technique for finding the problem would be to swap parts from one system to another, one at a time, retesting after each swap. At the point when the DIMMs were swapped, upon powering up and testing (in this case testing is nothing more than allowing the system to boot up and run some of the installed applications), the problem has now moved from one system to the other. Knowing that the last item swapped over was the DIMM, you have just identified the source of the problem! This did not require an expensive ($2,000 or more) DIMM test machine or any diagnostics software. Because components such as DIMMs are not economical to repair, replacing the defective DIMM would be the final solution. Although this is very simplistic, it is often the quickest and easiest way to identify a problem component as opposed to specifically testing each item with diagnostics. Instead of having an identical system standing by to borrow parts from, most technicians have an inventory of what they call "known-good spare" parts. These are parts that have been previously used, are known to be functional, and can be used to replace a suspicious part in a problem machine. However, this is different from new replacement parts because, when you open a box containing a new component, you really can't be 100% sure that it works. I've been in situations in which I've had a defective component and replaced it with another (unknown to me) defective new component and the problem remained. Not knowing that the new part I just installed was also defective, I wasted a lot of time checking other parts that were not the problem. This technique is also effective because so few parts are needed to make up a PC and the known-good parts don't always have to be the same (for example, a lower-end video card can be substituted in a system to verify that the original card had failed). Troubleshooting by the Bootstrap ApproachAnother variation on this theme is the "bootstrap approach," which is especially good for what seems to be a dead system. In this approach, you take the system apart to strip it down to the bare minimum necessary, functional components and test it to see whether it works. For example, you might strip down a system to the chassis/power supply, bare motherboard, CPU (with heatsink), one bank of RAM, and a video card with display and then power it up to see whether it works. In that stripped configuration, you should see the POST or splash (logo) screen on the display, verifying that the motherboard, CPU, RAM, video card, and display are functional. If a keyboard is connected, you should see the three LEDs (capslock, scrlock, and numlock) flash within a few seconds after powering on. This indicates that the CPU and motherboard are functioning because the POST routines are testing the keyboard. After you get the system to a minimum of components that are functional, you should reinstall or add one part at a time, testing the system each time you make a change to verify it still works and that the part you added or changed is not the cause of a problem. Essentially, you are rebuilding the system from scratch using the existing parts, but doing it one step at a time. Many times problems are caused by corrosion on contacts or connectors, so the mere act of disassembling and reassembling a PC will "magically" repair it. Over the years, I've disassembled, tested, and reassembled many systems only to find no problems after the reassembly. How can merely taking it apart and reassembling repair a problem? Although it might seem that nothing was changed and everything is installed exactly like it was before, in reality simply unplugging and replugging renews all the slot and cable connections between devices, which is often all the system needs. Some useful troubleshooting tips include
Before starting any system troubleshooting, a few basic steps should be performed to ensure a consistent starting point and to enable isolating the failed component:
Note The Technical Reference section of the disc accompanying this book contains an exhaustive listing of BIOS error codes, error messages, and beep codes for BIOSs from Phoenix, AMI, Award, Microid Research, and IBM. Problems During the POSTProblems that occur during the POST are usually caused by incorrect hardware configuration or installation. Actual hardware failure is a far less-frequent cause. If you have a POST error, check the following:
Hardware Problems After BootingIf problems occur after the system has been running, and without having made any hardware or software changes, a hardware fault possibly has occurred. Here is a list of items to check in that case:
Problems Running SoftwareProblems running application software (especially new software) are usually caused by or related to the software itself, or are due to the fact that the software is incompatible with the system. Here is a list of items to check in that case:
Problems with Adapter CardsProblems related to add-in boards are usually related to improper board installation or resource (interrupt, DMA, or I/O address) conflicts. Chapter 4, "Motherboards and Buses," has a detailed discussion of these system resources, what they are, how to configure them, and how to troubleshoot them. Also be sure to check drivers for the latest versions and ensure that the card is compatible with your system and the operating system version you are using. Sometimes adapter cards can be picky about which slot they are running in. Despite the fact that, technically, a PCI or ISA adapter should be able to run in any of the slots, minor timing or signal variations sometimes occur from slot to slot. I have found on numerous occasions that simply moving a card from one slot to another can make a failing card begin to work properly. Sometimes moving a card works just by the inadvertent cleaning (wiping) of the contacts that takes place when removing and reinstalling the card, but in other cases I can duplicate the problem by inserting the card back into its original slot. When all else fails, try moving the cards around! Because some motherboards share a single IRQ between two PCI slots or between a PCI and an AGP slot, changing one of the PCI cards to another slot can resolve conflicts. Caution Note that PCI cards become slot specific after their drivers are installed. By this I mean that if you move the card to another slot, the plug-and-play resource manager sees it as if you have removed one card and installed a new one. You therefore must install the drivers all over again for that card. Don't move a PCI card to a different slot unless you are prepared with all the drivers at hand to perform the driver installation. ISA cards don't share this quirk because the system is not aware of which slot an ISA card is in. Top Troubleshooting ProblemsThese are some of the most frequently asked troubleshooting questions I receive. When I power the system on, I see the power LED light and hear the fans spin, but nothing else ever happens.The fact that the LEDs illuminate and fans spin indicates that the power supply is partially working, but that does not exclude it from being defective. This is a classic "dead" system, which can be caused by almost any defective hardware component. In my experiences I've had more problems with power supplies than most other components, so I recommend immediately using a multimeter to measure the outputs at the power supply connectors and ensure they are within the proper 5% tolerances of their rated voltages. Even if the voltage measurements checked out, you should swap in a high-quality, high-power, known-good spare supply and retest. If that doesn't solve the problem, you should revert to the bootstrap approach I mentioned earlier, which is to strip the system down to just the chassis/power supply, motherboard, CPU (with heatsink), one bank of RAM (one DIMM), and a video card and display. If the motherboard now starts, begin adding the components you removed one at a time, retesting after each change. If the symptoms remain, use a POST card (if you have one) to see whether the board is partially functional and where it stops. Also, try replacing the video card, RAM, CPU, and then finally the motherboard, and verify the CPU and (especially) the heatsink installation. The system beeps when I turn it on, but there is nothing on the screen.The beep indicates a failure detected by the ROM POST routines. Look up the beep code in the table corresponding to the ROM version in your motherboard. This can typically be found in the motherboard manual; however, you can also find the beep codes for the most popular AMI, Award, and PhoenixBIOS earlier in this chapter. I see a STOP or STOP ERROR in Windows NT/2000/XP.Many things, including corrupted files, viruses, incorrectly configured hardware, and failing hardware, can cause Windows STOP errors. The most valuable resource for handling any error message displayed by Windows is the Microsoft Knowledgebase (MSKB), an online compendium of more than 250,000 articles covering all Microsoft products. You can visit the MSKB at support.microsoft.com, and from there you can use the search tool to retrieve information specific to your problem. For example, say you are receiving Stop 0x0000007B errors in Windows XP. In this case, you should visit the MSKB and enter the error message in the search box. In this case, I typed stop 7B error Windows XP in the box, and it returned two articles, one of which was Microsoft Knowledgebase Article number 324103, titled, "HOW TO: Troubleshoot "Stop 0x0000007B" Errors in Windows XP." Upon this link, I was taken to the article at support.microsoft.com/default.aspx?scid=kb;en-us;324103, which has a complete description of the problem and solutions. The article states that this error could be caused by the following:
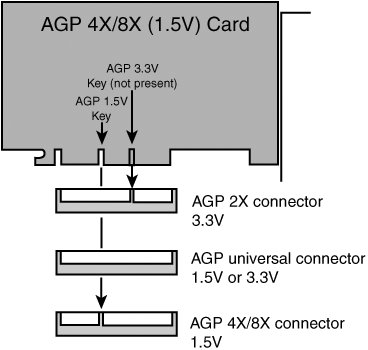
The article explains each issue and solution in detail. All things considered, the MSKB is a valuable resource when dealing with any problems related to or reported by any version of Windows or any other Microsoft software. I see Fatal Exception errors in Windows 95/98/Me.This is the equivalent of the STOP error in Windows NT/2000/XP. As indicated in the previous answer, this can be caused by both hardware and software problems, and the best place to check for specific solutions is in the Microsoft Knowledgebase (MSKB) at support.microsoft.com. The system won't shut down in Windows.This is another example where the MSKB comes to the rescue. For example, by searching for shutdown problems Windows XP, (substitute the version of Windows you are using), you will quickly find several articles that can help you troubleshoot this type of problem. This problem has been caused by bugs in motherboard ROM (try upgrading your motherboard ROM to the latest version), bugs in the various Windows versions (visit www.windowsupdate.com and install the latest fixes, patches, and service packs), or in some cases configuration or hardware problems. I'll defer to the MSKB articles for more complete explanations of the Windows issues. The power button won't turn off the system.Desktop PCs built since 1996 mostly use the ATX form factor, which incorporates a special power supply design such that the power switch is connected to the motherboard and not the power supply directly. This enables the motherboard and operating system to control system shutdown, preventing an unexpected loss of power that can cause data loss or file system corruption. However, if the system experiences a problem and becomes frozen or locked up in some way, the motherboard might not respond to the power button, meaning it will not send a shutdown signal to the power supply. It might seem that you will have to pull the plug to power off the system, but fortunately a forced shutdown override is provided. Merely press and hold down the system power button (usually on the front of the chassis) for a minimum of 4 seconds, and the system should power off. The only drawback is that, because this type of shutdown is forced and under the control of the motherboard or operating system, unsaved data can be lost and some file system corruption can result. You should therefore run ScanDisk (found in the Windows Accessories, System Tools folder) in Windows 95/98/Me/NT/2000 or Chkdsk in Windows XP to check and correct any file-system issues after a forced shutdown. The modem doesn't work.First verify that the phone line is good and that you have a dial tone. Then check and, if necessary, replace the phone cable from the modem to the wall outlet. If the modem is integrated into the motherboard, check the BIOS Setup to ensure that the modem is enabled. Try clearing the Enhanced System Configuration Data (ESCD) in the BIOS Setup. This forcees the plug-and-play routines to reconfigure the system, which can resolve any conflicts. If the modem is internal and you aren't using the COM1/COM2 serial ports integrated into the motherboard (as for an external modem), try disabling the serial ports to free up additional system resources. Also, try removing and reinstalling the modem drivers, ensuring that you are using the most recent drivers from the modem manufacturer. If that doesn't help, try physically removing and reinstalling the modem. If the modem is internal, install it in a different slot. Or, if the modem is external, make sure it has power and is properly connected to the serial or USB port on the PC. Try replacing the external modem power brick and the serial/USB cable. Finally, if you get this far and it still doesn't work, try replacing the modem and finally the motherboard. Note that modems are very susceptible to damage from nearby lightning strikes. Consider adding lighting arrestors or surge suppressors on the phone line running to the modem, and unplug the modem during storms. If the modem has failed after a storm, you can be almost certain that it has been damaged by lightning. The strike might have damaged the serial port or motherboard, in addition to the modem. Any items damaged by lightning will most likely need to be replaced. The keyboard doesn't work.The two primary ways to connect a keyboard to a PC are either via the standard keyboard port (usually called a PS/2 port) or via USB. One problem is that many older systems that have USB ports cannot use a USB keyboard because USB support is provided by the operating systemfor instance, if the motherboard has a USB port but does not include what is called USB Legacy Support in the BIOS. This support is specifically for USB keyboards (and mice) and was not common in systems until 1998 or later. Many systems that had such support in the BIOS still had problems with the implementation; in other words, they had bugs in the code that prevented the USB keyboard from working properly. If you are having problems with a USB keyboard, check to ensure that USB Legacy Support is enabled in the BIOS. If you are still having problems, make sure you have installed the latest BIOS for your motherboard and any Windows updates from Microsoft. Some older systems never could properly use a USB keyboard, in which case they should change to a PS/2 keyboard instead. Some keyboards feature both USB and PS/2 interfaces, which offer the flexibility to connect to almost any system. If the keyboard is a PS/2 type and is having problems, the quickest way to verify whether it is the keyboard or the motherboard is to replace the keyboard with a known-good spare. In other words, borrow a working keyboard from another system and try it. If it still doesn't work, the keyboard controller on the motherboard is most likely defective, meaning the entire board must be replaced. My favorite replacement keyboards come from the PC Keyboard Co. (www.pckeyboard.com), which makes the legendary buckling spring design used by IBM. The company even offers versions with the Trackpoint pointing device built in. I can't hear any sound from the speakers.This can often be as simple as the speakers being unplugged or powered off, so don't overlook the obvious and check to be sure! Also check the volume controls in Windows or your application to see that they are turned up and not muted. When you are sure the volume is turned up and the speakers have power and are plugged in, you need to verify whether the problem is with the speakers or the sound card. To do this most efficiently, you merely connect different known-good speakers and see whether they work. If they don't, clearly the issue is in the sound cardpossibly the configuration of the card is incorrect or the card itself is defective. The first thing to try is clearing the ESCD in the BIOS Setup. This essentially forces the plug-and-play routines to reconfigure the system, which can resolve any conflicts. If this doesn't help, try removing and reinstalling the sound card drivers. Finally, if that doesn't help, physically remove and replace the card from the system. You might try replacing it first in the same slot and then in a different slot because timing issues can sometimes exist from one slot to the next. If that doesn't work, you must try replacing the card. If the sound "card" really isn't a card but is integrated into the motherboard, first try the ESCD reset and driver reinstallation. Then, if that doesn't work, you have to try disabling the integrated sound and perhaps installing a replacement card or replacement motherboard. If your problem is only with playing audio CDs, check for a cable between the sound card and the drive. If there is no cable, check the properties for the drive in the Device Manager in Windows to see whether the Digital CD Audio option is checked (enabled). If it's not, enable it. If your system will not allow digital CD audio to be enabled, it is not supported and you must install an analog cable connected between the sound card and the drive. The monitor appears completely garbled or unreadable.A completely garbled screen is most often due to improper, incorrect, or unsupported settings for the refresh rate, resolution, or color depth. Using incorrect drivers can also cause this. To check the configuration of the card, the first step is to power on the system and verify whether you can see the POST or the system splash screen and enter the BIOS Setup. If the screen looks fine during the POST but goes crazy after Windows starts to load, the problem is almost certainly due to an incorrect setting or configuration of the card. To resolve this, boot the system in Windows Safe mode (hold down the F8 function key as Windows starts to load). This bypasses the current video driver and settings and places the system in the default VGA mode supported by the BIOS on the video card. When the Windows desktop appears, you can right-click the desktop, select Properties, and then either reconfigure the video settings or change drivers as necessary. If the problem occurs from the moment you turn on the systemand even if you boot to a DOS floppy (such as a Windows 98 startup floppy)a hardware problem definitely exists with the video card, cable, or monitor. First, replace the monitor with another one; if the cable is detachable, replace that, too. If replacing the monitor and cable does not solve the problem, the video card is probably defective. Either replace the card or, if it is a PCI-based card, move it to a different slot. If the video is integrated into the motherboard, you must add a separate card instead or replace the motherboard. The image on the display is distorted (bent), shaking, or wavering.This can often be caused by problems with the power line, such as an electric motor, an air conditioner, a refrigerator, and so on causing interference. Try replacing the power cord, plugging the monitor and/or the system into a different outlet, or moving it to a different location entirely. I've also seen this problem caused by local radio transmitters such as a nearby radio or television station or two-way radios being operated in the vicinity of the system. If the monitor image is bent and discolored, it could be due to the shadow mask being magnetized. Turn the monitor on and off repeatedly; this causes the built-in degaussing coil around the perimeter of the tube to activate in an attempt to demagnetize the shadow mask. If this seems to work partially but not completely, you might need to obtain a professional degaussing coil from an electronics or TV service shop to demagnetize the mask. Next, replace the monitor cable, try a different (known-good) monitor, and finally replace the video card. I purchased a video card, and it won't fit in the slot.Most video cards are designed to conform to the AGP 4X, AGP 8X, or PCI Express x16 specification. It is all but impossible to install a PCI Express x16 card into a nonPCI Express x16 slot, but problems can arise with AGP cards when they're used with older AGP systems. Both AGP 4X and AGP8X are designed to run on only 1.5V. Most older motherboards with AGP 2X slots are designed to accept only 3.3V cards. If you were to plug a 1.5V card into a 3.3V slot, both the card and motherboard could be damaged. Special keys have therefore been incorporated into the AGP specification to prevent such disasters. Typically, the slots and cards are keyed such that 1.5V cards fit only in 1.5V sockets and 3.3V cards fit only in 3.3V sockets. Additionally, universal sockets are available that accept either 1.5V or 3.3V cards. The keying for the AGP cards and connectors is dictated by the AGP standard as shown in Figure 22.12. Figure 22.12. AGP 4X/8X (1.5V) card and how it relates to 3.3V, universal, and 1.5V AGP slots. As you can see from Figure 22.12, AGP 4X or 8X (1.5V) cards fit only in 1.5V or universal (3.3V or 1.5V) slots. Due to the design of the connector and card keys, a 1.5V card cannot be inserted into a 3.3V slot. So, if your new AGP card won't fit in the AGP slot in your existing motherboard, consider that a good thing because, if you were able to plug it in, you would have fried both the card and the board! In a case such as this, you have to either return the 4X/8X card or get a new motherboard that supports 4X/8X (1.5V) cards. I installed an upgraded processor, but it won't work.First, make sure the motherboard supports the processor that is installed. Also make sure you are using the latest BIOS for your motherboard; check with the motherboard manufacturer to see whether any updates are available for download, and install them if any are available. Check the jumper settings (older boards) or BIOS Setup screens to verify that the processor is properly identified and set properly with respect to the FSB (or CPU bus) speed, clock multiplier, and voltage settings. Make sure the processor is set to run at its rated speed and is not overclocked. If any of the CPU settings in the BIOS Setup are on manual override, set them to automatic instead. Then reseat the processor in the socket. Next, make sure the heatsink is properly installed and you are using thermal interface material (that is, thermal grease) at the mating junction between the CPU and heatsink. Just because a processor fits in the socket (or slot) on your motherboard does not mean it will work. For a processor to work in a system, the following things are required:
Before purchasing an upgraded processor for your system, you should first check with the motherboard manufacturer to see whether your board supports the processor. If so, it will meet all the requirements listed previously. Often, BIOS updates are available that enable newer processors to be supported in older boards, beyond what was originally listed in the manual when you purchased the board. The only way to know for sure is to check with the motherboard manufacturer for updated information regarding supported processors for a particular board. As a specific example, some versions of the Pentium 4 that support hyper threading (HT) technology (one processor acts as if it were two processors, increasing performance) have dual-cores or neither of these features. If you have a system that uses the original non-HT, nondual-core Pentium 4 CPU, it would be great to be able to simply purchase one of these newer processors as an upgrade for an existing Pentium 4 system. Unfortunately, many existing boards do not accept these new processors. If you are considering replacing an existing Pentium 4 with a new HT technology or dual-core version, you need to verify that the motherboard supports this processor (in many cases it won't). Some older boards might be capable of supporting a newer CPU with only a BIOS upgrade, but many boards do not meet the chipset and front side bus speed requirements. In that case, you need a new processor, a new motherboard, and in all likelihood new memory to perform such an upgrade. The system runs fine for a few minutes but then freezes or locks up.This is the classic symptom of a system that is overheating. Most likely the CPU is overheating, but other components such as the video card or motherboard chipset can also be overheating. If the system is new or custom built, the design might be insufficient for proper cooling, and bigger heatsinks, more fans, or other solutions might be required. If the system was working fine but now is exhibiting this problem, check to see whether the problem started after any recent changes were made. If so, then whatever change was made could be the cause of the problem. If no changes were made, most likely something such as a cooling fan is either failed or starting to fail. Modern systems should have several fans, one inside the power supply, one on the CPU (or positioned to blow on the CPU), and optionally others for the chassis. Verify that any and all fans are properly installed and spinning. They should not be making grinding or growling noises, which usually indicates bearing failure. Many newer systems have thermostatically controlled fans; in these systems it is normal for the fan speeds to change with the temperature. Make sure that the chassis is several inches from walls and that the fan ports are unobstructed. Try removing and reseating the processor; then reinstall the CPU heatsink with new thermal interface material. Check the power supply and verify that it is rated sufficiently to power the system (most should be 300 watts or more). Use a digital multimeter to verify the voltage outputs of the power supply, which should be within +/5% of the rated voltage at each pin. Try replacing the power supply with a high-quality replacement or known-good spare. I am experiencing intermittent problems with the hard drive(s).Most systems use ATA (AT-Attachment, commonly called IDE) interface drives, which consist of a drive and integrated controller, a ribbon cable, and a host adapter circuit in the motherboard. Typically, intermittent problems are found with the cable and the driveit is far more rare that the host adapter fails or exhibits problems. Many problems occur with the cables. ATA drives use either 40-conductor or 80-conductor cables, with one 40-pin connector at either end and optionally one in the middle. Drives supporting transfer rates higher than ATA-33 (33MBps or Ultra DMA Mode 2) must use 80-conductor cables. Check the cable to ensure that it is not cut or damaged; then try unplugging and replugging it into the drive and motherboard. Check to see that the cable is not more than 18" (46cm) in length because that is the maximum allowed by the ATA specification. This is especially important when you are using the faster ATA-100 or ATA-133 transfer rates. Try replacing the cable with a new 80-conductor 18" version. If replacing the cable does not help, replace the drive with a spare, install an OS, and test it to see whether the problem remains. If the problem does remain, the problem is with the motherboard, which will most likely need to be replaced. Alternatively, you could try adding a separate ATA 133 PCI card and attaching the drives to that, but in many cases a newer motherboard will give you more bang for your buck. If the problem does not remain, the problem is most likely with your original drive. You can simply replace it or try testing, formatting, and reinstalling to see whether the drive can be repaired. To do this, you need the low-level format or test software provided by the drive manufacturer. You can find out more about where to get this for various makes of drives in Chapter 12, "Physical Drive Installation and Configuration." The system won't boot up; it says Missing operating system on the screen.When your system boots, it reads the first sector from the hard diskcalled the master boot record (MBR)and runs the code contained in that sector. The MBR code then reads the partition table (also contained in the MBR) to determine which partition is bootable and where it starts. Then it loads the first sector of the bootable partitioncalled the volume boot record (VBR)which contains the operating-system-specific boot code. However, before executing the VBR, the MBR checks to ensure that the VBR ends with the signature bytes 55AAh. The Missing operating system message is displayed by the MBR if it finds that the first sector of the bootable partition (the VBR) does not end in 55AAh. Several things can cause this to occur, including these:
The system is experiencing intermittent memory errors.If the memory was recently added or some other change was made to the system, you should undo that addition/change to see whether it is the cause. If it's not, remove and reseat all memory modules. If the contacts look corroded, clean them with contact cleaner and then apply contact enhancer for protection. Check the memory settings in the BIOS Setup; generally, all settings should be on automatic. Next, upgrade to the latest BIOS for your motherboard, and remove all memory except one bank. Then run only one bank of memory, but in the second or third bank position. A socket can develop a problem, and most motherboards do not require that the sockets be filled in numerical order. Also, replace the remaining module with one of the others that was removed, a new module, or a known-good spare. If you get this far, the problem is most likely either the motherboard or the power supplyor possibly some other component in the system. Remove other components from the system to see whether they are causing problems. Reseat the CPU, and replace the power supply with a high-quality new unit or a known-good spare. Finally, try replacing the motherboard. The system locks up frequently and sometimes reboots on its own.This is one of the classic symptoms of a power supply problem. The power supply is designed to send a special Power_Good signal to the motherboard when it has passed its own internal tests and outputs are stable. If this signal is dropped, even for an instant, the system resets. Problems with the power good circuit cause lockups and spontaneous rebooting. This can also be caused if the power at the wall outlet is not correct. Verify the power supply output with a digital multimeterall outputs should be within +/5% of the rated voltages. Use a tester for the wall outlet to ensure that it is properly wired, and verify that the voltage is near 120V. Replace the power cord or power strip between the power supply and wall outlet. Unfortunately, the intermittent nature makes this problem hard to solve. If the problem is not with the wall outlet power, the best recourse is to replace the power supply with a high-quality new unit or a known-good spare of sufficient rating to handle the system (300 watts or higher recommended). If this doesn't help, reseat the CPU and reinstall the heatsink with new thermal interface material. Then reseat the memory modules, run only one bank of memory, and finally replace the motherboard. I installed a 60GB drive in my system, but it is recognizing only 8.4GB.Motherboard ROM BIOSs have been updated throughout the years to support larger and larger drives. BIOSs older than August 1994 are typically limited to drives of up to 528MB, whereas BIOSs older than January 1998 are limited to 8.4GB. Most BIOSs dated 1998 or newer support drives up to 137GB, and those dated September 2002 or newer should support drives larger than 137GB. These are only general guidelines; to accurately determine this for a specific system, you should check with your motherboard manufacturer. You can also use the BIOS Wizard utility from www.unicore.com/bioswiz/index2.html. It tells you the BIOS date from your system and specifically whether your system supports the Enhanced Hard Disk Drive specification, which means drives larger than 8.4GB. If your BIOS does not support EDD (drives larger than 8.4GB), the three possible solutions are as follows:
Of these, the first one is the most desirable because it is usually free. Visit your motherboard manufacturer's website to see whether it has any newer BIOSs available for your motherboard that will support large drives. If it doesn't, the next best thing is to use a card such as the Ultra ATA 133 PCI card from Maxtor. I almost never recommend the software patch solution because it merely installs a special driver in the boot sector area of the hard drive, which can result in numerous problems when booting from different drives, installing new drives, or recovering data. The 137GB barrier is a bit more complicated because, in addition to BIOS issues, operating system and chipset-based ATA host adapter driver issues are involved. Drives larger than 137GB are accessed using 48-bit logical block address (LBA) numbers, which require BIOS support, chipset driver support, and operating system support. Generally, you need a BIOS with 48-bit LBA support (normally dated September 2002 or newer), the latest chipset driver such as the Intel Application Accelerator (for motherboards using Intel chipsets, at www.intel.com/support/chipsets/iaa), and Windows XP with Service Pack 1 (or later) installed. If your motherboard BIOS does not provide the necessary support, the Maxtor Ultra ATA 133 PCI card listed earlier adds this support to your system. The original version of XP, as well as Windows 2000/NT or Windows 95/98/Me, does not currently provide native support for hard drives larger than 137GB. If you have a system without BIOS support, check with your motherboard manufacturer for an update (or you can use a card with onboard BIOS, such as the Ultra ATA 133 PCI card from Maxtor). If your motherboard uses a non-Intel chipset, check with the motherboard or chipset manufacturer for driver updates to enable 48-bit LBA support. My CD-ROM/DVD drive doesn't work.CD and DVD drives are some of the more failure-prone components in a PC. It is not uncommon for one to suddenly fail after a year or so of use. If you are having problems with a drive that was newly installed, check the installation and configuration of the drive. Check the jumper settings on the drive. If you're using an 80-conductor cable, the drive should be jumpered to Cable Select; if you're using a 40-conductor cable, the drive should be set to either master or slave (depending on whether it is the only drive on the cable). Check the cable to ensure that it is not nicked or cut and is a maximum of 18" long (the maximum allowed by the ATA specification). Replace the cable with a new one or a known-good spare, preferably using an 80-conductor cable. Make sure the drive power is connected, and verify that power is available at the connector using a digital multimeter. Also make sure the BIOS Setup is set properly for the drive, and verify that the drive is detected during the boot process. Finally, try replacing the drive and, if necessary, the motherboard. If the drive had already been installed and was working before, first read different discs, preferably commercial-stamped discs rather than writeable or rewriteable ones. Then try the steps listed previously. My USB port or device doesn't work.Make sure you have enabled the USB ports in the BIOS Setup. Make sure your operating system supports USBWindows 95 and NT do not, whereas Windows 98 and later do have USB support. Then remove any hubs and plug the device directly into the root hub connections on your system. Replace the cable. Many USB devices require additional power, so ensure that your device has an eternal power supply connected if one is required. Replace the power supply. I installed an additional memory module, but the system doesn't recognize it.Verify that the memory is compatible with your motherboard. Many subtle variations exist on memory types that can appear to be identical on the surface. Just because it fits in the slot does not mean the memory will work properly with your system. Check your motherboard manual for the specific type of memory your system requires, and possibly for a list of supported modules. You can visit www.crucial.com and use its Memory Advisor Tool to determine the exact type of memory for a specific system or motherboard. Also note that all motherboards have limits to the amount of memory they support, and many boards today support only up to 512MB or 1GB. Again, consult the motherboard manual or manufacturer for information on the limits for your board. If you are sure you have the correct type of memory, follow the memory troubleshooting steps listed previously for intermittent memory problems. I installed a new drive, but it doesn't work and the drive LED remains lit.This is the classic symptom for a cable plugged in backward. Both ATA and floppy drives are designed to use cables with keyed connectors; however, some cables are available that lack this keying, which means they can easily be installed backward. When the cable is installed backward into either the motherboard or the drive, the LED on the drive remains lit and the drive does not function. In some cases, this can also cause the entire system to freeze. Check the cables to ensure that they are plugged in properly at both ends; the stripe on the cable indicates pin-1 orientation. On the drive, pin-1 typically is oriented toward the power connector. On the motherboard, look for orientation marks silk-screened on the board or observe the orientation of the other cables plugged in (all cables follow the same orientation). While I was updating my BIOS, the system froze and now the system is dead!This can occur when a flash ROM upgrade goes awry. Fortunately, most motherboards have a recovery routine that can be enabled via a jumper on the board. When enabled, the recovery routine causes the system to look for a floppy with the BIOS update program on it. If you haven't done so already, you need to download an updated BIOS from the motherboard manufacturer and follow its directions for placing the BIOS update program on a bootable floppy. Then set BIOS recovery mode via the jumper on the motherboard, power on the system, and wait until the procedure completes. It usually take up to 5 minutes, and you might hear beeping to indicate the start and end of the procedure. When the recovery is complete, turn off the system and restore the recovery jumper to the original (normal) settings. If your motherboard does not feature BIOS recovery capability, you might have to send the board to the manufacturer for repair. I installed a new motherboard in an older Dell system, and nothing works.Many older Dell Dimension systems (Dimension 4100, 8100, or older systems) do not fully conform to the ATX specification with respect to their power supplies and the power connectors on their motherboards. If you replace one of these nonstandard Dell power supplies with a standard ATX type, or replace the nonstandard Dell motherboard with a standard ATX type, you risk frying both the power supply and the motherboard. The older Dell systems can be upgraded only by replacing both the motherboard and the power supply at the same time. Starting in 2001, Dell converted to using industry-standard ATX power supplies and motherboard power connectors for its systems, so this should not be a problem for the Dimension 4200, 8200, and later machines. I installed a PCI video card in an older system with PCI slots, and it doesn't work.The PCI bus has gone through several revisions; most older slots are "2.0" type, and most newer cards need "2.1" or later PCI slots. The version of PCI your system has is dictated by the motherboard chipset. If you install a newer video or other PCI card that requires 2.1 slots in a system with 2.0 slots, often the system won't boot up or operate at all. If you check the chipset reference information in Chapter 4, you might be able to determine which revision of PCI slots your motherboard has by knowing which chipset it has. If this is your problem, the only solution is to change either the card or motherboard so that they are both compatible. |
EAN: 2147483647
Pages: 283