Managing RAID
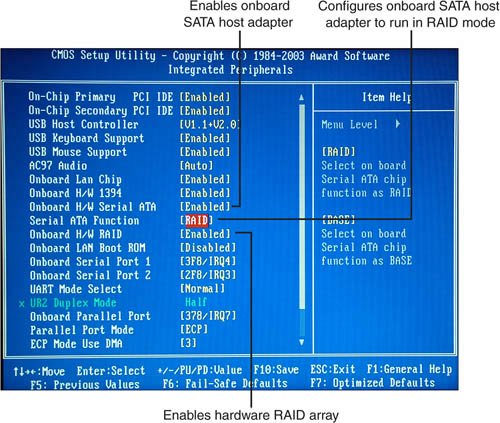
| RAID creates an abstraction of the physical disks involved and creates data structures that can be implemented independently of hardware. The prototype RAID systems were built with SCSI, but as you have already seen, you can build RAID arrays with ATA, SCSI, Fibre Channel, and other storage interfaces. In SCSI, as you have learned, the bus can connect to multiple disk drives identified to the bus as LUNs. A LUN is really a connection point to the controller, something that can take part of your array. Because you now know what RAID is, let's take a look at what you have to do to create, manage, and rebuild or modify a RAID array. We will talk generally using a Windows SATA array as an example, but the principles apply to all RAID systems. Creating New ArraysTo create a new array, you need to have an HBA or a RAID controller that supports the kind of RAID array you want to create. If that RAID is onboard, you might need to enable the controller in the BIOS. Chances are that if the HBA is an add-in board, you will need to install it. Implementing RAID involves creating a container, which is nothing more than an object that contains the specific LUNs that you assign to it. You create a container in the RAID software. After a container is created, you can partition the container by using partitioning software and then apply formatting to create a file system. Partitioning is most often done in the operating system, but without the existing container, your operating system may not even recognize that the hard drives are there to work with. In order to partition the storage that is assigned to the container, you need to have an appropriate driver so that the container is recognized. That driver is specific to the operating system being used and to the RAID chip that contains the RAID software that is managing the container. With the correct driver in place, you can proceed to partition and format the storage assigned to the container from the array of disks. To install your RAID components and create a container, you need to do the following:
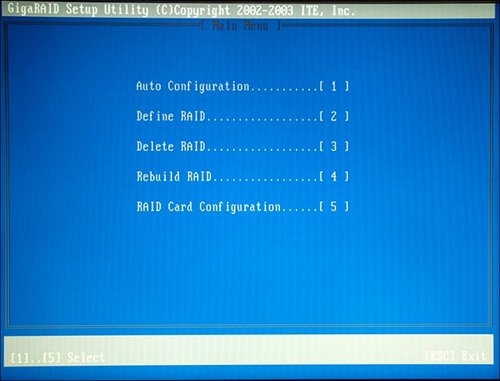
What happens next depends on your particular operating system and your RAID controller. Some operating systems automatically recognize a new container, and some do not. If you are installing an operating system into this array (and even if you are not), you need the device driver that lets your RAID controller talk to your operating system. Your motherboard or controller should come with the driver on disk, or you can go to the vendor's website to get the most current driver. You shouldn't count on your operating system to provide the correct driver. In the case of the SATA RAID controller used as an example here, the Windows Setup installation routine refuses to recognize the container. As far as Windows is concerned, the drives added are simply raw disk. So in order to install Windows into this container, you can use FDISK on a DOS 6.22 disk or another partitioning program to create a partition on the container. At that point, Windows XP can recognize the container's partition and make the entire array available to the installer. In creating a RAID volume, the two places people get into trouble is that they forget about creating the container and they use the wrong driver. Either can lead to the dreaded "disk not found" warning. RAID MaintenanceAlthough RAID protects your data, there are still issues that arise. Most drives don't fail at once. Usually, a drive starts to fail, and a cluster here or there becomes corrupted. When there are a few bad clusters, you can remap your drive, but when the number of bad clusters reaches a certain point, it is best to replace the drives. Depending on your RAID hardware and software, some of this work might be done for you, or you might have to do it manually. All advanced RAID array systems offer some form of protection in the form of routines that are referred to as disk scrubbers. A disk scrubber checks the data on an array to see if it can be read correctly. It also checks the parity data to see if it is still valid. Disk scrubbing goes on in the background, and when errors are reported, those errors are fixed by remapping the data or correcting the data written. Damaged areas of the disk are cordoned off by a disk scrubber, just as they would be when you run Check Disk in the operating system. With many RAID systems, you can simply restart the array and go through an exhaustive diagnostic. When you purchase your RAID controller or the program that creates and manages software RAID, one of the things you are paying for is the management utilities that come with that system. Among the features you are looking for are the following:
Rebuilding Failed ArraysEventually, all components fail, and disks and RAID controllers are certainly no exception. While these are long-lived components, they are high-performance ones, too, often operating at extreme speeds or high voltages. Mechanical devices fail more often than electrical devices, and really that's what RAID is aimed to protect against. Let's take a look at some of the scenarios for damaged RAID arrays and how you go about rebuilding them. First of all, there is no cure for a damaged RAID 0 array. The best you can hope for is to rebuild the array and restore your data from a backup. That means that if you are running a RAID 0 array, as many small workstations and home users do, that array should have attached a multilevel backup scheme with a real-time backup system. However, RAID 0 isn't typically used on servers, so we don't need to discuss this further. RAID 1 data mirroring can survive a failed disk. To re-create a failed mirror, you need to follow these steps:
In many instances, a mirror breaks because a disk gets disconnected and is no longer synchronized. You need to reconnect the drive and resynchronize the two drives so that the mirror is reestablished. Usually, this is a two-step process: Issue a Repair Mirror command and then issue a Resynchronize command. Whereas resynchronization may not be a long or processor-intensive operation, creating an entirely new mirror drive generally is. You might want to re-create the mirror at a time of low activity. When a RAID 5 array fails, the procedure for repairing the array isn't much different from the procedure you saw earlier for RAID 1. However, most systems that offer RAID 5 support employ the use of a hot spare and rebuild the array for you automatically. Chances are you won't have to do anything except live though a period of poor server performance while the missing member of the array is rebuilt. |
EAN: 2147483647
Pages: 240