Hack12.Make Your Own PSP Case
Hack 12. Make Your Own PSP Case
There are plenty of third-party cases available for the PSP, but why not make your own? You've eyed them in stores and online. Yet none of the commercially available PSP cases that you have seen manage to blend individuality with the coolness of the raw PSP in the necessary ratio to warrant their purchase. You want something to protect your PSP, but you also want something that maintains the coolness factor and makes your PSP definitively yours. The only option left within easy reach is to design and make your own PSP case. This hack will walk you through the necessary steps to make your own PSP case out of cardboard. 2.2.1. Why Cardboard?The short answer: why not cardboard? The longer reply is that cardboard is a good choice for a do-it-yourself PSP case because of many of the same reasons why it is one of the most common forms of packaging. It's cheap, strong, impact-resistant, easily replaceable, bendable, and although it can be rigid, it still has some give. And, perhaps most importantly, you can probably find a suitable piece of cardboard for this project lying around your house or place of work. If you are a recycling maniac and just sent the cardboard out yesterday, nicely stacked in the little blue bin that will transport it to cardboard heaven, never fear: there are many places where you can find free cardboard in good shape. Try your local bookstore or liquor store. They are very familiar with people asking for boxes when moving, so your request for a box won't be met with any looks of surprise or disgust. If you just bought your PSP, consider that you could use the cardboard in which the PSP was packaged. The only downside to this is that the PSP box is made of a very rigid and thin cardboard, so it won't provide as much cushion when you inevitably drop your PSP. Ideally, I recommend snatching the top of a case of paper from work (make sure that your boss knows you are only taking the cardboard top, and not the entire case of paper). For this hack, I am using the box that my copy of Mac OS X Tiger came in. This cardboard isn't quite as thick as I'd like to use, but it's thicker than the PSP box's cardboard, and it's what I have on hand. Cardboard is a very forgiving medium to test run your first PSP case. If you screw up, it won't cost anything to start over. After you've gone through these instructions with cardboard, you can try designing your own case out of other materials. You may be thinking, "Try better, more stylish materials." If you're a cardboard hater, I just want to point out that designers such as Frank Gehry actually build furniture out of cardboard. If you Google "cardboard chair," you'll find some of Gehry's designs alongside design school assignments that require students to design chairs out of cardboard. As the price tags associated with Gehry's designs will testify, cardboard may be inexpensive, butwhen nicely styledit ain't cheap! 2.2.2. Things You'll NeedBesides time, patience, and a steady hand, here's a short list of things you will need or that you might find useful in designing your PSP case:
Also, if you have a computer and a printer handy, you could easily design the layout for your cardboard PSP case in a program such as Quark, Illustrator, Photoshop, or any other program with a ruler that is capable of accurately drawing measured lines. Then you could print this template out on a regular piece of paper, glue that paper to your cardboard, and start cutting away. Figure 2-1 shows everything you need to get started. 2.2.3. Designing the CaseIn the interest of speed and clarity, I'm keeping the design to a bare bones minimum, focusing on the fundamentals that any cardboard PSP case will need (this will also allow for quite a bit of improvement, customization, elaboration, and reconfiguring on your part when you go to make your PSP case). The first thing you need to do is take the PSP's measurements. The PSP is roughly 74 mm (or just under 3 inches) tall, 170 mm (or 6 3/4 inches) long, and 23 mm thick, which is just about an inch. While the manual that came with your PSP will tell you that the screen is 4.3 inches, that measurement is from corner to corner. The screen area is roughly 3 3/4 inches (or 96 mm) wide by 2 1/8 inches (or 54 mm) tall. Figure 2-1. What you'll need to make a PSP case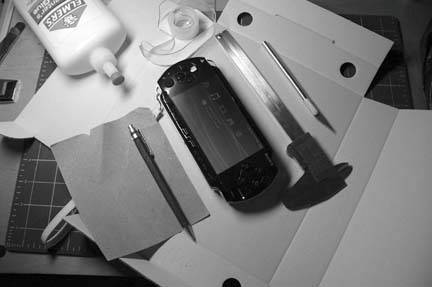 You first need to design the case in the rough without opening up a space for the screen or the controls. The base design for the case will be a solid cardboard shell that you can wrap around the PSP. Take the dimensions from the previous paragraph and imagine that the PSP is a box that you need to unfold. There will be front and back panels of cardboard, each measuring 3 inches x 6 3/4 inches. There will also be a pair of thin rectangles for the top and bottom of the PSP. Each of these will measure 1 inch x 6 3/4 inches. The two sides will be two other rectangles measuring 3 inches x 1 inch. Now all you have to do is stack the front, back, top, and bottom rectangles on top of one another and leave a little wiggle room at each intersection of these rectangles to account for the width of your cardboard. The result is a rectangle a little over 8 inches tall (depending on the thickness of your cardboard) by 6 3/4 inches wide. Measure and draw out this rectangle on your cardboard. Make sure you use a T square or two straightedges to draw the corners at 90 degrees. After drawing the rectangle, feel free to cut off the excess cardboard, but leave about half an inch on the top and the bottom and an inch on each side. See Figure 2-2. Figure 2-2. The rough rectangle on the cardboard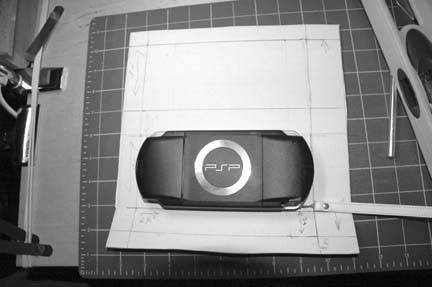 After you have this rough triangle together, mark the 3-inch front of the case, the 1-inch bottom, the 3-inch back, and the 1-inch top, leaving a little give in your measurements to account for the thickness of the cardboard and the places where you want to make your bends in the cardboard. 2.2.4. Cutting, Folding, and FittingAfter marking up your cardboard satisfactorily for the basic fit, it is time to start bending, cutting, and piecing together your PSP case. You could use something blunt such as the back part of the blade on a pair of scissors or a flat edge of your straightedge to flatten the corrugated cardboard along the seam where you want to fold it, in effect crimping the cardboard at the folds. This method will make your case a bit more durable. I chose a different method. Corrugated cardboard is made of two thin pieces of paper attached to another piece that runs in waves. Very carefully making sure to only cut through the outermost layer of paper, I cut on either side of each line where the cardboard needed to bend around the PSP. After cutting the top layer, I gently and carefully pulled it free, revealing the ribbed effect of the cardboard. Then I carefully folded along the different seams, using my straightedge to help bend along the lines and shaping the piece around my PSP. If you do not like either of these methods, consider using some thread and a needle to sew along the seams, pulling the thread tight to collapse the cardboard into a crimped seam. After you have all the proper parts bent, you will need to cut free the tabs that would meet on the corners of the PSP, as shown in Figure 2-3. Next, fold the cardboard around the PSP, as shown in Figure 2-4. Figure 2-3. The PSP sitting on the rough case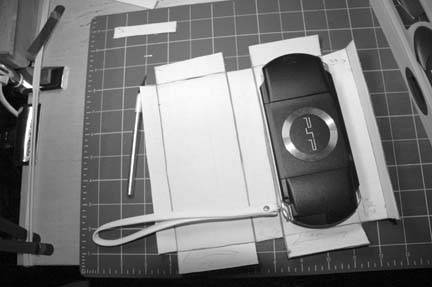
2.2.5. Building the BoxFor now, you're going to ignore the open holes that you will later need to cut for the PSP's screen and controls, since you need to first properly build the box for the case. If you had cut the hole for the screen before bending the overall structure of the case, the cardboard most likely would have bent in places that would ruin the strength and design of the case. Figure 2-4. Folding the cardboard around the PSP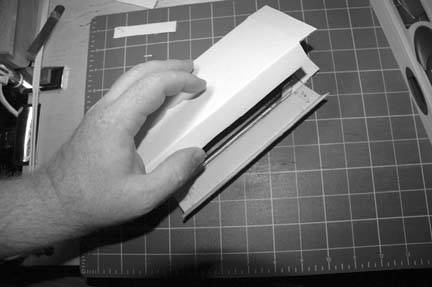 You need to figure out how to take advantage of the trim your cardboard left around the original rectangle. The best way to do this is to build a few tabs that will hold the case together. The remaining side tabs aren't large enough to make insertion tabs, so those will simply be folded over each other and glued together. The PSP will be inserted and removed from the case via the top, where you will build a tab. Since the top and bottom parts of our original rectangle become the top of the case, you're going to need to trim them in order to make space for the L and R triggers, and to prepare for the design of the tab, as shown in Figure 2-5. Place the PSP face down on the top part of the cardboard. This will become the front of the case. You can simply center the PSP and use it to mark the amount you will need to trim off to leave a port open for the L and R triggers. It's about 1 1/4 inch on either side. Remember that you need to take this off from both the very bottom and top of the rectangle, since these two parts, folded together, make the top of the case. Make a tab by measuring in an inch on either side of the top bit of cardboard and cutting these little flaps away. Then on the bottom section of cardboard, measure in an inch on either side flush with the crease and cut a slot of roughly the same height as your cardboard's thickness (see Figure 2-6). Figure 2-5. After you make space for the L and R triggers on the PSP Figure 2-6. The tab and slot for the top part of the case Now fold the case back around your PSP and test to make sure that the tab fits snugly into the slot you have created, as in Figure 2-7. When I folded this together, I discovered I needed to cut in a slight bit on the bottom panel of the case to make space for the strap that comes with the PSP and to allow access for the power switch and the WLAN switch. I only removed about a quarter inch from either side of the bottom panel, and I winged it without any formal measurements. Figure 2-7. Testing the tab and slot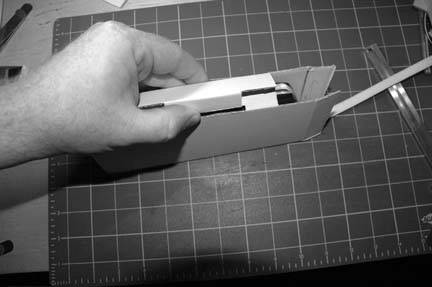 After this step, the basic box is completed, but don't glue those sides together yet. It's time to make space for the controls and the screen. 2.2.6. Screen and ControlsIf you measure in an inch and a half from either side of the front of the case, then measure down a quarter inch from the top of the front of the case, and up three-eighths of an inch from the bottom, you will have the exact dimensions of the screen marked off. At the bottom section of the screen, mark out a quarter inch (even with the sides of the top panel) to make space for the controls along the bottom of the PSP. Place the PSP upside down (see Figure 2-8) on top of the front part of the case and trace around its perimeter to help guide your placement of the four buttons, the analog stick, and the control pad. Both the four buttons and the control pad are centered just slightly north of the center of the screen. I didn't actually measure this part with a ruler, but instead estimated by sketching lines across based on the screen, and drawing rough circles, which I then carved into pizza slice-like sections for better mapping of the circles. Figure 2-8. Placing the PSP upside down beneath what will be the front panel of the case After you have everything drawn, cut out both the small control area along the bottom and the screen as one piece. Cut slowly and with enough force to ensure that you get through all three levels of the cardboard and prevent pulling the paper on the other side. Then, very carefully, begin trimming away at the circles needed for the controls. On the side with the analog stick, I extended the circle down like a cone. Cut less than you think you need to at first. Then put the case together and hold the PSP in place to see whether you need to trim away some more. Remember, you can always take more away, but you can't put back what you've cut off. Figure 2-9 shows that I need to take more away from the bottom of the buttons on the right and a slight bit more from the right side of the cone I've made, to accommodate the analog stick. 2.2.7. Finish the CaseAfter making all the necessary cuts, it's finally time to glue the side panels. Place the wood glue on the flap coming from the back of the case, and fold the flap coming from the front of the case on top of it. Don't make the mistake of squeezing the front and back of the case too close together during this step. Try to get the front and back to stand parallel to one another. Once you have them lined up correctly, slip some paper clips in from the top and bottom to hold them together as shown in Figure 2-10. Figure 2-9. After the initial cut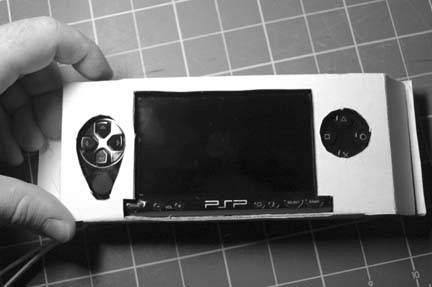 Figure 2-10. The freshly glued and paper-clipped sides of the case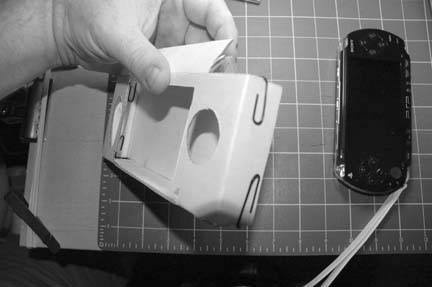
Make sure to wipe away any excess glue and let the glue dry to the touch before putting the PSP inside. To insert the PSP, if you have the strap attached, first string it through the proper corner of the case and then carefully lower the PSP into the case through the top panel (see Figure 2-11). Figure 2-11. Sliding the PSP in through the top of the finished case Close the top flaps and slide the tab into the slot. You'll find you can reach in the bottom-right side of the case to turn your PSP on, and that the PSP functions normally inside your brand new cardboard case, as shown in Figure 2-12. 2.2.8. Hacking the HackAdmittedly, this is a horribly ugly hack with plenty of room for improvement. If I'd been less lazy, I would have taken a transparency meant for use with an overhead projector and trimmed it to just slightly wider than the size of the screen and glued it carefully to the inside of the case to protect the screen from scratches. As is, if I drop the PSP flat on its face, the thickness of the cardboard protects the screen from hitting a flat surface. Nevertheless, the front is rather unprotected. Figure 2-12. Playing Lumines on my stylin' cardboard PSP An additional piece of cardboard could be glued to the back of this case and folded nicely over the screen to protect it while on the go, and to function as a glare shield when playing games. Flip this flap around the other way and use it to prop the PSP up while watching a movie. These suggestions are sticking with the cardboard motif, which does have its advantages. As you can see, I went for a sort of rough and cheap look to keep the New York muggers from considering stealing my PSP. However, your case doesn't have to be as rough around the edges as mine. There are a nearly infinite number of ways you could hack this hack. The most important things you need to keep in mind when designing a PSP case are measurements and materials. Think about which materials could work, in what ways they will work best, and consider how difficult working with those materials can be. I chose cardboard because it is freely available and because if I drop my PSP when it is in my cardboard case, the cardboard will offer protection from scratching and some absorption of the impact with a bit of pushback bounce, unlike materials such as metal or a hard wood, which lack the sponginess of cardboard. If you are a wood shop hobbyist and would like to go the wood route, consider using a soft wood like balsa that you whittle to the right shape and size, and then cover with a thin veneer of some harder wood to protect against scratches. If you stick with the cardboard design, consider ways that you could make the case water-resistant with different paints or sprays. If you get your cardboard from a liquor store, consider designing your case so that the logo of your favorite drink adorns the back of the PSP. I'm considering taking some soda cans and trying to glue some flattened aluminum to my cardboard case to make it match my aluminum PowerBook. If cardboard, box cutters, and glue aren't your cup of tea, but fabric and sewing machines are, consider using these measurements to design yourself a quilted and padded PSP case out of your favorite fabric. Whatever you choose to do, have fun, post pictures of your results online, and send me the link! |

EAN: 2147483647
Pages: 108