Designing and Saving a Report
When you run your query, you can use the REPORT procedure to modify your output. If there is an active query in the SQL Query Window, then select
Tools – Reset
to clear the query. Select OK in the dialog box that appears.
In the SQL QUERY TABLES window, select SAMPLE.EMPINFO and SAMPLE. SALARY from the Available Tables list and add them to the Selected Tables list.
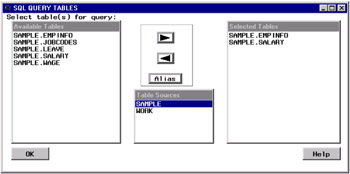
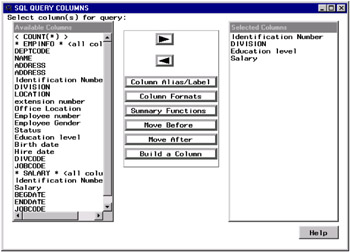
Select OK to display the SQL QUERY COLUMNS window. Add Identification Number , DIVISION , Education level , and Salary to the Selected Columns list.
Select
View – Join Type
Select Matched Join from the Join Types window to create an inner join. Select OK .
Select Identification Number from both lists in the Columns for Setting Join Criteria window.
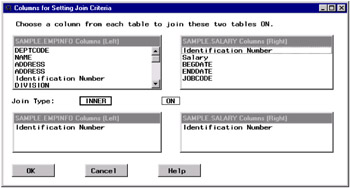
Select OK .
Producing Output with the REPORT Procedure
Select
Tools – Run Query – Design a Report – Begin with default report
The output from your query appears in a PROC REPORT window.
Modifying the Format of Your Report
You can now modify your report.
Set Report Options
In the REPORT window, select
Tools – Options – Report
In the ROPTIONS window, type 80 in the Linesize field to set the width of the output. Type 60 in the Pagesize field. Select the HEADLINE and HEADSKIP check boxes.
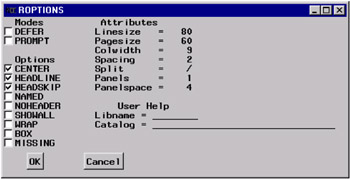
Select OK .
Define Selected Item
Select the Identification Number heading. Select
Edit – Define
Select NOPRINT in the DEFINITION window to prevent the identification number from being displayed.
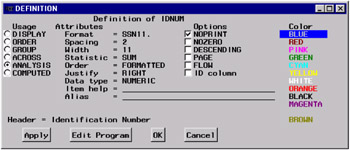
Select OK .
Move Selected Item
In the REPORT window, select the Education level heading. Select
Edit – Move – Left of the Next Selected Item
Select the DIVISION heading in the REPORT window. Education Level appears as the first column in the window.
Select the Education level heading in the REPORT window. Select
Edit – Define
In the DEFINITION window, select ORDER . Type 2 . in the Format field. Type 15 in the Width field. Type CENTER in the Justify field.
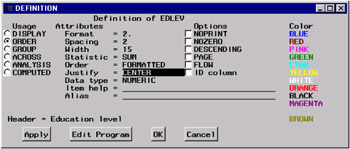
Select OK .
Select the Salary heading in the REPORT window. Select
Edit – Move – Left of the Next Selected Item
Select the Division heading. Salary will appear as the second column in the window.
Select the Salary heading. Select
Edit – Define
In the DEFINITION window, type DOLLAR8 . in the Format field. Type 8 in the Width field.
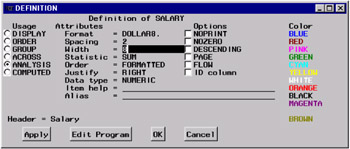
Select OK .
Select the DIVISION heading in the REPORT window. Select
Edit – Define
Type $30 . in the Format field of the DEFINITION window. Type 30 in the Width field.
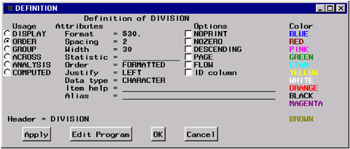
Select OK .
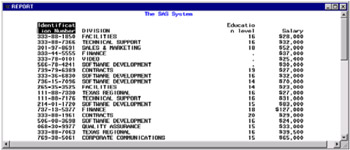
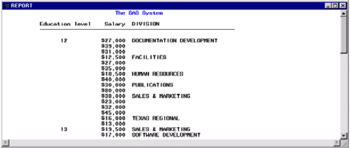
The Formatted Report
Your completed report compares the salaries of employees from different divisions who have the same education level.
Viewing the Report Statements
You can view your report statements in the SOURCE window by selecting
Tools – REPORT Statements
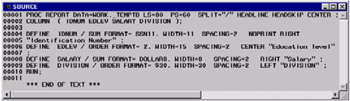
Select
File – Close
to close the SOURCE window and return to the REPORT window.
Saving Your Report
You can save your customized report to a catalog entry for use with later queries by selecting
File – Save Report
to display the SAVE DEFINITION window. Type SAMPLE in the Libname field. Type SQL in the Catalog field. Type SALARY in the Report name field. Type Salaries and Divisions in the Description field.
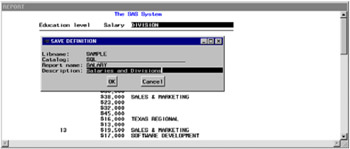
Select OK . A dialog box appears that notifies you of the creation of a new catalog.
Select OK . Select
File – Close
to exit the REPORT window. Select OK in the dialog box that appears.
You can also save your report definition in the SQL Query Window when you save the query.
Use Definition From Last Report
You can use your customized report definition. In the SQL QUERY COLUMNS window, select
Tools – Run Query – Design a Report – Use definition from last Report
The results of the query are presented using your predefined report.
Select
File – Close
to exit the REPORT window. Select OK in the dialog box that appears.
EAN: 2147483647
Pages: 54