Dreamweaver s Visual XML Authoring Environment


Dreamweaver's Visual XML Authoring Environment

As you saw in the previous section, working with XML and XSL files by hand can become a chore. With the release of Dreamweaver 8, however, Macromedia brought about new and revamped features for building, interacting with, and binding XML and XSL files so that you don't have to do it manually. Specifically, these features include:

  • Create XML/XSL files directly from the New Document dialog: Built into the New Document dialog are new template files for creating XML and XSL pages. Creating a new document from one of these templates lays the framework for building XML files and subsequently generating XSL transformations effortlessly.

  • Create XSL transformations intuitively: After you select an XSL template from the New Document dialog and click Create, a dialog appears asking you for the location of the XML file. The path to the XML file can reside on your computer or it can be remote (Internet) if you're working with RSS feeds (discussed later). After you've selected the file, tags and attributes in the XML file become visible as nodes/elements within the Bindings panel as a schema tree.

  • Create bindings visually using the Bindings panel: After the elements are visually accessible within the Bindings panel, you can then click, hold, and drag out each individual element onto the XSL page, not unlike the process involved when creating bindings from a recordset.

  • Work with a robust suite of XSL application objects: With a populated list of elements in the Bindings panel, you're free to work with a suite of easy-to-use XSL application objects including dynamic text, repeating regions, conditional regions, filters, and more.

  • Integrate RSS feeds directly into your website with little to no setup time: By far one of the coolest new features integrated into Dreamweaver 8 is the ability to tie directly into RSS feeds. By simply pointing the XSL file to the remote path of the RSS feed, Dreamweaver automatically generates a schema tree of nodes, elements, and more within the Bindings panel. After the schema tree has been created from the remote RSS feed, it's merely a matter of dragging and dropping the elements from the Bindings panel into your XSL page, formatting the content, and then previewing the result in the browser.

Before we dive into all these topics, however, let's begin by creating our first XML file.

Creating an XML Document

Before we can begin working with XSL pages, the Bindings panel, or application objects, we must build our XML file. After the XML file has been created, we can turn our attention to working with the other XSL features built into Dreamweaver 8. Let's get started.

Keeping in line with the Dorknozzle application, let's build an XML file that defines data for our Dorknozzle employees. What purpose this data serves and for which application it will be designed is irrelevant at this point. What we care about is creating the XML file that defines the name, title, department, and email for all the company employees.

To create the XML file, start by choosing File, New. The New Document dialog appeasr. Choose the XML option from the Basic Page category and click Create. The XML file appears in Code view with the following line at the top of the page:

 <?xml version="1.0" encoding="iso-8859-1"?> 

As you can see, the first line of code defined in the XML file is the XML declaration. This declaration must be included at the beginning of each XML document. Not only does it specify the XML version to the browser, it also outlines the character set to be used in the document. Now that the XML document has been created, add the following data, beginning at line 2:

 <employees>         <employee >                 <name>Ada</name>                 <title>Admin Assistant</title>                 <department>Administration</department>                 <email>ada@dorknozzle.info</email>         </employee>         <employee >                 <name>Agnes</name>                 <title>Accountant</title>                 <department>Accounting</department>                 <email>agnes@dorknozzle.info</email>         </employee>         <employee >                 <name>Cammy</name>                 <title>Content Manager</title>                 <department>Marketing</department>                 <email>cammy@dorknozzle.info</email>         </employee>         <employee >                 <name>Dave</name>                 <title>Developer</title>                 <department>Engineering</department>                 <email>dave@dorknozzle.info</email>         </employee>         <employee >                 <name>Ferris</name>                 <title>Founder</title>                 <department>Executive</department>                 <email>ferris@dorknozzle.info</email>         </employee>         <employee >                 <name>Herb</name>                 <title>Representative</title>                 <department>Human Resources</department>                 <email>herb@dorknozzle.info</email>         </employee>         <employee >                 <name>Mike</name>                 <title>Director</title>                 <department>Marketing</department>                 <email>mike@dorknozzle.info</email>         </employee>         <employee >                 <name>Pat</name>                 <title>Programmer</title>                 <department>Engineering</department>                 <email>pat@dorknozzle.info</email>         </employee>         <employee >                 <name>Tina</name>                 <title>Tech Writer</title>                 <department>Administration</department>                 <email>tina@dorknozzle.info</email>         </employee>         <employee >                 <name>Wally</name>                 <title>Webmaster</title>                 <department>Marketing</department>                 <email>wally@dorknozzle.info</email>         </employee> </employees> 

Save your file as employees.xml. Looking at the data, you'll probably notice some interesting aspects. First and foremost, the tags say a lot about the data contained within them, right? This is XML at its finestit's describing the data contained within the tags. First we have a list of employees, hence the <employees> tag. Second, we have groups of individual employees, therefore we have various <employee> tags uniquely identified by the id attribute. Within each <employee> tag, we have tags that define the employees name (<name>), title (<title>), department (<department>), and email address (<email>). Second, and possibly the most obvious even if you're not an HTML developer, is that none of these tags are recongnizable. Remember, with XML, you are responsible for defining the tags. XML is used to define data, not to structure it.

Ultimately, the browser doesn't care what XML tags you're using because it won't attempt to parse anything out of the file. This is where XSL come in. Let's do that next.

Creating an XSL Transformation

Now that the XML file has been created, we'll want some way of structuring the data so that it's presentable in the browser. As mentioned earlier, the eXtensible Stylesheet Language (XSL) is the markup language used for structuring XML pages such that the data becomes legible by the browser. You might be thinking that we'll be creating the XSL file by hand as we did in the opening section of this chapter, right? Think again. Dreamweaver 8's handling of XSL files is such that you can create an XSL file, tie the XSL file to an XML file, and then simply preview the results by pressing F12 to see the dynamic XML transformation to HTML in the browser. To create the XSL page, follow these steps:

1.

Create a new XSL page by selecting File, New. Choose the XSLT (Entire Page) option from the Basic Page category and click Create.

2.

Immediately Dreamweaver opens the Locate XML Source dialog. You'll use this dialog to browse to and select the XML file to stylize. As you can see, two options exist. You can browse to and select an XML file on your computer or you can enter an absolute path to an XML file remotely. We'll save the second option for later. For now, select the Attach a Local File on My Computer radio button. Next, browse to and select the employees.xml file you created in the previous section. The formatted Locate XML Source dialog resembles Figure A.3.

Figure A.3. Browse to the location of the employees.xml file using the Locate XML Source dialog.


3.

Click OK. The tags and attributes outlined in the XML file instantly appear in a hierarchal schema tree in the Bindings panel (see Figure A.4). Save the page as employees.xsl.

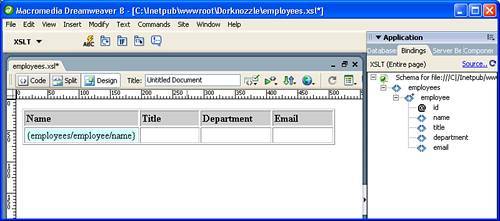
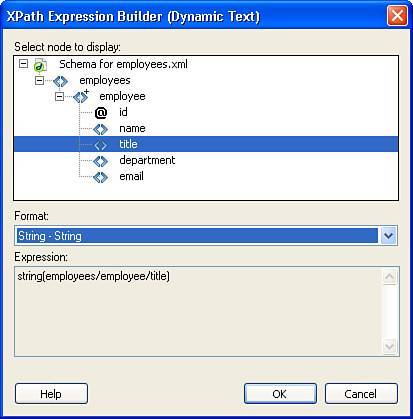
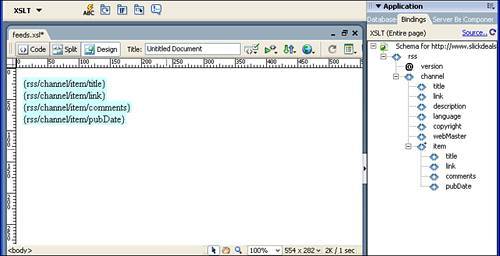
As you can see from the callouts in Figure A.4, the XML file's tags are organized in a hierarchal schema tree as nodes and elements within the Bindings panel. These nodes, represented by the root node (employees), trickle down to expose repeating nodes (employee), and elements (name, title, department, and email). You'll also notice that the unique id attribute is outlined as a parameter within the panel. More on this later.

Notice that not much occurred in our XSL page. For the most part, the Bindings panel was populated with a schema that represents our XML file. Aside from that, nothing. Our next task is to present the data elements within the XML file in the XSL page by way of dynamic text. You can create dynamic text using a variety of methods, let's discuss each next.

Dynamic Text

Now that you've effectively tied the XSL file to your XML document, you'll undoubtedly want some method for displaying the data contained within the XML tags onto the page and ultimately onto the browser. Enter dynamic text. Dynamic text, not unlike the dynamic text we've worked with in the last few chapters of the book, allows you to dynamically represent the data contained within the XML tags on the XSL page such that when we preview the page in the browser, the data is pulled from the XML file, stylized by the XSL file, and dynamically transformed into an HTML file that the browser understands. To work with dynamic text, follow these steps:

1.

In the XSL file, create a new table by choosing Insert, Table. The Insert Table dialog appears. Create a table with 2 rows, 4 columns, a border thickness of 1, and a cell padding and cell spacing of 2. Click OK to create the table within the XSL page.

2.

In each column header, add the text Name, Title, Department, and Email. Make the text bold and set the background color of the four cells within the header row to a color of your choosing.

3.

Now it's time to create the dynamic text. Creating text can be accomplished in one of a few ways. The simplest method is to simply drag the element from the Bindings panel into the respective cell within the table. Use this method first: Select the name element from the Bindings panel and drag it into the second cell, first column of the newly created table. The result resembles Figure A.5.

Figure A.5. Drag the name element from the Bindings panel into the newly created table.


4.

As you can see, the drag-and-drop method is fairly straightforward. The drawback to using this method is that it doesn't allow you to explicitly define the data type of the element, something that's of relative importance when working with XSL/XML. An alternative method of creating dynamic text is to use the Dynamic Text application object available from both the Insert, XSLT Objects menu and from the XSLT category in the Insert bar. Place your cursor in the second cell of the second column and choose one of these options; the XPATH Expression Builder (Dynamic Text) dialog opens. From this dialog box, you have the opportunity to choose the element you want to insert as dynamic text. Choose the title element. You can also choose the format (data type) that the element should be defined as from the Format menu. Choose the StringString option, as shown in Figure A.6.

Figure A.6. The XPATH Expression Builder (Dynamic Text) dialog allows you to insert an element as dynamic text but also provides you with the option of choosing the format to define the element as.


5.

Click OK. The new element appears within the table's cell.

6.

To round off the dynamic text functionality, drag the department and email elements into their respective cells within the table and save your work.

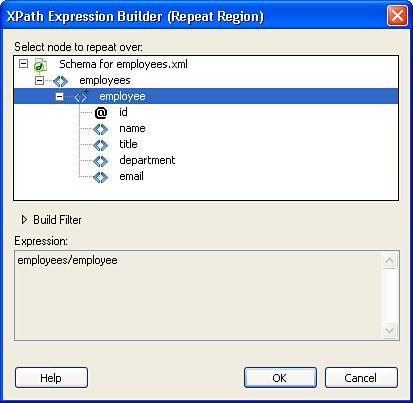
To preview the page in the browser, press the F12 key. Instantly Dreamweaver creates a temp HTML file (the transformed file) and presents it in the browser, similar to Figure A.7.

Figure A.7. The first employee in our XML file is presented, structured for the browser.


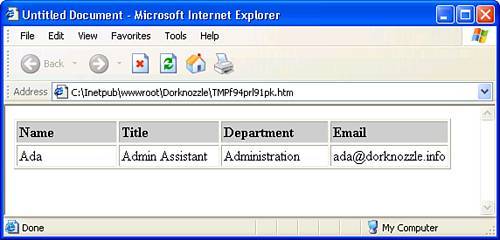
As you can see from Figure A.7, the first employee in our employees.xml file (Ada) is shown in a cleanly formatted table. After you pick your jaw up off the floor, you'll quickly come to realize that we created ten employees in our XML file, yet only one appears. This is where the Repeat Region application object comes in.

Repeating Regions

In the previous section, you saw how easy it was to work with dynamic text in an XSL document. Unfortunately, the previous section only went as far as allowing you to present the first employee in the XML file. In this section, we'll explore the addition of repeating regions within the table in the XSL file. By including a repeating region, we can effectively display all the records contained within the XML file. To add a repeating region to the table in the XSL page, follow these steps:

1.

Open the employees.xsl page if it's not open already. Select the second row in the table.

2.

Choose Insert, XSLT Objects, Repeat Region. The XPATH Expression Builder (Repeat Region) dialog appears.

3.

Similar to the Dynamic Text dialog, the Repeat Region dialog allows you to select an element from the schema tree that you want to repeat. Select the employee node, as shown in Figure A.8.

4.

Click OK. A Repeat Region visual aid appears within the table row.

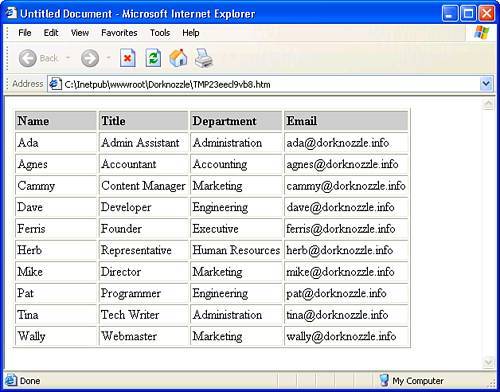
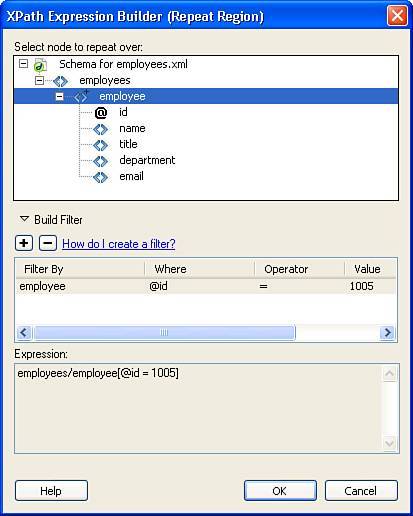
Save your work and test the results in the browser by pressing the F12 key. As you can see from Figure A.9, all the records in the XML file are now displayed in the HTML table in the browser.

In the preceding example, we used the Repeat Region application object to display all the data contained within the XML file. But what if we wanted to filter results based on a specific parameter? Perhaps we want to select a specific employee with the ID of 1005 from the XML file. To accomplish this, you can easily build a filter within the Repeat Region dialog that filters based on the id attribute of the <employee> tag in the XML file. To do this, follow these steps:

1.

Select the second row in the table.

2.

Choose Insert, XSLT Objects, Repeat Region. The XPATH Expression Builder (Repeat Region) dialog appears.

3.

Select the employee node from the schema tree.

4.

Click the Build Filter expander arrow.

5.

Click the Add (+) button and enter the following information in the fields that appear:

Filter By

Specifies the repeating node that contains the elements you want to filter by. The pop-up menu provides a list of nodes relative to the node you selected in the XML schema tree. For our purposes, make sure that the employee option is selected.

Where

Specifies the attribute of the Filter By node that will be used to limit the results. You can select an attribute from the pop-up menu, or you can enter your own expression in this field to identify elements that exist deeper within the schema tree. For our purposes, make sure that the @id attribute is selected.

Operator

Specifies the comparison operator to use in the filter expression. For our purposes, make sure the = operator is selected.

Value

Specifies the value to check for in the Filter By node. For our purposes, enter the numeric value 1005.


Figure C.8. Select the employee node from the schema tree.


Figure C.9. All the records in the XML file are displayed in the HTML table in the browser.


To recap, our expression is essentially saying, "Give me all employees where their ID is equal to 1005." The result resembles Figure A.10.

Figure A.10. Create a filter in the Repeat Region dialog box.


6.

Click OK. A Repeat Region visual aid appears within the table row.

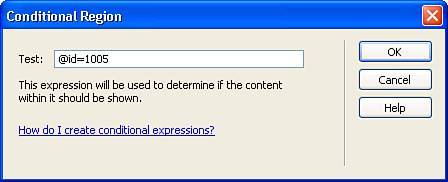
Save your work and test the results in the browser by pressing the F12 key. This time, only one record (the employee with an ID of 1005Ferris) appears in the table in the browser.

Conditional Regions

Conditional regions, similar to the filters you can create in the Repeat Regions dialog, allow you to build a filtering expression for data within your XML file. To work with conditional regions, follow these steps:

1.

Choose Insert, XSLT Objects, Conditional Region. The Conditional Region dialog appears.

2.

Enter the filtering criteria in the Conditional Region dialog. Assuming that we want to filter by ID, enter the value @id=1005 in the Test text box, similar to Figure A.11.

Figure A.11. Create a conditional expression in the Conditional Region dialog.


3.

Click OK.

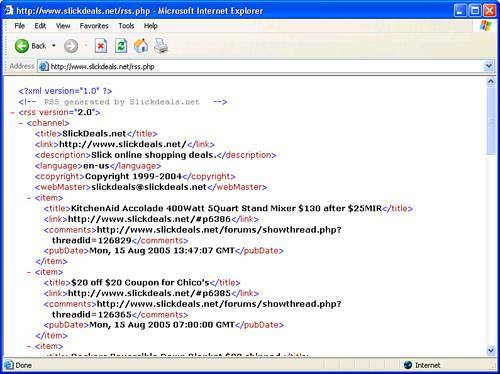
Save your work and test the result in the browser by pressing the F12 key. This time, one record (Ferris) appears in the table in the browser.

Working with RSS Feeds

Quite possibly one of the hottest trends, aside from Web services, is that of RSS. Originally developed by Netscape, Rich Site Summary (RSS) is an XML format for syndicating web content. A website that wants to allow other sites to publish some of its content creates an RSS document and registers the document with an RSS publisher. A user that can read RSS-distributed content can then use the content on a different site. Syndicated content includes such data as news feeds, events listings, news stories, headlines, project updates, excerpts from discussion forums, and even corporate information. Although numerous websites are devoted to the topic of helping you publish and distribute RSS feeds, you need look no further than Dreamweaver 8. With Dreamweaver 8's built-in XML/XSL transformation integration, consuming RSS feeds in your website is a snap. To work with RSS feeds, follow these steps:

1.

The first step to integrating RSS into your web pages is to locate an RSS feed. One of my favorite websites (and a website that I know exposes an RSS feed) is www.slickdeals.net. Browse to that web site.

2.

In the left corner, above the navigation menu, you'll see a small orange button titled RSS. Click it. You're immediately presented with the RSS feed (and the path to the feed in the address bar) in the browser window, similar to Figure A.12.

Figure A.12. The RSS feed appears in the browser.


3.

Note the path to the feed as http://www.slickdeals.net/rss.php. Copy it. You'll need to paste this path in the Locate XML Source dialog in Dreamweaver. You can now close the browser.

4.

Shift your attention back to Dreamweaver. Create a new XSLT (Entire Page) document by choosing File, New. Select the XSLT (Entire Page) option from the Basic Page category and click Create. The Locate XML Source dialog appears.

5.

Select the Attach a Remote File on the Internet radio button and paste the http://www.slickdeals.net/rss.php path into the text box. Click OK. The XML nodes appear within the schema tree in the Bindings panel.

6.

Drag out the title, link, comments, and pubdate bindings into the page, creating line breaks along the way. Your page in Dreamweaver resembles Figure A.13.

Figure A.13. Drag the bindings into the XSL page.


7.

Highlight the four bindings on the page and choose Insert, XSLT Objects, Repeat Region. The XPATH Expression Builder (Repeat Region) dialog appears.

8.

Select the item node within the schema tree and click OK. A Repeat Region visual aid surrounds the dynamic text elements within the XSL page.

Save your work and test the results in the browser by pressing the F12 key. Instantly, Slick Deals feeds are presented to you within the browser, similar to Figure A.14.

Figure A.14. Slick Deals news feeds are shown in the browser.
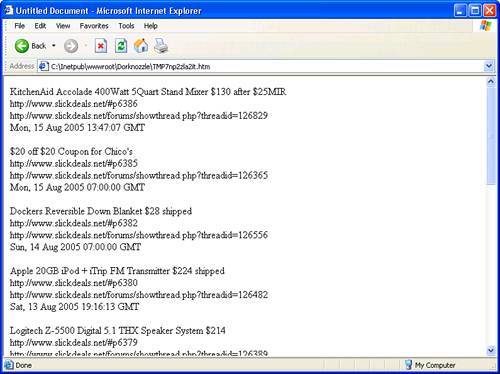


Macromedia Dreamweaver 8 Unleashed
ISBN: 0672327600
EAN: 2147483647
Year: 2005
Pages: 237
Authors: Zak Ruvalcaba

flylib.com © 2008-2017.
If you may any questions please contact us: flylib@qtcs.net