Building an ASP.NET Shopping Cart
| So far you've seen how the UltraDev Shopping Cart can help you with building a full functioning ASP shopping cart under an ASP server model. But what if you were using ASP.NET? Unfortunately, as an ASP.NET developer, you're at a slight disadvantage because free extensions currently do not exist. But who needs extensions when you can build the shopping cart by hand just as easily using ASP.NET. In the following sections, we'll do just that. You'll see how, with a little knowledge of DataSets and DataTables, you can easily build the ASP.NET shopping cart. Let's get started. As you have seen in the previous chapters, DataSets provide you with a way of creating a purely memory-resident representation of a database table. DataSets, like recordsets in ASP, act as an intermediary between the database and the code. Unlike recordsets, however, the DataSet mirrors the database more closely. DataSets contain tables (called DataTables); the DataTables contain columns and rows (called DataColumns and DataRows), and multiple DataTables within a DataSet can even contain relationships (DataRelations). Because DataTables have columns represented by the columns property and rows represented by the rows property, DataTables are viable alternative when creating an ASP.NET shopping cart from scratch in Dreamweaver. We can build the columns just as we would in a database using the columns property of the DataTable and add rows to the DataTable with the rows property. With the DataTable built, we can then bind the DataTable to a DataGrid to display the results in an intuitive manner. Building the View Cart PageNow that you have an idea as to the underpinnings of our ASP.NET cart, let's begin building it. We'll start by building the viewcart.aspx page:
As you can see, the DataGrid functions as the presentational element for the items in our cart. As the user adds items to the cart, the items are displayed in the DataGrid in a fashion similar to that of the ASP version, only without the need for designing a new table. As you progress through the chapter, we need to add the following functionality to make the cart work:
We'll add all this functionality as we progress through the chapter. For now, let's focus on constructing the cart DataTable. Start by adding the code that creates the cart structure, queries the database for the ItemID that will be passed across the query string, and binds the results to our new DataGrid in a new code declaration block in the <head> of the viewcart.aspx page: <script runat="server" language="vb"> Dim objDT As System.Data.DataTable Dim objDR As System.Data.DataRow Dim objDS As New System.Data.DataSet() Private Sub Page_Load() If Not IsPostBack Then If (Session("Cart") Is Nothing) Then objDT = New System.Data.DataTable("Cart") objDT.Columns.Add("CartID", GetType(Integer)) objDT.Columns("CartID").AutoIncrement = True objDT.Columns("CartID").AutoIncrementSeed = 1 objDT.Columns.Add("ItemID", GetType(Integer)) objDT.Columns.Add("ItemName", GetType(String)) objDT.Columns.Add("Quantity", GetType(Integer)) objDT.Columns("Quantity").DefaultValue = 1 objDT.Columns.Add("Cost", GetType(Decimal)) Session("Cart") = objDT End If End If objDT = Session("Cart") If (Request.QueryString("ItemID") <> "") Dim objConn As New System.Data.OleDb.OleDbConnection ("Provider=Microsoft.Jet.OleDb.4.0;" & _ "Data Source=C:\Inetpub\wwwroot\DorknozzleASPX\Database\Dorknozzle.mdb") Dim objDA As New System.Data.OleDb.OleDbDataAdapter ("SELECT * FROM EmployeeStore WHERE ItemItemID")), objConn) objDA.Fill(objDS, "SelectedProduct") Else Response.Redirect("employeestore.aspx") End If Dim blnMatch As Boolean = False For Each objDR In objDT.Rows If objDR("ItemID") = objDS.Tables("SelectedProduct").Rows(0).Item("ItemID") Then objDR("Quantity") += 1 blnMatch = True Exit For End If Next If Not blnMatch Then objDR = objDT.NewRow objDR("ItemID") = objDS.Tables("SelectedProduct").Rows(0).Item("ItemID") objDR("ItemName") = objDS.Tables("SelectedProduct").Rows(0).Item("ItemName") objDR("Cost") = objDS.Tables("SelectedProduct").Rows(0).Item("Cost") objDT.Rows.Add(objDR) End If dg.DataSource = objDT dg.DataBind() Session("Cart") = objDT End Sub </script> Okay, that was a lot of code to start off with! Before you close the book in horror, remember that the complete version of these projects can be downloaded from www.dreamweaverunleashed.com. For now, though, let's go over the code section by section to make it a bit more understandable. Initially, we create our code declaration block complete with the runat="server" property. In that code declaration block, we instantiate (set aside memory for) the classes we'll use in our code, including the DataTable, DataRow, and DataSet classes: <script runat="server" language="vb"> Dim objDT As System.Data.DataTable Dim objDR As System.Data.DataRow Dim objDS As New System.Data.DataSet() Next we create a new Page_Load() event handler complete with a PostBack check (If Not IsPostBack Then). The reason for adding this check is simple: We want the DataTable structure to be created only once and not every time the user interacts with the page. Because this is the case, we check for PostBack. If this is the first time the page is loaded, the script executes and the DataTable structure is created. If the user is posting back to the page, the script is ignored: Sub Page_Load() If Not IsPostBack Then Next we check to make sure that a session doesn't exist. We'll use a session to store the cart DataTable. Obviously, if a user navigates from one page to the next, we don't want to lose any added items. In this case, we check to make sure that the session doesn't already exist. If it does, don't re-create the structure. If the session doesn't exist, create it: If (Session("Cart") Is Nothing) Then Next we'll define the columns for our DataTable. Remember that DataTables work like database tables. They have a column name and a data type association. For that reason, the columns are added by accessing the Add() method of the Columns collection for the DataTable and passing in two values as parameters: the name of the column and the data type the column will hold: objDT = New System.Data.DataTable("Cart") objDT.Columns.Add("CartID", GetType(Integer)) objDT.Columns("CartID").AutoIncrement = True objDT.Columns("CartID").AutoIncrementSeed = 1 objDT.Columns.Add("ItemID", GetType(Integer)) objDT.Columns.Add("ItemName", GetType(String)) objDT.Columns.Add("Quantity", GetType(Integer)) objDT.Columns("Quantity").DefaultValue = 1 objDT.Columns.Add("Cost", GetType(Decimal)) As you can see, we create a new DataTable object variable named objDT. Next we access the Add() method of the Columns collection and add five new columns: CartID, ItemID, ItemName, Quantity, and Cost. Similar to a database table, we establish a unique primary column that automatically increments: CartID. The last lines of code add the DataTable structure to the Session() and perform the necessary conditional terminations: Session("Cart") = objDT End If End If Our next section of code is relatively simple and to the point. First we dump out the contents of the session into a new DataTable object variable named objDT: objDT = Session("Cart") Then we check and make sure that a QueryString parameter for ItemID is being passed across: If (Request.QueryString("ItemID") <> "") If the parameter does in fact exist, we'll establish a new connection to our database by creating a new instance of the OleDbConnection class and passing the connection string into the constructor as a parameter to return a new OleDbConnection object variable named objConn: Dim objConn As New System.Data.OleDb.OleDbConnection("Provider=Microsoft.Jet.OleDb.4.0;Data Source=C:\Inetpub\wwwroot\DorknozzleASPX\Database\Dorknozzle.mdb") Next we create a new instance of the OleDbDataAdapter() class, passing in our SQL SELECT statement with the ItemID for the WHERE clause and the newly created connection object in the constructor to return a new OleDbDataAdapter object variable named objDA: Dim objDA As New System.Data.OleDb.OleDbDataAdapter("SELECT * FROM EmployeeStore WHERE ItemItemID")), objConn) Then we call the Fill() method of the DataAdapter, passing in the DataSet object variable and a unique DataTable named SelectedProduct: objDA.Fill(objDS, "SelectedProduct") Finally, we finish our conditional statement by adding the Else and End If clauses: Else Response.Redirect("employeestore.aspx") End If To prevent errors, this conditional statement must be added. If it were left out, the SQL statement would try to query based on a filter that was nonexistent and would produce an error. Our next section of code checks for a product in the cart DataTable. It uses a For...Each loop to loop through each DataRow in the collection of DataTables for a matching ItemID. If it exists, rather than adding a duplicate item to the cart, it increments the quantity of the item that's already in there, sets a Boolean variable to true, and exits out of the loop: Dim blnMatch As Boolean = False For Each objDR In objDT.Rows If objDR("ItemID") = objDS.Tables("SelectedProduct").Rows(0).Item("ItemID") Then objDR("Quantity") += 1 blnMatch = True Exit For End If Next That Boolean variable is an important part of our next section of code. By setting that Boolean variable to TRue, we are essentially acknowledging that a duplicate value exists and that we don't need to add a new item to the cart; we simply need to increment the quantity by 1. If there isn't a match in the DataTable, however (if Boolean is still false), we add the new item to the cart: If Not blnMatch Then objDR = objDT.NewRow objDR("ItemID") = objDS.Tables("SelectedProduct").Rows(0).Item("ItemID") objDR("ItemName") = objDS.Tables("SelectedProduct").Rows(0).Item("ItemName") objDR("Cost") = objDS.Tables("SelectedProduct").Rows(0).Item("Cost") objDT.Rows.Add(objDR) End If Finally, we bind the cart DataTable object variable (objDT) to the DataGrid, store the DataTable within the session variable, and close the subroutine: dg.DataSource = objDT dg.DataBind() Session("Cart") = objDT End Sub So far so good! We've built the cart structure; we've checked and collected the ItemID that will be passed on the query string, we created code to query the database for the matching item that the user will be selecting, we've added an item (DataRow) to the DataTable, and finally, we bound the DataTable to the DataGrid for presentation. Our next order of business is to create a function that keeps track of the total cost of items in our cart and presents a user with the grand total. Keeping a Grand TotalNow that you have the functionality of being able to add items to the cart, you'll want to keep a running total. This allows users to determine total costs when they have multiple items in their cart. To accomplish this functionality, we'll do a couple of things. First, we'll need to create a new Label control just underneath the DataGrid: <b><asp:label runat="server"></asp:label></b> Next we'll create a new function called getItemTotal() that has a return type set as a Decimal data type. Place the function just below the Page_Load() event handler but before the closing </script> tag: Function GetItemTotal() As Decimal Dim intCounter As Integer Dim decRunningTotal As Decimal For intCounter = 0 To objDT.Rows.Count - 1 objDR = objDT.Rows(intCounter) decRunningTotal += (objDR("Cost") * objDR("Quantity")) Next Return decRunningTotal End Function In an effort to simplify the code, let's break it down a bit. Initially, we define the new function as GetItemTotal() with a return type of Decimal: Function GetItemTotal() As Decimal Next we create two variables. The first, intCounter, we define as an Integer; it is the counter variable that we use within our loop. The second, decRunningTotal, we define as a Decimal; it is the variable that the function will return: Dim intCounter As Integer Dim decRunningTotal As Decimal Our next step is to loop through all the rows in the DataTable using a For loop: For intCounter = 0 To objDT.Rows.Count - 1 objDR = objDT.Rows(intCounter) decRunningTotal += (objDR("Cost") * objDR("Quantity")) Next As you can see, within our loop, we increment the value of decRunningTotal as the sum of the Cost column multiplied by the Quantity column. Finally, we return decRunningTotal and terminate the function: Return decRunningTotal End Function Our last step is to write the value of decRunningTotal into the newly created Label control. You can accomplish that by adding one line of code in the Page_Load() event handler. The code addition follows, in bold: dg.DataSource = objDT dg.DataBind() lblTotal.Text = "Grand Total: $" & GetItemTotal() Session("Cart") = objDT End Sub That's it! Our next step is to actually add items to the cart. Sit tight, we're almost there! Adding Items to the CartNow that viewcart.aspx is 75% complete, we can turn our attention to the employeestore.aspx page. From this page, users can select an item from the catalog, click an Add To Cart link, and instantly be redirected to the viewcart.aspx page to see a list of added items. You can included the Add To Cart functionality first by modifying the table in the employeestore.aspx page so that it includes two new rows just below the cost binding. With your cursor positioned within the row, add the text Add to Cart. Select the text and add the following code to the Link text box in the Properties Inspector: viewcart.aspx?ItemID=<%# dsEmployeeStore.FieldValue("ItemID", Container) %> When you're done, the design will resemble Figure 28.26. Figure 28.26. Add a new Add To Cart link.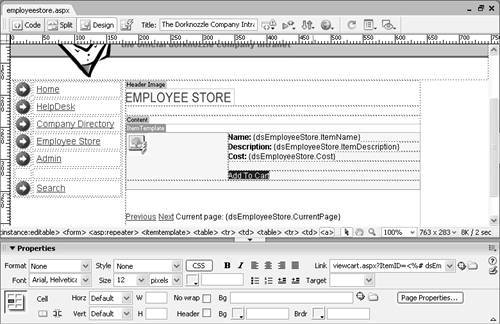 That's it! You're ready to test the functionality. To test your work, select Preview in Browser by pressing the F12 key. The page displays similar to Figure 28.27. Figure 28.27. The employee store page appears complete with the Add To Cart link.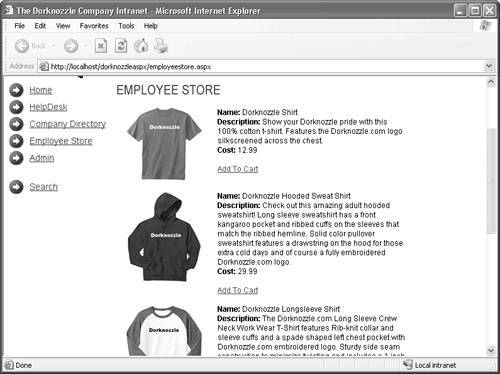 Click the Add To Cart link. Instantly you are redirected to the viewcart.aspx page. Notice that your selection and the total display in the DataGrid and Label control respectively. The result is shown in Figure 28.28. Figure 28.28. Your selection appears in the DataGrid, and the total is displayed in the Label control.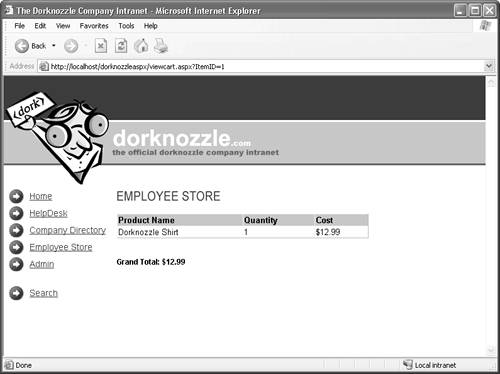 Removing Items from the CartThe final piece of functionality is to add a feature that allows users to remove items from their cart. You can add this functionality by adding a new ButtonColumn within the DataGrid in the viewcart.aspx page as follows: <asp:datagrid runat="server" DataKeyField="ProductID" AutoGenerateColumns="false" OnDeleteCommand="Delete_Item" Font-Size="10pt" Font-Name="Arial" Width="400"> <headerStyle Font-Bold="true" BackColor="#99CC00"></headerStyle> <columns> <asp:buttoncolumn Text="Remove Item" CommandName="Delete" /> <asp:boundColumn DataField="ProductName" HeaderText="Product Name" /> <asp:boundColumn DataField="Quantity" HeaderText="Quantity" /> <asp:boundColumn DataField="Cost" HeaderText="Cost" DataFormatString="{0:c}" /> </columns> </asp:datagrid> Also, don't forget to add the OnDeleteCommand() method to the DataGrid tag. Notice that the OnDeleteCommand() method points to a subroutine called Delete_Item(). Let's write that subroutine next: Sub Delete_Item(s As Object, e As DataGridCommandEventArgs) objDT = Session("Cart") objDT.Rows(e.Item.ItemIndex).Delete() Session("Cart") = objDT dg.DataSource = objDT dg.DataBind() lblTotal.Text = "Grand Total: $" & GetItemTotal() End Sub Most of this code should look relatively familiar. Initially, we dump the session variable into the objDT DataTable object variable. Next we call the Delete() method of the row in the DataTable that matches the selected row in the DataGrid to delete it. Then we place the DataTable back into the session, rebind the DataGrid, and call the GetItemTotal() function to update the grand total. Now let's test the functionality. Figure 28.29 shows the Remove Item column that appears in the DataGrid in the viewcart.aspx page. Figure 28.29. The user can remove a specific item from the DataGrid.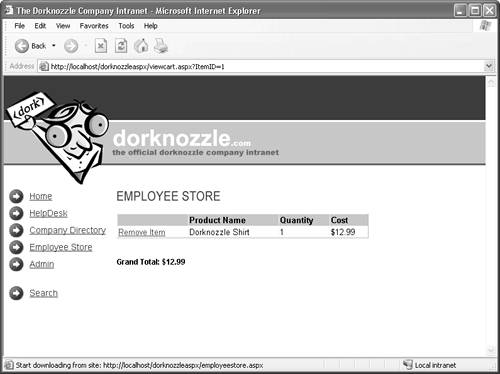 |
EAN: 2147483647
Pages: 237