Installing a Database
| Now that you have a general idea as to what a database is and you understand some of the concepts that drive database functionality, it's time to actually choose and install one. Just like the server-side technology that you picked, the database you choose should coincide with your business practices, budget, scalability needs, feature wants, and more. Dreamweaver supports any ODBC-compliant database; unfortunately, we can't cover them all in this book, so for development purposes, the decision has been made to support the following three databases:
TIP Although we've made the decision to support MySQL for PHP development in this book, in reality, Dreamweaver can connect to many more. Interakt has a product by the name of PHakt that allows you to connect your PHP applications in Dreamweaver to virtually any database. More information on that product can be found at the following URL: http://www.interaktonline.com/Products/Free-Products/PHAkt/Overview/. Of course, there's nothing stopping you from installing all three options. Access is file-based which makes it no different than having Word, Excel, or even Dreamweaver open. MSDE and MySQL run as independent Windows services which means that they'll never overlap and data is always guaranteed to be stored independently of the other storage mechanism. NOTE Again, because of size constraints, examples in this book use Access. Although references are always made to other database products, the core functionality of the Dorknozzle project is added under the assumption that you're using Access. For the most part, database integration in Dreamweaver is handled exactly the same, regardless of which datatbase you use. With that said, after you've defined the database in Dreamweaver (covered in Chapter 25, "Working with Dynamic Data") working with database data is exactly the same regardless of the database you choose. Installing AccessAccess is Microsoft's database solution for developers and small companies alike who desire to build and/or house data in a small yet reliable store. Because Microsoft Access is cheap and easily attainable (either from Microsoft's website or as an installation option with Microsoft Office), it's usually the perfect choice for discussion and use in books such as this one. For the most part, Microsoft Office includes Access. If you've already installed Microsoft Office on your computer, but didn't install Access at the same time, you'll need to add it to your installation. The following assumes that you have Microsoft Office 2000, XP, or 2003 handy and that you will be installing from that CD:
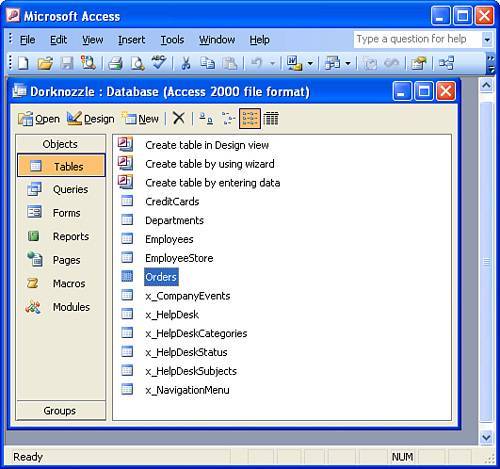
That's all there is to it. You are now ready to begin working with Access. TIP Of course, if you don't have Microsoft Office 2000, XP, or 2003, you're not completely out of luck. You can download and install a 45-day free trial from Microsoft's website at http://www.microsoft.com/office/access. Also on the website, you can find the latest updates, news, and purchase information for Microsoft Access. The Access File ManagerAlthough Access doesn't work within the framework of what is considered a DBMS, its built-in file manager does offer some similarities. Remember that Access databases are self-contained MDB files that, when double-clicked, open within the Microsoft Access program also shown in Figure 23.11. Figure 23.11. Access database files are self-contained MDB files that open in Microsoft Access.
Using this file manager, you can create tables, columns, data types for columns, and even add rows with data to the tables. Furthermore, you can perform standard database operations such as create queries, manage security restrictions, back up a database, and more. If you'd like to explore the Dorknozzle Access database, simply browse to the Database folder for the Dorknozzle project you plan on using and double-click the Dorknozzle.mdb file. We'll explore this with more detail later in the chapter. Installing MSDESQL Server 2000 is Microsoft's database solution for medium to large companies and enterprises. It is quite a bit more expensive than Access, generally requires its own dedicated "database server," and at times requires the hiring of a certified database administrator (DBA) to maintain. However, it also offers a robust and scalable solution for larger web applications. I will assume that if you're reading this book, you probably don't want to invest in something as massive as SQL Server 2000 and that your needs are better suited to something free but just as powerful for testing and development purposes. If this is the case, then Microsoft's SQL Server Desktop Engine or MSDE is perfect for you. MSDE is Microsoft's free database alternative to SQL Server 2000. It functions and stores data exactly as SQL Server 2000 does but is meant for development purposes only. After you get your feet wet with MSDE, you might like to think about upgrading to a more robust and licensed database in SQL Server 2000. To download and install MSDE, follow these steps:
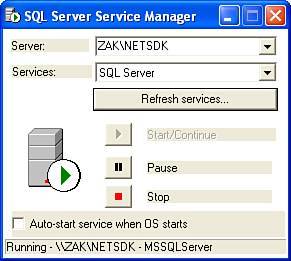
Now that you've successfully installed MSDE, you're ready to start the service. The easiest way to start the MSDE service is to launch the service manager. You can do this by following these steps:
After you close the Service Manager, it continues to run out of sight in the system tray. You'll notice a small icon that looks like a cylinder with a play icon on top. Web Data AdministratorTo use MSDE effectively, you'll need to download and install the Web Data Administrator. Web Data Administrator is a free DBMS provided by Microsoft that allows you to manage your instance of MSDE locally and remotely using a web-based interface. What's nice about Web Data Administrator, aside from the fact that it's free, is that it lets you manage databases, tables, columns, column types, stored procedures, and more. To download and install Web Data Administrator, follow these steps:
after it's installed, you can access the Web Data Administrator through your browser at the URL http://localhost/SqlWebAdmin. Before you can use it however, you must enable what is known as SQL Mixed Mode authentication. This process involves making a small change to the registry, but don't be put off. If you follow these instructions exactly, you won't do any harm:
Open Web Data Administrator in the browser using the URL http://localhost/SqlWebAdmin. You'll be asked for the login, password, and server name for your instance of MSDE similar to Figure 23.13. Figure 23.13. Web Data Administrator requires you to provide the user name, password, and server instance.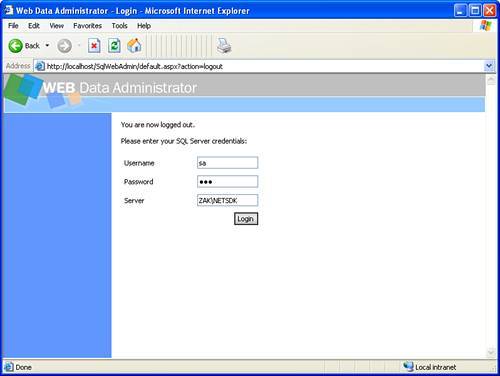 Type sa in the User Name text box and type the password you supplied during the installation of MSDE in the Password text box. If you're unsure what the name of your server is, double-click the database engine icon in the system tray. The name of your server is located in the Server drop-down menu. Enter this value into the Server text box of the login screen for Web Data Administrator. Click Login; you will see a list of the default databases currently available in MSDE. Now that you're logged into Web Data Administrator, the next step is to import the pre-built Dorknozzle database into MSDE. Of course, the import process can be handled directly from Web Data Administrator. To import the pre-built Dorknozzle database, follow these steps:
To see the imported database, click the Databases link. As you can see from Figure 23.14, the Dorknozzle database is now contained within our MSDE instance. Figure 23.14. The Dorknozzle database is now imported into our instance of MSDE.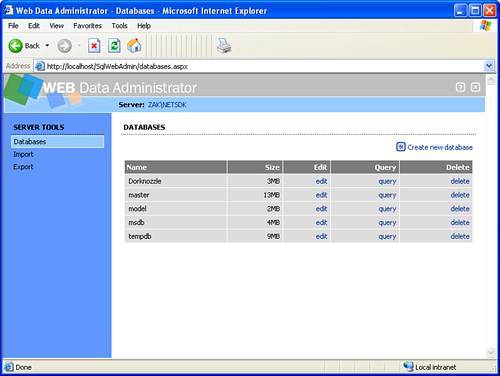 If you find some time, explore the features of Web Data Administrator. Practice creating databases, tables, columns, and so on. Doing so will help you get acquainted with Web Data Administrator's interface and its functionality. Installing MySQLGaining a lot of steam over the years is the free, open source database known as MySQL. But don't let the free or open source references fool you. MySQL has proven over the years to be as robust, secure, and scalable as any enterprise alternative including Microsoft's SQL Server, Oracle, or IBM's DB2. If your goal in reading this book is to side with the open source movement, then MySQL is your best bet and is available as a free download from http://www.mysql.com. To download and install MySQL, follow these steps:
That's it! You've successfully installed MySQL. To ensure that the installation was successful and that the database server is running, click Start, Settings, Control Panel, Administrative Tools, and Services. In the Services window, scroll down and find the MySql option. If the status reads started, the database server is indeed started and the installation was successful. If it's listed but not started, right-click the option and choose the Start option from the context menu. You're now ready to begin developing web applications that use MySQL as the data storage mechanism. Before you begin however, you'll want to install the free MySQL DBMS MySQL Administrator. Let's discuss that next. MySQL AdministratorTo use MySQL effectively, you'll need to download and install MySQL Administrator. MySQL Administrator is a free DBMS that allows you to manage your instance of MySQL using a slick and easy-to-use interface. What's nice about MySQL Administrator, aside from the fact that it's free, is that it lets you manage databases, tables, columns, column types, security, and more. To download and install MySQL Administrator, follow these steps:
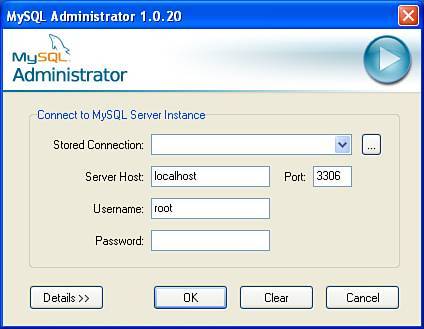
After you've installed MySQL Administrator, you will see a shortcut on your desktop. Double-click that shortcut to open the MySQL Administrator login similar to Figure 23.15. Figure 23.15. MySQL Administrator requires you to provide the user name, password, and server instance.
Unless you specified a login and password during the installation, you can type localhost in the Server Host text box and type root in the Username text box. Leave the Password text box empty and click OK to open MySQL Administrator. Now that you're logged into MySQL Administrator, the next step is to import (Open Source uses the term restore) the prebuilt Dorknozzle database into MySQL. Of course, the restore process can be handled directly from MySQL Administrator. To restore the prebuilt Dorknozzle database, follow these steps:
To see the imported database, click the Catalogs link located in the navigation menu on the left side. As you can see from Figure 23.16, the Dorknozzle database is now contained within our MySQL instance. Figure 23.16. The Dorknozzle database is now restored into our instance of MySQL. If you find some time, explore the features of MySQL Administrator. Practice creating databases, tables, columns, and so on. Doing so will help you get acquainted with MySQL Administrator's interface and its functionality. For the most part, you've downloaded and installed everything you need to get started with PHP and MySQL without the use of Dreamweaver. However, because we plan on using Dreamweaver to build PHP pages that tie into a MySQL database, you'll need to perform some minor tweaks on the php.ini file as well as download some additional files to get Dreamweaver to work correctly with PHP and MySQL. Configuring PHP to Work with DreamweaverAlthough it might seem that you've just done everything you need to do to get PHP and MySQL working with Dreamweaver, think again. You must make two minor adjustments for Dreamweaver to recognize your MySQL database under the PHP server model:
Understanding the goal of this section, let's now walk through the steps. First, you want to download and unpack the PHP 5.0.4 zip package. You can do this by following these steps:
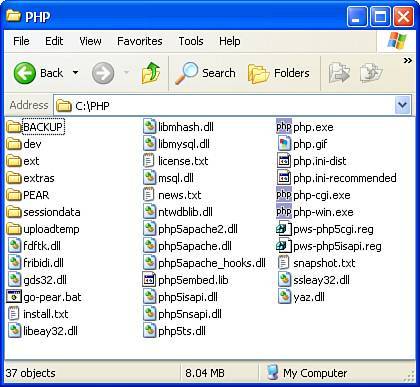
Look in the C:\php\ext folder. Halfway down the list, you'll have a php_mysql.dll file. This is the file that Dreamweaver needs to communicate with MySQL through its interface. Before that communication can be established, however, you'll want to configure the php.ini file. The php.ini file is a configuration file tapped by Dreamweaver before actually communicating with the php_mysql.dll file. If the php.ini file doesn't make reference to that .DLL (or if the reference is commented within the .INI file), communication won't be established. To configure the php.ini file now, follow these steps:
That's it! You're now ready to begin using the MySQL database under the PHP server model in Dreamweaver. More on that in a couple of chapters. |
EAN: 2147483647
Pages: 237