Understanding Dreamweaver Templates
| Although the concept of templates can seem like a broad term, thinking analogously can aid in understanding the framework behind Dreamweaver templates. Think of professions in the real world as examples. For instance, furniture makers use templates to duplicate furniture based on a master design. To add uniqueness to each furniture piece, they may use different dyes or leather colors. Clothing manufacturers create one pattern and base future clothing pieces from the master pattern. Welders create jigs as a way of precisely duplicating curves when welding medal. The list goes on and on. Templates are simply a way for individuals to create a master design or pattern and then derive future designs from that master, effectively ensuring consistency and uniformity across future versions of that design. The profession of web development is no different. Using the Dorknozzle organization as an example, assume that our organization has numerous departments. Also assume that each department wants to create their own web presence in the Dorknozzle intranet site. Although the overall framework of the site must remain the same, each department is certainly welcome to customize the content that appears on their particular page. This is where templates become useful. As the webmaster, your task is to create one master template file. When that master template file is done, we can base other pages off of that master. For instance, we could create the main page, the help desk page, the employee store page, the company directory page, and the admin page. Even better, we could allow the web developers from each department to derive their own pages off of our template for each of their own department sites. Of course, the obvious benefit here is that this will ensure a consistent look and feel throughout the entire intranet site. The major benefit goes beyond consistency and uniformity and includes maintainability. Now assume that we need to add a link to the navigational structure of the site. Traditional methods would have us opening every page in our site and manually adding the new link to the navigation menu. Even worse, we would have to ask all web developers in each department to also make the change in their individual websites. Because every developer works a bit differently, this could result in errors within the structure of the navigation menu. Because we've decided to use a template, however, we simply have to make the change in the master template file, update the site, and instantly all pages derived from the template file are edited appropriately. Figure 15.1 illustrates this point. You can begin to see the benefits that templates provide. Figure 15.1. Numerous pages are based off of a master template, including main intranet pages and inter-department pages.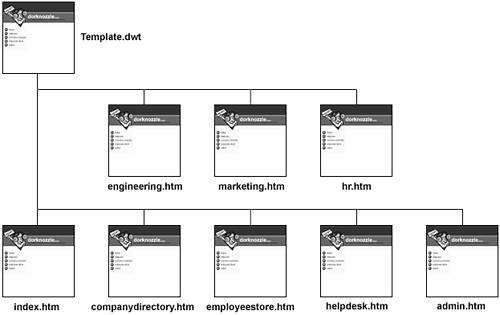 Dreamweaver templates give you far more flexibility than simply creating a design that acts as a master for other future designs. By default, when a new page is derived from a template file, the regions within the page become locked. Locked portions of the page cannot be edited or changed in the derived page. The idea is to create editable regions in the template file so that, when new pages are derived from the master template file, developers can make changes only to the editable regions, effectively preserving the overall design and structure of the site from accidental modifications. As it stands, Dreamweaver supports four types of regions within a template:
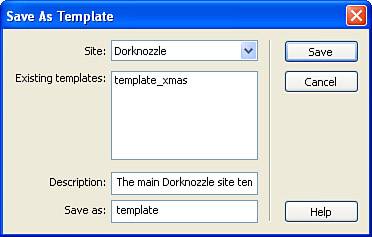
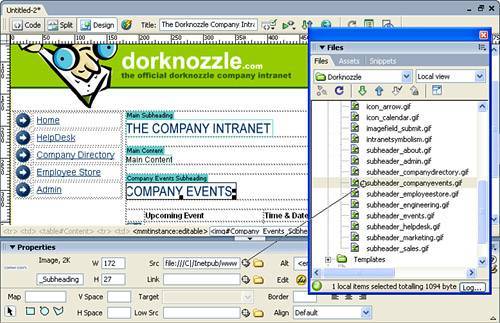
Figure 15.2 shows how these regions might be applied to our Dorknozzle design to create an organization-wide template. Figure 15.2. Editable, optional, and repeating regions can be added to a template for numerous design options.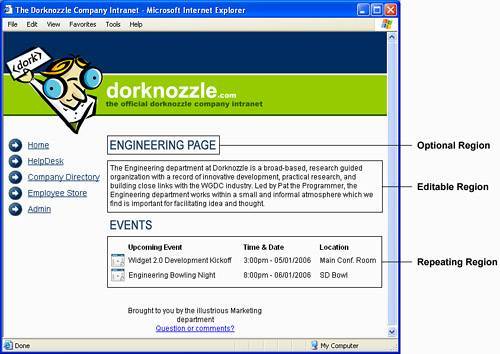 Now that you have a visual idea as to how our template might look, let's actually build it! Creating a New TemplateCreating a new template in Dreamweaver is simple. For the most part, it's simply a matter of creating a new blank document and choosing File, Save As Template. Unfortunately, this method won't do us any good because it doesn't contain any graphics that represent the overall design of our Dorknozzle site. In fact, the best method for establishing a template is to simply create a skeleton design as you normally would when creating pages for a site. When you have the design exactly the way you want it, choose File, Save As Template. Dreamweaver converts the document into a DWT (Dreamweaver Template) file and places it in a Templates folder (created automatically for you by Dreamweaver) in your site. To get you started, go ahead and open the template.htm file included with the files for this project. NOTE I'll assume that you're familiar with creating the structure of the Dorknozzle design. Because of space constraints, rather than walking you through the process of rebuilding the design, I've merely included it as a prebuilt page called template.htm. To review the process of creating the page, refer to Chapter 3, "Building a Web Page." As you can see in Figure 15.3, the design acts as a shell for the content that will eventually appear on the page. Figure 15.3. The complete design of the Dorknozzle site before saving it as a template.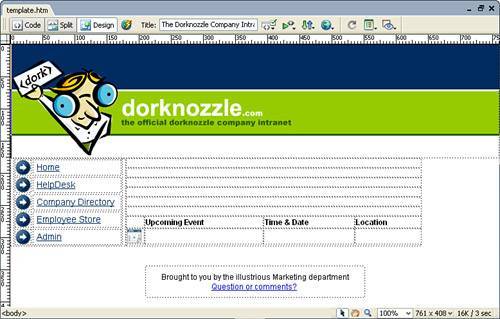 This page will serve as the overall template for the site. Because this is the case, you don't want to add any content yet. Anything added to the page before it's converted to a template will be locked into any template-derived pages. For now, you simply want to create the structure. Later, we'll add editable regions that define areas where users (developers in other departments in our organization) can add their own content. Now choose the Save As Template option from the File menu. The Save As Template dialog appears (see Figure 15.4). Figure 15.4. The Save As Template dialog allows you to save a template in a defined site.
The Save As Template dialog allows you to save the page as a template in any defined site. The Save As Template dialog exposes the following functionality:
To create the new template, click the Save button. Notice that Dreamweaver launches an Update Links dialog. Because newly created templates reside in the Templates folder, Dreamweaver must update any links in the page to coincide with the change. For instance, our navigation menu lists five links that point to index.htm, helpdesk.htm, and so on. Because our template file now resides in the Template folder, the new links should resemble ../index.htm, ../helpdesk.htm, and so on. Rather than doing this manually, Dreamweaver scans the site cache and immediately recognizes the change; it then alerts you with the Update Links dialog, allowing you to let Dreamweaver make the link changes automatically. Click Yes to update all the links in the page. With the template now created, Notice two changes illustrated by the callouts in Figure 15.5: The new template (template.dwt) is placed directly in the new Templates folder. Furthermore, when a new template is created, Dreamweaver alerts you of its status by placing the <<template>> text directly in the title of the page. Figure 15.5. Templates are placed in the Templates folder. Dreamweaver alerts you of the page's status by placing the <<Template>> text in the page's title.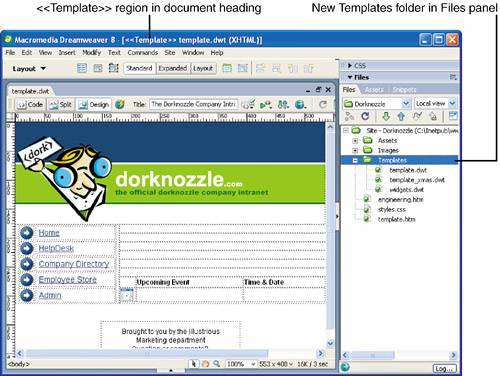 With the new template created, you can now start adding editable regions. Defining Editable RegionsAs the template designer, your main task, aside from designing the structure of the template, is to outline areas of the page to which other developers can add content. You can do this by outlining editable regions. In our case, we'll want to add three editable regions: One for the main subheader image that appears at the top of the page, the content that appears below it, and the events subheader that department users can customize according to their departments' names. To add an editable region, follow these steps:
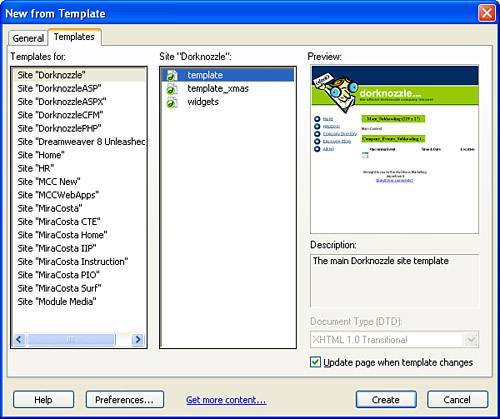
Deriving a New Page from a TemplateWith the new template created and editable regions defined, users can now begin using the template by creating a new instance of the template. Playing the role of the department web developer for this section, we'll do just that. To create a new page based on a template, follow these steps:
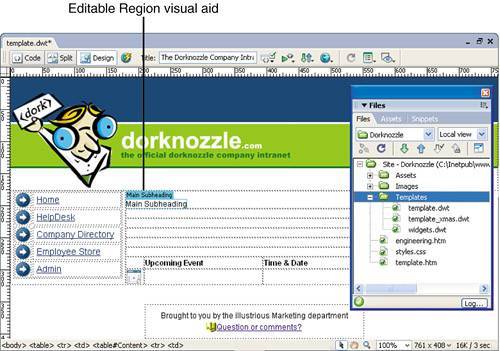
The page opens in the Document window but clearly resembles the original template file. Before you assume that you've done something wrong, notice two distinct changes: First, the <<template>> text is no longer in the title bar; instead, you can see the full title of the page, just as for a normal HTML page. Second, if you hover over areas that weren't designated as editable regions, the locked region cursor appears. You'll quickly realize that only areas marked as editable regions allow users to place their cursors inside and make changes. Let's do that now. Adding Content to Editable RegionsAs a user of a template-derived page, we're at the mercy of the template designer. Dreamweaver locks the design of a template, and only the template designer can delegate which areas in the template, marked by editable regions, can be customized. In our template, we've set aside two editable regions for image subheadings (marked with image placeholders) and one editable region for plain text. These are the only areas in the template that the user of the template file can customize. For the most part, place your cursor in the editable region and begin typing. However, other options exist for adding or modifying content in editable regions:
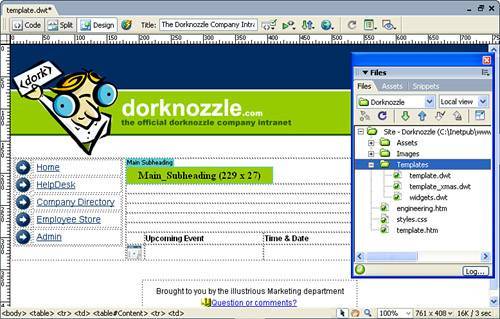
Whichever method you choose allows you to make changes in the editable region. With that said, assume that we're the web developers for the Engineering department and that we're ready to customize this template-derived page accordingly. To customize the page by adding content to the existing editable regions, follow these steps:
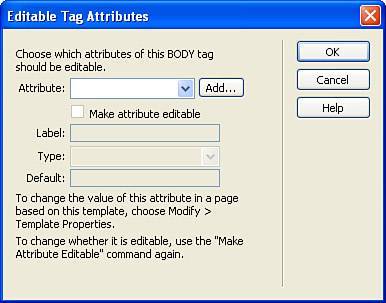
That's all there is to it. So far, we've only added content to editable regions. But as you'll see in the coming sections, adding content to other regions such as optional and repeating regions is just as easy. Creating an Editable Tag AttributeTemplates seem like a viable option when you want to disseminate a consistent look and feel throughout your organization. The downside to using templates, however, is that you're either locking the entire template (in which case nothing is customizable by a template-derived page), or you're outlining editable regions (in which case, everything in the editable region is customizable). What if you wanted to allow users to customize the background color of the page (the bgcolor attribute of the <body> tag)? This doesn't seem like a far-fetched request; you might want to allow the various departments to customize the background color of their respective pages. Unfortunately, because the template locks the <body> tag, there's really no access to the bgcolor attribute of the tag. Think again! Dreamweaver's second method of defining editable content in templates solves this dilemma. By defining editable tag attributes, Dreamweaver allows the template designer to precisely control which tags and even which attributes within tags a user of a template-derived page can edit. This functionality is key, especially when you want to allow customizations of attributes such as the bgcolor attribute of the <body> tag that would otherwise be locked by the template. The various types of attributes that Dreamweaver allows you to mark as editable include text, numbers, URLs, colors, and even Boolean values such as the readonly and multiple attributes for form elements. Even better, Dreamweaver makes it easy to customize these attributes by exposing a centralized Editable Tag Attributes dialog that makes the attributes of the selected element available from a drop-down menu. Furthermore, Dreamweaver allows you to edit which attribute values you as the template designer want to expose by the editable attribute. More on this later. For now, let's make an attribute editable. To do this, follow these steps:
You won't notice any changes in Design view, but switching to Code view reveals the addition of the editable attribute as follows: <body bgcolor="@@(bgcolor)@@"> In this case, Dreamweaver specifies the bgcolor attribute as editable by setting its value to a dynamic parameter (specified by the opening @@ and closing @@ symbols) named bgcolor. Inspecting the <head> tag reveals that that parameter is actually listed in a Dreamweaver comment as follows: <! TemplateParam name="bgcolor" type="color" value="#FFFFFF" > This TemplateParam tag is used by Dreamweaver to identify the editable attributes and provide their types with a default value. Setting Editable AttributesAfter you've specified which attributes users implementing template-derived pages can customize, Dreamweaver provides a straightforward interface for customizing the properties. Again, let's switch hats and play the role of the Engineering department's web developer. Assuming this role, let's work with the freedom we've just been given by the template designer and customize the background color of the page to a faint grayish color. To do this, follow these steps:
|


EAN: 2147483647
Pages: 237