Working with Commands
| At the heart of task automation and workflow enhancement lie commands. Commands, located in the Commands menu, are prebuilt pieces of functionality that, when executed, perform various actions on your web pages such as cleaning up your HTML/XHTML code, applying Dreamweaver's source formatting to your HTML code, creating an automated web photo album, and more. Although we've already covered a couple commands in previous chapters (such as the Format Table and Sort Table commands), and others will be covered in future chapters, three commands stand out as workflow enhancement features and are covered in this chapter:
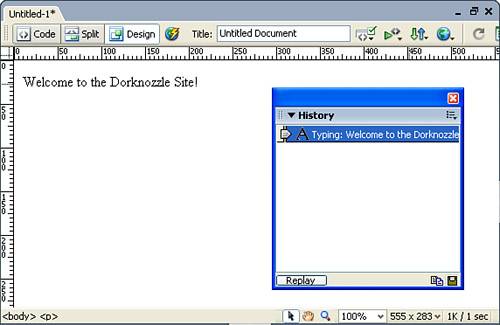
Recording New CommandsOne of the benefits to working with commands in Dreamweaver is that they're not static; meaning that what you get out-of-the-box is not all you have to work with. Instead, Dreamweaver allows you to download free commands from the Dreamweaver Exchange (covered in Appendix B, "Extending Dreamweaver") or even create your own commands by recording the steps you take in Dreamweaver and then playing them back. Furthermore, you can highlight a number of steps in the History panel and save the steps as a command for use later in your web pages. This section explores the different options for working with self-made commands using the recording features in the Commands menu as well as the Save Selected Steps as a Command option from the History panel. Let's begin with the former. To record a new command, follow these steps:
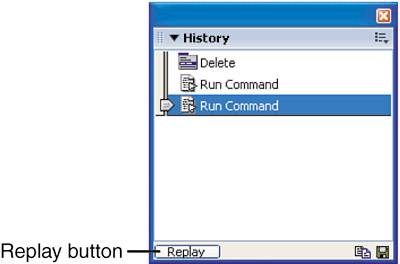
Alternatively, and quite possibly a quicker way of replaying a command, you can simply click the Replay button in the History panel while the Run Command step is highlighted in the list (see Figure 14.14). Doing this allows you to continuously replay the recorded command without having to access the Commands menu each time. Figure 14.14. Click the Replay button in the History panel to replay a step listed in the History panel.
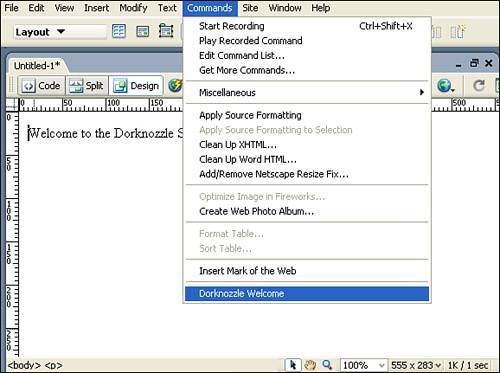
Although the process of recording a command and replaying it numerous times seems like a beneficial alternative to retyping the text each and every time, it does have its limitations. For instance, closing Dreamweaver or flushing the clipboard will delete the recorded command. What if you wanted to save the command so that you can use it in any site, at any time, even after you've closed and reopened Dreamweaver? To do this, you must create and save the command. You can do this by following these steps:
You can now access this command at any time, even if you close and reopen Dreamweaver. If you find that you're no longer using a command, you can remove it from the list by choosing Commands, Edit Command List. The Edit Command List dialog appears. You can rename and remove a command from the list. To remove a command from the list, choose the command and click the Delete button. Dreamweaver prompts you with a message asking whether you're sure you want to delete the command. Click Yes. The command is permanently deleted. Apply Source FormattingYou can use the Apply Source Formatting command to reapply Dreamweaver's default tabs and indents to the HTML code of your web pages. Alternatively, you can use the Apply Source Formatting to Selection command to reapply Dreamweaver default formatting to a specific selection of code while you're in Code view. As an example of how the Apply Source Formatting feature works, follow these steps:
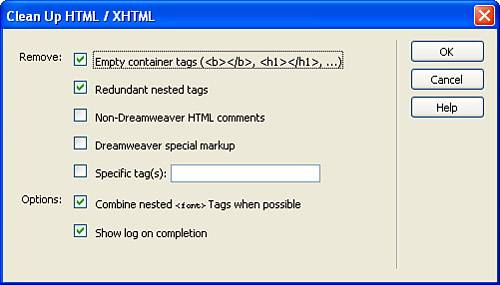
As you saw in Chapter 3, "Building a Web Page," you can also use the Format Source Code icon, located last in the Code toolbar in Code view. Clicking this button displays a menu of options that includes the Apply Source Formatting and Apply Source Formatting to Selection commands. Clean Up (X)HTML and Clean Up Word HTMLOne of the last actions I perform before I call a web page complete (aside from using the Apply Source Formatting command) is the Clean Up (X)HTML command. Let's face it, although Dreamweaver writes excellent HTML in the background, there are many times where you'll add code, remove code, add some more code, remove some more code, and so on. Throughout the development life of the page, the code can become unsightly and might need a little attention. You can use the Clean Up (X)HTML command to clean up or fix problems with your code. For instance, you can use this command to search for and repair empty tags, redundant nested tags, non-Dreamweaver HTML comments, special markup that Dreamweaver may add, or even specific tags you want to specify. Furthermore, you can have the Clean Up HTML command combine nested <font> tags when possible and even show the results in a log when it's finished. NOTE Depending on the document type definition (DTD) of your document, the command name changes to either a Clean Up HTML or Clean Up XHTML option. Although the functionality exposed by the two options are similar, they warrant mention. To demonstrate the use of the Clean Up HTML command, follow these steps:
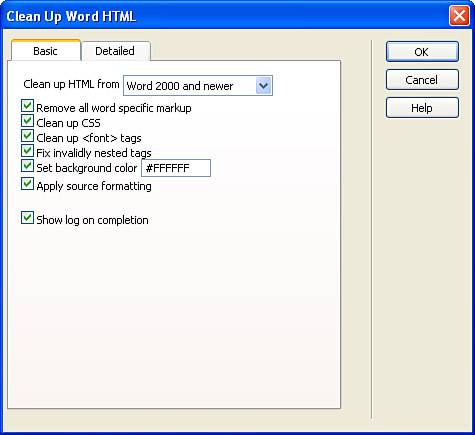
You can also use the Clean Up Word HTML option to fix the code mess for which Microsoft Word's HTML editor is infamous. To demonstrate the use of this command, follow these steps:
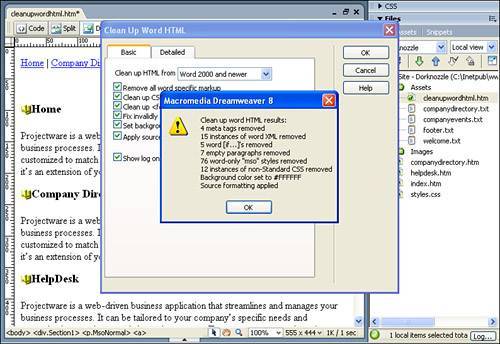
Now switch to Code view and see the result. Dreamweaver compacted the code down to 30 or so lines! |
EAN: 2147483647
Pages: 237