Working with the Assets Panel
| Similar in concept to the Assets folder defined in the root of our Dorknozzle site, the Assets panel is a central repository for website elements. Unlike the Assets folder in our Dorknozzle project (which holds items such as PSD files, Word documents, and so on), however, the Assets panel contains items that our HTML files can and will use. Items such as images, Shockwave files, QuickTime files, Flash files, JavaScript, and even colors and links are all considered assets and are all managed in the Assets panel by Dreamweaver. By having access to these items in one central location, you have quick access to any of these items. No more shuffling around, searching for the same content in the local root folder. Furthermore, the Assets panel offers a Favorites feature that allows you to filter out more commonly used assets. Often times, websites have thousands of assets; usually, you don't need immediate access to all those assets. In this situation, Favorites allow you to store in a small subsection the more items you use most often, such as a company logo, colors you've been using throughout the site regularly, and commonly used hyperlinks. NOTE Because the Assets panel more or less indexes all your site's content, you must have a local root folder already defined. Dreamweaver then scans the files in your defined site and makes them visible within the appropriate categories in the Assets panel. To open the Assets panel, choose the Assets option from the Window menu (or press F12) or, if you have the Files panel already open, choose the Assets tab located just to the right of the Files tab. As you can see from Figure 14.1, the Assets panel comes into view. Figure 14.1. The Assets panel is a central repository for usable items in your defined site.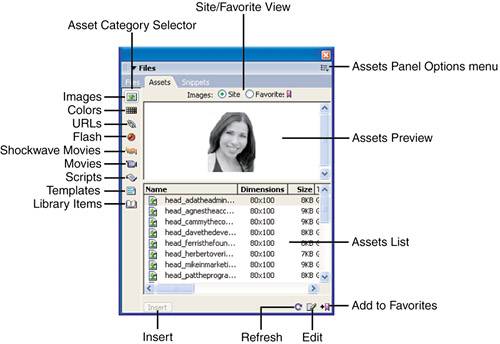 The Assets panel is divided into separate sections including:
As you've probably noticed, the Asset Category Selector lists several different types of icons, each representing a different type of asset managed in the panel. These options include:
NOTE For the most part, Dreamweaver automatically scans your defined site and picks out the assets it can work with. You can always use the Cloak feature to prevent Dreamweaver from scanning files located within a particular folder. The Assets folder, for instance, is an excellent candidate for cloaking. For the most part, the Assets folder in our site contains PSD, FLA, TXT, and DOC files we can't use in our site anyway. Cloaking this folder prevents Dreamweaver from scanning that folder and importing any unneeded files into the Assets panel. How the Assets Panel WorksNow that you have a simple understanding of what the Assets panel provides, it's important to understand how the Assets panel works. The Assets panel doesn't scan the structure of your site every time Dreamweaver is opened, nor does it scan the structure of your site when you open the Assets panel. Instead, the Assets panel, like many of the other features in Dreamweaver, works off the site's cache. Chapter 4, "Dreamweaver Site Management," discussed that the site cache was Dreamweaver's way of taking a "snapshot" of the folder and file structure of your site. Many features in Dreamweavernamely the Check Links feature, the Site Map feature, and more importantly the Assets panelrely on this snapshot for quick and efficient management of files. With that said, it's important that the Site Cache feature is enabled when you're defining or editing a site in Dreamweaver. If your Assets panel isn't listing items, chances are you've disabled the Site Cache check box. To re-enable it, follow these steps:
For the Assets panel to display your site's assets, you'll want to refresh the panel. This process is outlined next. Refreshing the Assets PanelAt some point in the development of your website, you'll find that you have to refresh the Assets panel so that the content is being displayed correctly. The Assets panel automatically updates every time you restart the site, but if you're in the middle of a project, that's not realistic. That's why there's a Refresh button, located in the bottom portion of the panel as shown in Figure 14.1. There are numerous instances when you'll want to update or refresh the Assets panel:
Inserting Assets into Your Web PagesA couple methods exist for inserting assets into your documents. What you want to insert determines which method you should use. By far the simplest method of inserting an asset is to highlight the asset in the Assets panel and click the Insert button at the bottom left of the panel. Doing this inserts the asset at the point at which your cursor was placed. Alternatively, you could simply drag an asset out of the Assets panel and drop it into a spot in your document. To demonstrate this approach, follow these steps:
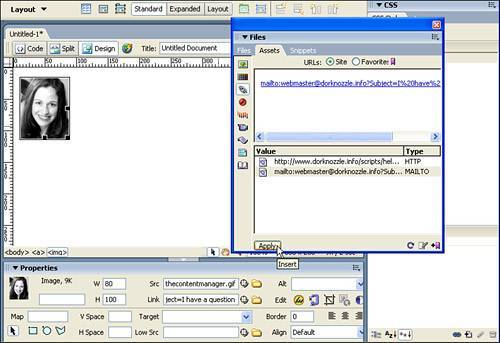
Another way of inserting an asset, as mentioned earlier, is to use the Insert button on the Assets panel. This technique is important, especially when applying links to images or colors to text. To apply links to an existing image, follow these steps:
Of course it doesn't stop there. You can also apply colors to elements on the page, apply links to text, drag media files into the page, and more. The possibilities are limited only by the types of assets in your site. Customizing the Assets PanelThe Assets panel was incorporated into Dreamweaver to enhance workflow. Macromedia knew that for workflow to be enhanced, it was important to allow people to customize features to better suit their work habits. The Assets panel is no exception. One of the more important workflow features in the Assets panel is the Favorites list. This list can save you a tremendous amount of time shuffling through thousands of images, links, and so on. "Adding Assets to Your Favorites," later in this chapter, covers the process in greater detail. Another option you have for customizing your experience with the Assets panel is changing the listing order of the assets. As an example, switch to the Images category in the Assets panel. Notice that the default listing order is alphabetical, from A to Z for the name or value of the asset. Click the Name column heading in the Assets panel to flip the order from ascending (A to Z) to descending (Z to A). You can click any of the column headings to sort the list by that particular category. For example, if you wanted to sort by the smallest to largest file size, click the Size heading; if you wanted to sort by the type of asset, click the Type heading, and so on. You can further customize the appearance of the Assets panel by resizing the columns. To do this, hold your mouse pointer directly over the line dividing the columns. When the mouse pointer changes into a two-way arrow, click and drag the dividers in whichever direction you want to resize the columns. By resizing the columns, you can see additional content, such as the type and possibly the full path, as shown in Figure 14.3. Figure 14.3. When resizing the columns in the Assets panel, you can view more information about the assets, such as the type and the path to where the asset is located.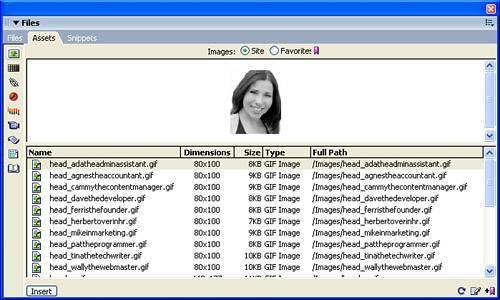 Managing Your AssetsNow that you've been working with assets, let's look at how you can manage them in your own sites and how you can share them with other sites. Often, you'll be working in a site and wishing you could have access to another site's assets. This is not an unreasonable requestit will just take a few steps of preparation. To copy assets from one site to another, follow these steps:
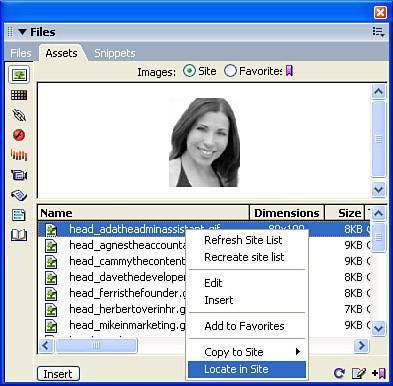
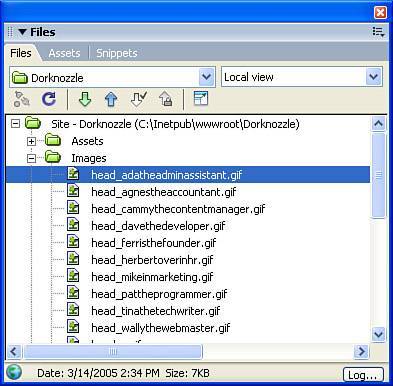
Copying assets to other sites is that simple! Open the site into which you copied the assets to make sure that they appear in that site's Assets panel; keep in mind that you might have to refresh the panel. Another concern you may have when working with Assets is where the actual files are located. As you know, you can always see the path on the far right side of the Assets panel. Alternatively, you can use the Locate in Site option as a quick way of forcing the cursor to the file within the Files panel. When you choose the Locate in Site command, Dreamweaver opens the Files panel and highlights the location of the selected files in the Assets panel. As the first image in Figure 14.4 shows, one image is selected in the Assets panel when I right-clicked and choose the Locate in Site command from the context menu. As the second image in Figure 14.4 shows, the Files panel appears with the selected file in the list. Figure 14.4. Right-click a selected asset and choose the Locate in Site command; the Files panel highlights the location of the selected asset.
Editing AssetsAfter using an asset, you may decide that you want to edit some of its properties using an external editor. For example, if you needed to update an image, you can change or edit that image using the external editor of choice with a simple click of a button. To edit an image asset, do one of the following:
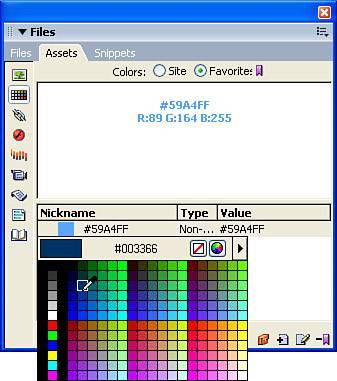
Although this process seems simple, it's not that intuitive for un-sourced assets such as links and colors. These assets are not linked to anything; therefore, when you edit them, they'll only be updated in the Assets panel for future use. If you want colors and links to be updated in the same way that images are, you'll need to use library items, discussed in Chapter 16, "Working with Library Items." To edit assets such as color and links, they must be contained in the Favorites section of the panel. When you click the Favorites radio button, your favorite colors and links are revealed. (To add something to your Favorites list, refer to the following section of this chapter.) When you have the color you want selected, click the Edit button; the color swatch appears below the color name, as shown in Figure 14.5. Figure 14.5. The color swatch appears inside the Assets panel when you're editing a color. The color must be located under the Favorites portion of the panel.
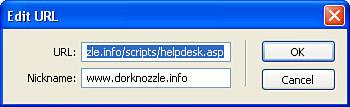
If the swatch is open and you decide you no longer want a different color, press Esc to make the swatch disappear without choosing a color. To edit a link, do the same: highlight the link and click the Edit button in the bottom-right corner of the panel. This action opens the Edit URL dialog, as displayed in Figure 14.6, which allows you to specify a new URL. Figure 14.6. When you edit a link, the Edit URL dialog box is launched.
Adding Assets to Your FavoritesBy adding assets to your Favorites, you can greatly increase productivity. When you're dealing with the Assets panel for an entire website, the content often can become unwieldy. Many times, while navigating through the Assets panel, you're looking for a specific file that you use frequently. Instead of having to search for these files again and again, you can store them in a Favorites list, offering more direct access. There are several ways to add assets to a Favorites list. You can use any one of the following techniques:
Removing FavoritesYou can easily remove an asset from your Favorites list by following these steps:
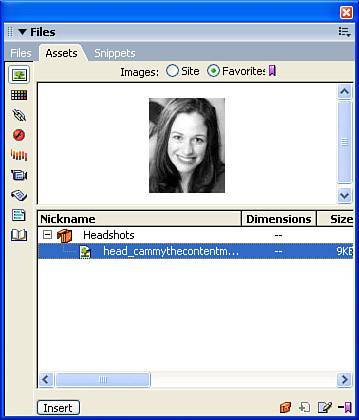
NOTE When deleting favorites, you're not actually deleting the file from your site; rather, you are just removing the asset from the Favorites list. Creating Folders to Organize FavoritesAnother way to manage your favorite assets is to organize them into separate folders. Doing so affords you the opportunity to organize by attributes other than the categories specified by the Assets panel. For example, in your Images category, you can create several folders for different types of images. You could create a folder called Headshots, which would contain the different headshot images for your site. You could also set up a folder called Subheaders, which would contain all the subheader images used by the overall design of the site. The possibilities are endless, yet it does offer another way for the Assets panel to increase your productivity for a more efficient workflow. To create a new folder for Favorites, follow these steps:
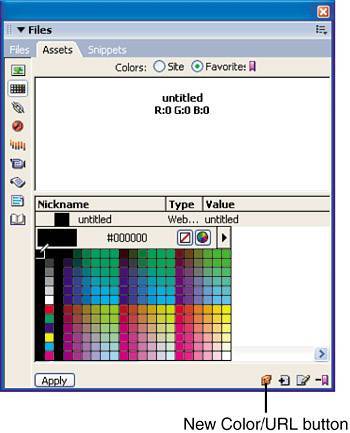
Creating New URL and Color AssetsYou can create new color and URL assets right within the Assets panel. To create new assets for either of these categories, make sure that you're in the Favorites section. To create a new color, click the Colors category and then click the New Color button located in the bottom-right corner of the Assets panel. You can also choose the New Color option from the panel's Options menu located in the top-right corner of the panel. When you choose the New Color command, a swatch appears, allowing you to choose a color (see Figure 14.8). Finally, after choosing a color, you can highlight it in the Assets panel and give it a nickname. Figure 14.8. You can easily create a new color asset from within the Assets panel.
Creating a new link is just as easy: Select the URL category and be sure to view the Favorites section. At the bottom of the panel, click the New URL button, which launches the Add URL dialog. Here you can define the nickname and the URL you want the asset to link to. |
EAN: 2147483647
Pages: 237