Aligning Objects
| You can align and distribute objects relative to each other or to the slide. Select the objects you want to align, click the Draw button on the Drawing toolbar, and choose Align or Distribute from the menu. A submenu appears. If you want to align or distribute relative to the slide, select Relative to Slide. If you want to align or distribute relative to the objects, make sure that Relative to Slide is not selected. Then choose from these options:
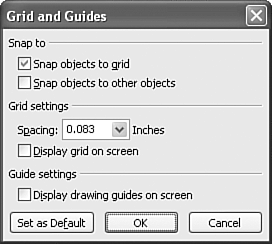
Nudging ObjectsIt can be hard to precisely position an object using the mouse. When you experience that frustration, give up the mouse for a minute and try nudging the object. To do this, select the object, click the Draw button on the Drawing toolbar, choose Nudge, and then select a direction: Up, Down, Left, or Right. The object moves a few pixels in the direction you choose. You might need to nudge an object several times to put it exactly where you want it. The advantage to nudging is that you can control very small movements, which is difficult to do if you move an object with the mouse. TIP Alternatively, you can also select an object and use the arrow keys to nudge the object in the direction of the arrow. Snapping to a Grid or ShapeWhen you align or move objects, they snap to an invisible grid that guides their positioning. This helps you more precisely align and position objects, creating a more polished and professional look. If you want to use other objects as a positioning guide, you can snap to shapes . To choose these options, click the Draw button on the Drawing toolbar and choose Grid and Guides to open the Grid and Guides dialog box (see Figure 14.30). Figure 14.30. Snap objects to a grid or another object. In this dialog box, you can choose to snap objects to either a grid or other objects. You can also indicate the spacing of your grid in inches (from 1/24th of an inch to two inches). Select the Display Grid on Screen check box to activate the grid. You'll see horizontal and vertical dotted lines on your screen in the spacing width you specified, which helps you position your objects. Although the grid appears on the screen, it doesn't appear in print or during a slideshow. Another option is to use adjustable drawing guides by selecting the Display Drawing Guides on Screen check box. This places one adjustable vertical line and one adjustable horizontal line on your screen, which you can drag to position where you want them. These, too, are invisible in print or during a slideshow. To set these options as your default, click the Set as Default button. Click OK to close the Grid and Guides dialog box. |
EAN: 2147483647
Pages: 261
