Understanding Group Policies
For many small to medium-sized networks, the groups built into Windows 2000 Server can, with perhaps a little tweaking, provide perfectly adequate security. In larger settings and settings with special needs, however, the security settings may be too strict for some groups and too lax for others. For these situations, group policies can give administrators a degree of control that is as granular as one could wish for. In addition, group policies can reduce the amount of lost productivity when users accidentally delete system configuration files, "lose" vital folders, or introduce a virus to the network.
Group Policy is the successor to the System Policy Editor in Windows NT. There is, however, one important difference: you can make group policies without having a Ph.D. in computer mysteries. They can be complex and extremely detailed, but they do work. Group policies can control all aspects of the environment, both large and small, and they are usually set at the site and domain level. With the Group Policy snap-in, you can specify settings for registry-based policy settings, security settings, software installation, scripts, and folder redirection.
Third parties can extend Group Policy to host other policy settings. All of the data generated by Group Policy is stored in a Group Policy object (GPO), which is replicated in all domain controllers within a single domain.
![]()
REAL WORLD Windows NT 4 Policies and Windows 2000
System policies set in Windows NT 4 do not migrate to Windows 2000. A Windows NT client upgraded to Windows 2000 will have only Active Directory-based group policies; no Windows NT 4 policies will survive the upgrade. The primary difference between Windows NT system policies and Windows 2000 group policies lies in where the policies are written. Windows 2000 uses only the following four trees of the registry:HKEY_LOCAL_MACHINE\Software\Policies
HKEY_CURRENT_USER\Software\Policies
HKEY_LOCAL_MACHINE\Software\Microsoft\Windows\CurrentVersion\Policies
HKEY_CURRENT_USER\Software\Microsoft\Windows\CurrentVersion\Policies
The first two are preferred. When a group policy changes, these trees are essentially deleted and their contents rewritten. Although none of the templates that come with Windows 2000 include values that write to other places in the registry, it is possible to do so. (Windows NT 4 policies can write to any part of the registry.) However, it is inadvisable to employ Windows NT-style policies that write to other parts of the registry for the following reasons:
- Only the four trees just listed are secure. Applications, the operating system, or users can modify other parts of the registry.
- Once a policy is set in another part of the registry, it will persist until the registry is edited or the policy is specifically reversed.
- Sticking with the Active Directory Group Policy gives you considerably more control over when and how policies will change.
Windows NT 4 Workstation and Server clients do not have Active Directory, so you will have to continue to use System Policy Editor (Poledit.exe) to set policy for those clients. Group policies will not apply to them. Similarly, run Poledit.exe on Windows 95 and Windows 98 clients and copy the resulting Config.pol file to the SYSVOL folder of the Windows 2000 domain controller.
Components of Group Policy
Group Policy consists of several configurable components. The first is administrative templates, which set registry-based policy. Five administrative templates are included with Windows 2000. Two of these are installed by default:
- System.adm System policies for Windows 2000 clients
- Inetres.adm Internet Explorer policies for Windows 2000 clients
These templates use the four areas in the registry reserved for Group Policy settings. Three additional administrative templates (Common.adm, Windows.adm, and Winnt.adm) are for setting policy for Windows NT, Windows 95, and Windows 98 clients. They are used with the System Policy Editor (Poledit.exe) on the clients themselves and should not be loaded into Group Policy.
The other components of Group Policy are as follows:
- Security Settings Configures security for users, computers, and domains
- Scripts Specifies scripts for computer startup and shutdown as well as for user logon and logoff
- Folder Redirection Places special folders such as My Documents or specified application folders on the network
- Software Assigns applications to users (See Chapter 24 for more on publishing software on the network.)
All components of Group Policy can be edited using the Group Policy Editor.
Group Policy Objects
Group Policy settings are stored in a Group Policy object (GPO). One or more GPOs can apply to a site, domain, or OU (SDOU), just as multiple SDOUs can be associated with a single GPO. GPOs store information in two locations: in a folder structure called a Group Policy template (GPT) and in a Group Policy container (GPC) in Active Directory.
The GPT can be found in the SYSVOL folder of all domain controllers. It contains information about software policy, file and application deployments, scripts, and security settings. A GPC contains GPO properties, including the Active Directory class information related to application deployment. The information stored in a GPC changes infrequently.
![]()
NOTE
A GPO that applies locally will be stored in the local computer's %SystemRoot%\system32\grouppolicy folder. A computer can have only one local group policy.
Group Policy Templates When you create a GPO, the corresponding GPT folder structure is created automatically. The actual name of the folder for the GPT will be the globally unique identifier (GUID) for the GPO—a number that is useful to the computer but otherwise incomprehensible. However, to see the policy folder, look in %SystemRoot%\SYSVOL\sysvol\domain_name\policies.
Group Policy Containers Nonlocal Group Policy objects will also have an Active Directory component called a GPC that includes subcontainers with version information, status information, and a list of which Group Policy extensions are employed in the GPO. GPCs have no direct relevance to administration.
Access to Group Policy
Group policies are created and modified in a number of different ways, depending on the type of group policy you want to implement. Table 9-13 describes how to apply Group Policy in various ways.
Table 9-13. Applying Group Policy
| To Apply Group Policy To | Follow These Steps |
|---|---|
| The local computer | For security policy only, select Local Security Policy from the Administrative Tools menu. On a Windows 2000 Professional machine, open Control Panel, click Administrative Tools, and select Local Security Policy. |
| Another computer | Open MMC* and add the Group Policy snap-in. In the Select Group Policy Object dialog box, browse to find the Group Policy object you want. |
| A domain | Open Active Directory Users and Computers. In the console tree, right-click the domain and choose Properties from the shortcut menu. Click the Group Policy tab. |
| An organizational unit | Open Active Directory Users and Computers. In the console tree, right-click the OU and choose Properties from the shortcut menu. Click the Group Policy tab. |
| A site | Open Active Directory Sites and Services. In the console tree, right-click the site and choose Group Policy from the shortcut menu. Click the Group Policy tab. |
*Details about using the Microsoft Management Console (MMC) can be found in Chapter 10.
Managing Group Policies
Group policies are inherited and cumulative. When you associate a GPO with an Active Directory container, the group policy is applied to all computer and user accounts in the container.
![]()
NOTE
The Users and Computers folders in Active Directory Users and Computers are not organizational units and therefore cannot have group policies applied to them. The Domain Controllers folder is, however, an OU and can have a specific GPO.
Order of Inheritance
As a rule, Group Policy settings are passed from parent containers down to child containers. This practice means that a policy that is applied to a parent container will apply to all of the containers—including users and computers—that are below the parent container in the Active Directory tree hierarchy. However, if you specifically assign a group policy for a child container that contradicts the parent container policy, the child container's policy will override the parent group policy.
If policies are not contradictory, both can be implemented. For example, if a parent container policy calls for an application shortcut to be on a user's desktop, while the child container policy calls for another application shortcut, both will appear. Policy settings that are disabled are inherited as disabled. Policy settings that are not configured in the parent container are not inherited.
Overriding Inheritance
Two options are available in Windows 2000 for changing how inheritance is processed. One option is No Override. When this option is set, child containers cannot override any GPO set in a higher level. This option is not set by default and must be turned on in each GPO where it's desired. To set the No Override option, follow these steps:
- Open the GPO you want to administer. (Refer back to Table 9-13.)
- Right-click the GPO and choose No Override from the shortcut menu (Figure 9-40). A check mark appears next to the GPO under No Override.
- Click OK.
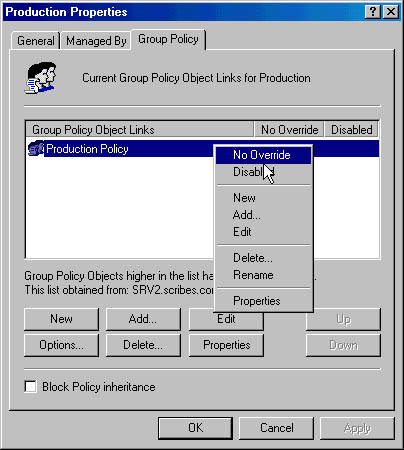
Figure 9-40. Preventing an override to the GPO's inheritance policy.
A second option is Block Policy Inheritance. This option is available in a check box in the GPO's Properties window. (The check box can be seen in Figure 9-40.) When you select this option, the child container will not inherit any policies from parent containers. If there is a conflict between these two options, the No Override option always takes precedence.
Order of Implementation
Group policies are processed in the following order:
- Windows NT 4 system policy (if any)
- Local group policy
- Site
- Domain
- Organizational unit
- Child OU
As you can see, local policy is processed first, and the OU of which the user or computer is a member is processed last. There are two exceptions to this. The Block Policy Inheritance option can be set for an SDOU, meaning that policy from above will not be applied. However, an SDOU group policy set to No Override is always applied, with the highest policy in the tree taking precedence.
Implementation and Effective Policy
Because policy can be set at several levels, when you click on a policy object, you'll see both local policy and the policy in effect on the system. These may not be the same if the computer is inheriting settings from domain-level policies. If you make a policy setting and it isn't reflected in effective policy, it's likely that a policy from the domain is overriding your setting.
It's also possible that the policy change hasn't been refreshed since you made the change. To force a policy refresh for the local computer, open a command window and type in:
secedit /refreshpolicy machine_policy |
To change the interval between automatic updates, see "Refreshing Group Policy."
Setting the Scope of the GPO
A Group Policy object applies to all of the users and computers in the SDOU with which the GPO is associated. Inevitably, there will be users and computers in the SDOU that should not have a particular GPO applied. In addition, policies for a particular GPO apply only to users who have Read permission for that GPO. To filter the application of a GPO, you can create security groups and assign Read permission only to the groups to which the GPO applies.
Filtering the scope of a GPO involves using the Access Control List (ACL) Editor to allow or deny access to the GPO for particular groups. To set access, follow these steps:
- Open the GPO you want to administer. (Refer back to Table 9-13.)
- On the Group Policy tab, highlight the GPO and click Properties.
- Click the Security tab. At the bottom of the Security tab, click the Advanced button to open the ACL Editor (Figure 9-41).
- Add or remove groups, or edit the settings. Click OK several times when you're done to close all of the open windows.
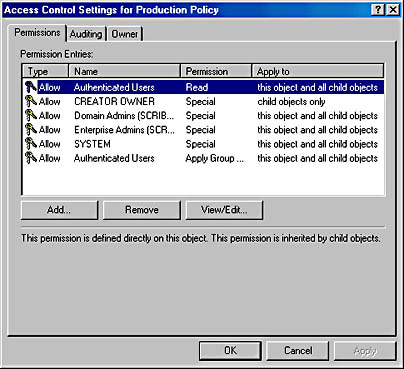
Figure 9-41. Setting the scope of a GPO.
Table 9-14 shows the settings to use to have a GPO apply or not apply to a security group. The location of the security group doesn't matter when making the settings. What matters is the location of the users or computers who are members of the security group. If a user or computer is not a member of the SDOU that the GPO is associated with (either directly, through a link, or by inheritance), no combination of permissions or membership in a security group can force the GPO to apply to that user or computer.
Table 9-14. Setting policies for security groups
| Intended Result | Permissions Needed | Outcome |
|---|---|---|
| This group policy will be applied to the members of this group. | Apply Group Policy: Allow Read: Allow | Group policy will be applied to all members except members who belong to another group with Apply Group Policy or Read set to Deny. |
| This group policy will not be applied to members of this group. | Apply Group Policy: Deny Read: Deny | Group policy will not be applied to any members of this group, no matter what other groups they belong to. |
| Membership in this group should not be a relevant factor in whether this group policy is applied or not | Apply Group Policy: No setting Read: No setting | Application of this group policy to members of this group will depend on whether members belong to other security groups with Allow or Deny settings. |

TIP
Bear in mind that just because something can be done doesn't mean that it should be done. Proceed carefully when it comes to setting permissions. Users who are in favor of security in the abstract become annoyed when they receive unnecessary "access denied" messages. Apply restrictions cautiously and only after you're sure you understand the implications of a particular policy, especially in the area of inheritability.
Creating a Group Policy Object
When you create an Active Directory domain, a default domain policy is also created. You can see it by right-clicking the domain in Active Directory Users and Computers, choosing Properties, and clicking the Group Policy tab. With some judicious adjustments to meet the needs of your own situation, you might never need anything else. Nevertheless, the time may come when you need to set up a GPO of your own. To do so, follow these steps:
- Open Active Directory Users and Computers (for domain or OU GPOs) or Active Directory Sites and Services (for site GPOs).
- Right-click the object for which you want to create a GPO, and choose Properties from the shortcut menu.
- Click the Group Policy tab, and then click the New button.
- Type in a name for the new GPO, and choose one of the following buttons:
- Add To add a link to the new policy.
- Edit To open the new GPO in the Group Policy Editor.
- Options To set No Override or to disable the GPO.
- Delete To remove the GPO permanently or remove it from the list. If you choose Remove The Link From The List, the GPO remains in Active Directory but is no longer applied to the particular SDOU.
- Properties To set filtering for the GPO through security groups.
- Click OK when you're finished.
Using the Group Policy Editor
You can edit Group Policy settings by accessing a GPO through the methods described in Table 9-13. For frequently accessed GPOs, create a Microsoft Management Console (MMC) that includes the Group Policy snap-in, and then save the console in a convenient location so that you can open it quickly when you need it. For example, to make an MMC that is focused on the default domain policy, follow these steps:
- Click the Start button and choose Run.
- Type in mmc and click OK.
- From the Console menu, choose Add/Remove Snap-in.
- Click the Add button and select Group Policy from the list of available snap-ins.
- Click Add. This opens the Select Group Policy Object dialog box. Click the Browse button.
- In the Browse For A Group Policy Object dialog box (Figure 9-42), select Default Domain Policy, and click OK.
- Click Finish in the Select Group Policy Object dialog box. Close the open dialog boxes.
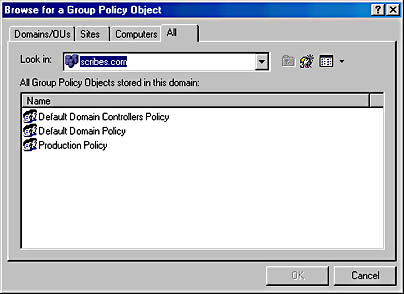
Figure 9-42. Finding an existing Group Policy object.
Inside the Group Policy Editor
If you click Default Domain Policy in the Group Policy console tree, you'll see that the Group Policy Editor (GPE) displays two nodes: Computer Configuration and User Configuration. When you click these nodes, you'll find that each displays extensions for Software Settings, Windows Settings, and Administrative Templates.
Use the Computer Configuration folders to customize policies for computers on the network. These policies go into effect when the computer is turned on and the operating system starts. Settings in these folders apply to any user who logs on to the computer. For example, if you have machines in a training room for which you want to enforce a strict environment, the Computer Configuration node is where you'd make those settings.
The User Configuration node contains settings for customizing environments or setting policies for users on the network. User Configuration policies come into play when a specific user logs on to the network.
Disabling a Branch of a GPO If a GPO has an entire node under User Configuration or Computer Configuration that is not configured, disable the node to avoid processing those settings. This speeds startup and logon for all users subject to that GPO. To disable a node, follow these steps:
- Right-click Group Policy Object, either in a console or in the Group Policy Properties window.
- Choose Properties from the shortcut menu.
- On the General tab, select the option to disable the User Configuration or Computer Configuration settings for this GPO (Figure 9-43).
- Click OK when you're finished. The disabled settings will no longer affect any SDOU linked to this GPO.
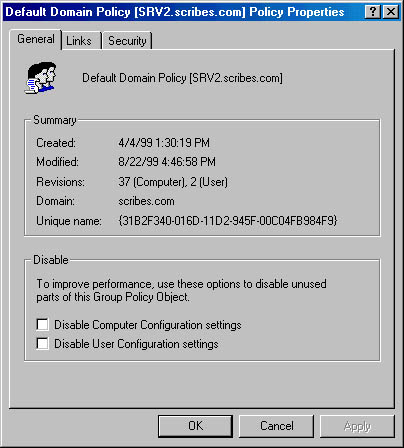
Figure 9-43. Disabling unused parts of a GPO.
Finding Group Policy Links
With numerous GPOs on a network, it's important to keep track of links between GPOs and SDOUs. To find out what SDOU uses a particular GPO, right-click Group Policy Object, either in a console or in the Group Policy Properties window. Choose Properties and then click the Links tab. Click the Find Now button, and a list of SDOUs that use the Group Policy object is returned.
Refreshing Group Policy
Policy changes are immediate, but they are not propagated to clients automatically. Client computers request policy when
- The computer starts
- A user logs on
- An application requests a refresh
- A user requests a refresh
- A Group Policy refresh interval is enabled and the interval has elapsed
To set a Group Policy refresh interval, follow these steps:
- Open the GPO.
- In the console tree, select Computer Configuration, then Administrative Templates, System, and finally Group Policy.
- In the details pane, double-click Group Policy Refresh Interval For Computers.
- Enable the refresh interval. Click OK.
Don't make the interval very short because of the large amount of network traffic generated by each refresh. The refresh interval for domain controllers is set separately.
Using Group Policy for Folder Redirection
Folder Redirection is an extension to Group Policy that allows you to place designated folders on the network. In particular, you may want to redirect users' My Documents folders or other folders that may become quite large over time. With redirected folders the following conditions apply:
- A user can log on to different computers and still have the folders available.
- When employing roaming profiles, only the network path to the redirected folders is part of the profile, not the folders themselves. This makes logging on and off much faster.
- Folders on a network server can be backed up as part of routine maintenance with no action on the part of the user.
Folders can be redirected to one location for everyone in the SDOU affected by the Group Policy object. They can also be redirected to different locations according to security group membership.
Redirecting to One Location
By far the most common form of redirection is to send everyone's My Documents folder to a single location on a network server. The following steps show how to do this. You can substitute other Windows special folders in the steps to redirect them as well.
- Create a shared folder on the server.
- Open the Group Policy object linked to the SDOU containing the users whose folders are to be redirected.
- In the console tree, click User Configuration, then Windows Settings, and finally Folder Redirection (Figure 9-44).
- Right-click My Documents and choose Properties from the shortcut menu.
- In the drop-down list, select Basic - Redirect Everyone's Folder To The Same Location. Enter the path for the shared folder on the server. Use a UNC path with the %username% variable, as shown in Figure 9-45.
- Click the Settings tab. The following settings are enabled by default:
- Grant The User Exclusive Rights To My Documents The user and the local system have exclusive rights to the folder. No administrative rights are enabled. If this setting is disabled, the permissions that exist on the folder in its present position will remain.
- Move The Contents Of My Documents To The New Location
- Policy Removal The default is to leave the folder in the new location when the policy is removed. If you choose to redirect the folder back to the local user, see the section "Removing Redirection," later in this chapter.
- My Pictures Preference My Pictures will follow My Documents as a subfolder.
- Click OK when you're finished.
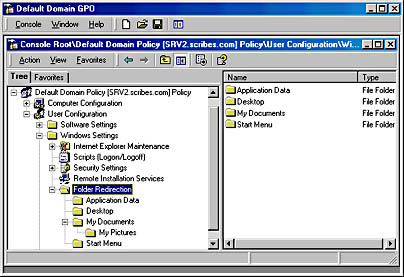
Figure 9-44. Locating the Folder Redirection node in the GPO.
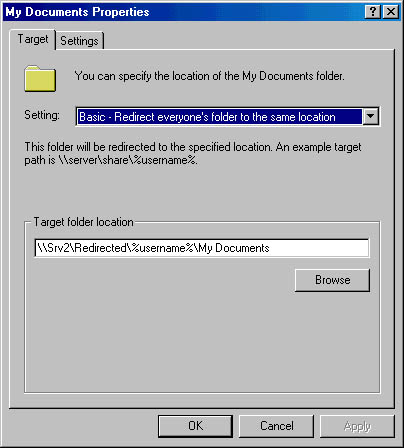
Figure 9-45. Setting a path for the redirection of My Documents folders.
Redirecting by Group Membership
Special folders can also be redirected to various locations based on the user's membership in security groups. To do so, follow these steps:
- Create the shared folders at the locations to which the folders will be redirected.
- Open the Group Policy object linked to the SDOU containing the users whose folders are to be redirected.
- In the console tree, click User Configuration, then Windows Settings, and finally Folder Redirection.
- Right-click the special folder (in this case My Documents), and choose Properties from the shortcut menu.
- In the drop-down list, select Advanced - Specific Locations For Various User Groups, and then click the Add button.
- In the Specify Group And Location box, enter the security group and the location for the redirected folders (Figure 9-46). Always use a UNC path, even if the folders are to be on the local computer, so that roaming users will be able to see their folders.
- Click OK. Add more groups and locations as needed.
- Click the Settings tab. The following settings are enabled by default:
- Grant The User Exclusive Rights To My Documents The user and the local system have exclusive rights to the folder. No administrative rights are enabled. If this setting is disabled, the permissions that exist on the folder in its present position will remain.
- Move The Contents Of My Documents To The New Location
- Policy Removal The default is to leave the folder in the new location when the policy is removed. If you choose to redirect the folder back to the local user, see the next section, "Removing Redirection."
- My Pictures Preference My Pictures will follow My Documents as a subfolder.
- Click OK when you're finished.
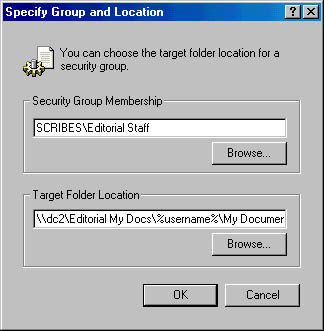
Figure 9-46. Setting folder redirection for an entire group.
Removing Redirection
When folders have been redirected and later the policy changes, the effect on the folders depends on the combination of choices made on the Settings tab in the special folder's Properties window. Table 9-15 shows the various combinations of settings and the outcome when the policy is changed. (Software policy settings are covered in Chapter 24.)
Table 9-15. Settings and their outcome when redirection is removed
| Policy Removal Option | Move Contents Of Folder To New Location | Outcome When When Policy Is Removed |
|---|---|---|
| Redirect the folder back to the local user profile location when policy is removed | Enabled | The folder returns to its user profile location; the contents of the folder are copied back to the original location; the contents are not deleted from the redirected location. |
| Redirect the folder back to the local user profile location when policy is removed | Disabled | The folder returns to its user profile location; the contents of the folder are not moved or copied back to the original location. Warning: this means that the user cannot see the folder contents. |
| Leave the folder in the new location when policy is removed | Enabled or Disabled | The folder and its contents remain at the redirected location; the user has access to the contents at the redirected location. |
EAN: 2147483647
Pages: 366