Managing User Accounts
Especially on a large, busy network, managing user accounts is an ongoing process of additions, deletions, and changes. While these taks aren't difficult, they can be time-consuming and need to be managed carefully.
Disabling and Enabling a User Account
If you need to deactivate a domain user account for some period of time but not delete it permanently, you can disable it. To disable a user account, follow these steps:
- Open Active Directory Users and Computers from the Administrative Tools menu.
- Open the container that holds the user account.
- Right-click the user name and select Disable Account from the shortcut menu (Figure 9-11). An informational box opens telling you that the object has been disabled, and a red circle with an "X" appears over the user account's icon.
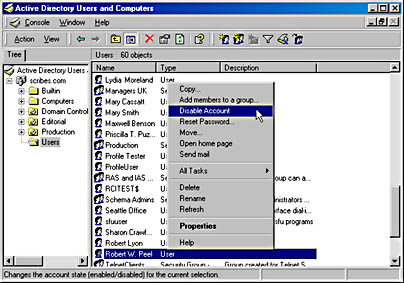
Figure 9-11. Disabling a user account.
To enable a previously disabled account, you perform the same steps, choosing Enable Account from the shortcut menu.
Deleting a User Account
Each user account in the domain has an associated security identifier that is unique and never reused, which means that a deleted account is completely deleted. If you delete Jeremy's account and later change your mind, you will have to re-create not only the account but also the permissions, settings, group memberships, and other properties that the original user account possessed. For that reason, if there's any doubt about whether an account might be needed in the future, it's best to disable it and not perform the deletion until you're sure it won't be needed again.
However, accounts do have to be deleted at regular intervals. To delete a domain user account, follow these steps:
- Open Active Directory Users and Computers from the Administrative Tools menu.
- Open the container that holds the user account.
- Right-click the user name and choose Delete from the shortcut menu.
- An Active Directory dialog box opens, asking you to confirm the deletion. Click Yes and the account is deleted.
Finding a User Account
To search for a particular user account, open Active Directory Users and Computers from the Administrative Tools menu and on the toolbar, click the Find icon, shown here:
![]()
This opens the Find Users, Contacts, And Groups dialog box. Don't be misled, though. Open the drop-down list in the Find box and you'll see that you can use this tool to search for computers, printers, shared folders, organizational units, and much more.
To find a specific user, select the scope of your search in the In box. Type in a name, part of a name, or some other descriptive element that's part of the user's profile, and click Find Now. As you can see in Figure 9-12, a search for a portion of a name returns all users with that element in their names.
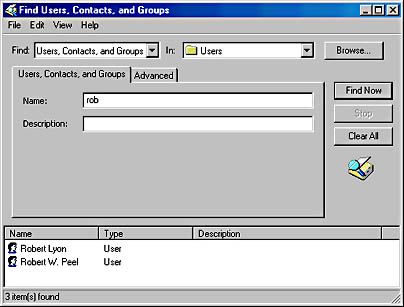
Figure 9-12. Searching for a user by name.
The larger the network, the more specific your search will need to be. In a large network environment, you can narrow your search to a specific organizational unit. Open Active Directory Users and Computers from the Administrative Tools menu and select Find from the shortcut menu. Right-click the OU you are interested in.
Moving a User Account
To move a user account from one container to another, follow these steps:
- Open Active Directory Users and Computers from the Administrative Tools menu.
- In the console tree, click the OU that contains the user account.
- Right-click the user account to be moved and choose Move from the shortcut menu.
- In the Move dialog box, highlight the destination container and click OK.
Renaming a User Account
On occasion, a user account may need to be renamed. For example, if you have an account configured with an assortment of rights, permissions, and group memberships for a particular position and a new person is taking over that position, you can change the first, last, and user logon names for the new person. To rename an existing user account, follow these steps:
- Open Active Directory Users and Computers from the Administrative Tools menu.
- In the console tree, click the OU that contains the account.
- Right-click the user name, and choose Rename from the shortcut menu. (You can also slowly click the user name twice.)
- Press the Delete key and then the Enter key to open the Rename User dialog box (Figure 9-13).
- Enter the changes and click OK. The account is renamed, and all permissions and other settings remain intact. Any other personal data in the account's Properties window will have to be changed as well.
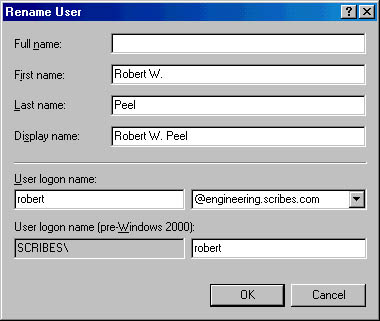
Figure 9-13. Renaming an existing user account.
Resetting a User's Password
For passwords to be effective, they must not be obvious or easy to guess. However, when passwords are not obvious or easy to guess, they will inevitably be forgotten. When a user forgets his or her password, you can reset it. The best policy is to reset it to a simple password and require the user to change the password at the next logon to the network.
To reset a password, just open Active Directory Users and Computers from the Administrative Tools menu and find the container for the account whose password you need to reset. Right-click the account name and choose Reset Password from the shortcut menu. In the Reset Password dialog box (Figure 9-14), enter the new password twice, and select the User Must Change Password At Next Logon option.
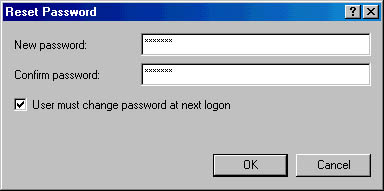
Figure 9-14. Resetting a user's password.
Unlocking a User Account
If a user violates a group policy, such as exceeding the limit for bad logon attempts, Group Policy will lock the account. When an account is locked, it cannot be used to log on to the system. To unlock a user account, follow these steps:
- Open Active Directory Users and Computers from the Administrative Tools menu.
- In the console tree, click the OU that contains the locked account.
- Right-click the user account in the details pane, and choose Properties from the shortcut menu.
- In the Properties window, click the Account tab.
- Clear the check box next to Account Is Locked Out. Click OK.
By default, Group Policy does not lock accounts due to failed logon attempts. You should make this setting for security reasons. See the section "Understanding Group Policies," later in this chapter.
Using Home Folders
Home directories or folders are repositories that you can provide on a network server for users' documents. Placing home folders on a network file server has several advantages:
- Backup of user documents is centralized.
- Users can access their home folders from any client computer.
- Home folders can be accessed from clients running any Microsoft operating system (including MS-DOS and all versions of Windows).
The contents of home folders are not part of user profiles, so they don't affect network traffic during logon. (A home folder can also be on a client computer, but that defeats much of its purpose.)
Creating Home Folders on a Server
To create a home folder on a network file server, follow these steps:
- On the server, create a new folder for the home folders. Right-click the new folder, and choose Properties from the shortcut menu.
- Click the Sharing tab, and Share This folder (Figure 9-15).
- Click the Security tab, and remove the default Full Control from the Everyone group and assign Full Control to the Users group. (This setting will prevent anyone other than domain user accounts from accessing the folder.)
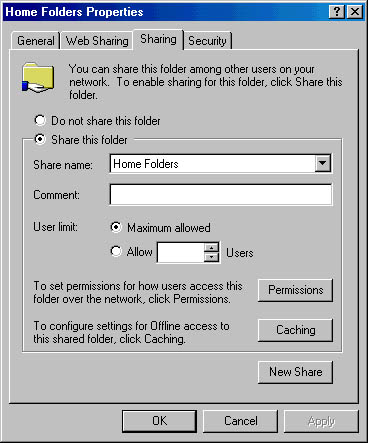
Figure 9-15. Sharing the new Home Folders folder.
![]()
NOTE
Home folders should be stored on a partition formatted with NTFS. Home folders on a FAT partition can be secured only by assigning shared folder permissions on a user-by-user basis.
Providing Home Folders to Users
To provide a user with a home folder, you must add the path for the folder to the user account's properties. Follow these steps to give a user access to a home folder:
- Open Active Directory Users and Computers from the Administrative Tools menu.
- Click the OU containing the user account. Right-click the user name, and choose Properties from the shortcut menu.
- Click the Profile tab.
- In the Home Folder area, click the Connect option and specify a drive letter to use to connect to the file server.
- In the To box, specify the UNC name for the connection—for example, \\server_name\shared_folder\user_logon_name. If you use the variable %username%, as shown in Figure 9-16, a home folder will be given the user's logon name.
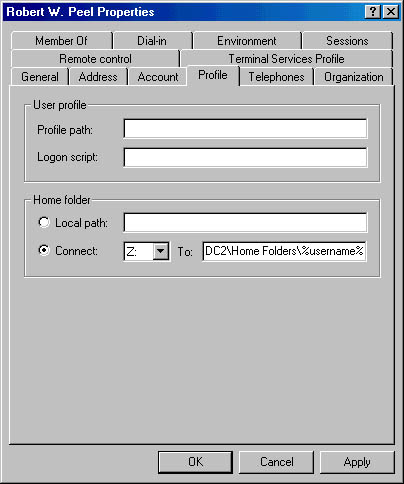
Figure 9-16. Specifying a home folder.
EAN: 2147483647
Pages: 366