Modifying Printer Properties
After you install printers on your print server, you'll need to set security, set various printer options, select the default printer and its options, and select the print server and its options. This section explains how to perform these tasks and more.
Setting Security Options
While some people don't think about security when setting up printers, this can be an important factor to consider. For example, you might not want everyone to print to the five-dollar-a-page dye sublimation printer purchased for the art staff. At a more basic level, you probably don't want most users to modify printer properties or change the priorities of documents in the print queue.
Setting permissions for groups (and occasionally individual users) and auditing the actions users and groups perform is how you handle printer security, just like access to your computer in general. Configure users to belong to groups, and then give the groups the level of permissions appropriate for those users. Turn on auditing for individual users or groups so that you or the person responsible for managing audit logs can track user actions in connection with the printer.
![]()
NOTE
You must use an account with Manage Printers permissions to view and change printer security settings.
Printer Permissions Levels
Printers are Windows 2000 resources and thus can be protected like any other resource by the Windows 2000 security features. Printers in Windows 2000 have owners and access control lists (ACLs), which specify the permissions each user or group has. The creator of the printer is automatically made the owner of the printer, and only users with sufficient permissions (Manage Printers) can take the ownership of the printer from the creator. A user or group has three levels of control permissions for a printer: Print, Manage Documents, and Manage Printers.

CAUTION
Macintosh clients assume that if a client can physically send a document to a printer, it implicitly has permission to do so. Therefore, a Macintosh client has no printer security.
Members of the Everyone group are granted the Print permission by default. However, you should remove Print permission from the Everyone group and instead assign it to the built-in Users group. This permits only users with domain accounts to print. Users or groups with Print permissions can do the following: connect to the printer; print documents; and pause, restart, and delete their own documents from the print queue.
The Creator/Owner group is granted the Manage Documents permission level by default. This level grants the Print permissions plus the ability to change the settings for all documents in the print queue and to pause, restart, and delete any documents from the print queue.
The Manage Printers permission level is the Windows 2000 equivalent of Full Control in Windows NT. This level is granted by default to power users, print operators, and server operators on a domain controller and to administrators on a server. In addition to the Printers and Manage Documents permissions, the Manage Printers permission level adds the ability to set printer sharing, modify printer properties, delete printers, change printer permissions, and take ownership of printers.
You should configure a printer according to the same guidelines you would follow for any shared resource. Create a local group with Print permissions, give it a name that matches the printer name, and then add global groups to the local group. If security isn't an issue, give Manage Documents or Manage Printers permission to the local group. For more on groups, see Chapter 9.
Changing Printer Permissions
To change the permissions on a printer, follow these steps:
- Open the Printers folder located on the Start menu.
- Right-click the printer to be modified, and then choose Properties from the shortcut menu.
- Click the Security tab in the printer's Properties window, as shown in Figure 8-10.
- To change the permissions for a group, select the group from the list, and then select the check boxes in the Permissions section of the window to choose which permissions to give to each group.
- To add a user or group to the list, click the Add button, select a user or group from the list to add (as shown in Figure 8-11), and then click Add. When you're finished adding users or groups, click OK.
- To remove a user or group from the list of users and groups with permission to use the printer, select the user or group, and then click Remove.
- To view or change more detailed security settings, click the Advanced button.
- Use the Permissions tab of the Access Control Settings dialog box to view or change all permissions for each user or group. (Additional settings are Read Permissions, Change Permissions, and Take Ownership.)
- To specify whether the permissions for a particular user or group apply to only the printer, only the documents, or both the printer and documents, select the user or group, click the View/Edit button, and then choose a setting from the Apply Onto drop-down list box. Click OK (Figure 8-12).
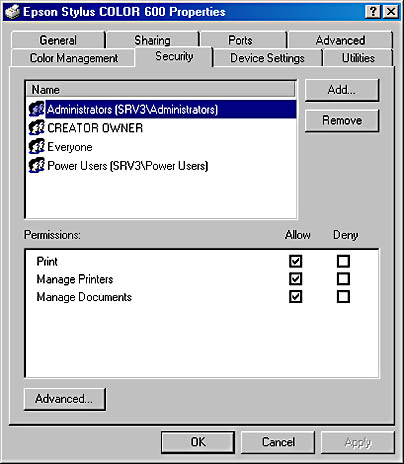
Figure 8-10. The Security tab of a printer's Properties window.
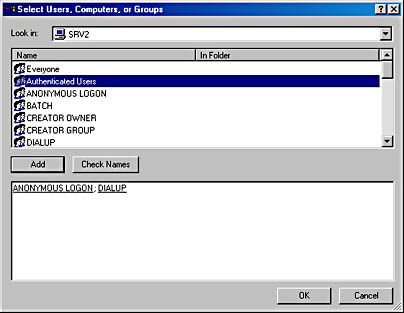
Figure 8-11. The Select Users, Computers, Or Groups dialog box.
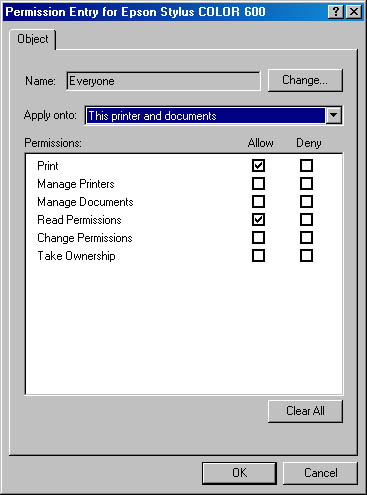
Figure 8-12. The Permission Entry dialog box.
Configuring Printer Auditing
To audit actions for your printer (to record the occurrences of successful or unsuccessful printer-related actions by users or groups), follow these steps:
- In the Printers folder (located on the Start menu), right-click the printer you want to modify, and then choose Properties from the shortcut menu.
- Click the Security tab in the printer's Properties window, and then click Advanced.
- Click the Auditing tab. To add an auditing entry, click the Add button.
- Select a group to audit, and then click OK.
- In the Auditing Entry dialog box, select the actions that you would like to record, and then click OK.
- To edit audits you create, select the auditing entry and click the View/Edit button.
You can view the results of the audit settings in the security log. After reviewing the log a few times, you might conclude that you're auditing too many or too few events. If you log too many actions, the log will fill rapidly and events that are more serious can get lost in the long list of relatively trivial ones. If too few events are logged, you might miss a pattern of improper access to printers.
Changing Printer Ownership
The owner of a printer is the person who has control over what level of permission users and groups have on the printer. To change the ownership for your printer, follow these steps:
- In the Printers folder, right-click the printer you want to modify, and then choose Properties from the shortcut menu.
- Click the Security tab in the printer's Properties window, and then click Advanced.
- Click the Owner tab to view the current ownership of the printer.
- Select the user or group to be the new owner of the printer, and then click OK.
![]()
NOTE
Only users or groups with the Manage Printers permission level will appear in the list of users or groups available to take ownership of the printer.
Changing Printer Options
Windows 2000 installs new printers with printer options designed to work for most users, but frequently, you'll need to change them so your printer will work optimally. Some printer modifications to options that you might need to make include changing the default printer, changing print server printer drivers, specifying color profiles, changing printer availability, determining group printing priorities, and setting up printer pools. These features might not be available until you actively enable them. Security settings such as permissions, auditing, and ownership are covered separately in "Setting Security Options" earlier in this chapter.
![]()
NOTE
Depending on the printer driver you use, the dialog boxes and printer options that you have will probably be different from those that we show. If you use a printer driver provided by the printer manufacturer, additional tabs and options might be unavailable in the standard Windows 2000 printer drivers.
Changing the Default Printer
Applications on the computer that shares the printer automatically print to the default printer unless a different printer is specified. On a print server, it hardly matters which printer is the default printer, but it is important for clients. After a few users accidentally print out their e-mail on the expensive plotter, you (or maybe just the finance department) begin to see the importance of having the default printer set correctly.
To change the default printer, follow these steps:
- In the Printers folder, right-click the printer you want to modify.
- Choose Set As Default Printer from the shortcut menu.
Changing General Options and Printing Test Pages
To change general printer options such as your printer name, or to print a test page, follow these steps:
- In the Printers folder, right-click the printer you want to modify, and then choose Properties from the shortcut menu.
- Use the General tab of the Properties window to view or modify the printer name, location name, or comments, as well as to view the printer capabilities.
- To print a test page, click the Print Test Page button on the General tab.
You can also print a test page by opening Windows NotePad and creating a simple document. In fact, printing in NotePad is an easy troubleshooting technique used to see whether basic printing is working.
Sharing a Printer and Providing Client Drivers
To change the share name your printer uses on a network, to stop sharing your printer, or to install drivers that client machines can use for the printer, follow these steps:
- In the Printers folder, right-click the printer you want to modify, and then choose Properties from the shortcut menu.
- Click the Sharing tab. Click the Shared As option, and enter the share name for the printer in the text box provided (Figure 8-13).
- To publish the printer in Active Directory, select the List In The Directory check box, if available. (To change the way printers are published in Active Directory, use the Group Policy snap-in, discussed in detail in Chapter 16.)
- To add client drivers that are automatically downloaded and installed when a Windows 2000 or Windows NT client connects to the printer, click the Additional Drivers button.
- In the Additional Drivers dialog box, select the check box next to any client drivers to be installed, and then click OK. To install additional client drivers, you need access to the Windows 2000 installation files, either on CD-ROM or across the network.
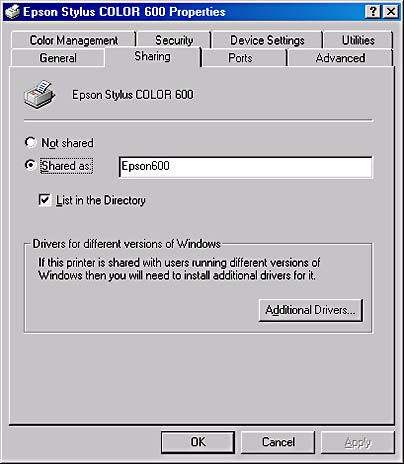
Figure 8-13. The Sharing tab of a printer's Properties window.
When client drivers are installed on a print server, many Windows clients automatically download the drivers when they are initially connected to the printer. Windows 2000 and Windows NT 4 clients automatically check for updated versions of the printer drivers at startup and download newer versions if necessary. Windows NT 3.x clients automatically check and update their drivers when they print to the server. Windows 95 and 98 clients don't automatically check for updated drivers and must be updated manually.
Changing Print Server Printer Drivers
To change the driver that the print server uses for a printer, follow these steps:
- In the Printers folder, right-click the printer you want to modify and select Properties from the shortcut menu.
- Click the Advanced tab.
- Choose a driver from the Driver drop-down list box, or click the New Driver option to start the Update Driver Wizard.
Setting Up Printer Pools and Changing Port Settings
A printer pool is useful for handling a large volume of printing at a location, particularly when there is a mix of large and small documents. For example, someone with a single-page memo doesn't have to be stuck in the queue behind a print job that's the corporate equivalent of the Encyclopedia Britannica.
If printers share a single driver, they can appear to clients as one printer. The advantage of using a printer pool is that clients don't need to find which printer is available; they simply print to the single logical printer (print driver) on the print server, which then sends the print job to the first available printer. Administration of the printers is also simplified because all of the printers are consolidated under one driver. If you modify the properties for the single logical printer, all physical printers in the printer pool use the same settings.

TIP
Printers in a printer pool should be located near each other to make finding a completed print job easier.
To set up a printer pool or simply change the port settings for a printer, follow these steps:
- In the Printers folder, right-click the printer you want to modify and select Properties from the shortcut menu.
- Click the Ports tab.
- Select the Enable Printer Pooling check box.
- To change the transmission retry settings for a port, select the port, and click Configure Port.
- To add additional printers to the printer pool, select the ports to which the additional printers are connected.
CAUTION
All printers in a printer pool must be identical or must at least be able to use the same printer driver, since they are all configured by one printer driver.
Specifying a Color Profile
Windows 2000 includes the Integrated Color Management (ICM) 2 API for maintaining consistent colors across monitors, color printers, and scanners. When you need to achieve accurate color reproduction, it's useful to set up your printer, as well as your users' monitors and scanners, with an appropriate color profile. To do so, follow these steps:
- In the Printers folder, right-click the printer you want to modify and select Properties from the shortcut menu.
- Click the Color Management tab. Select the Automatic option to have Windows 2000 choose the best color profile.
- To manually select a color profile, choose the Manual option, and then select a profile from the list or click the Add button to install an additional color profile from your device manufacturer. Click OK.
TIP
Color management in Windows has come a long way, but most graphics professionals still use third-party, hardware-based, color-matching solutions when color accuracy is important. However, ICM provides a good way to attain a reasonable measure of accuracy for noncritical work.
Changing Printer Availability
To set up your printer to be available only during certain times—perhaps to discourage after-hours printing—perform the following steps:
- In the Printers folder, right-click the printer you want to modify and select Properties from the shortcut menu.
- Click the Advanced tab, and then click the Available From option.
- Select the earliest and latest times the printer is to be available to users, and then click OK.
TIP
To dedicate a printer to large, high-priority print jobs after normal hours, install a duplicate logical printer (printer driver) for the printer. Make one logical printer available during normal hours to all users. Make the second one available after hours to only particular users or groups.
Determining Group Printer Priorities
Sometimes you might want to make the printer available preferentially to a certain group of users so that they can jump straight to the head of the print queue. This ability can be extremely useful for users who face time pressures and need to take precedence over other users when printing.
To set up groups to have different priorities on a printer, you need to set up two or more logical printers for the physical printer. Thus, you would have two or more printer drivers set up for a single printer, with each driver possessing a different priority level and a different set of users or groups. To do this, follow these steps:
- In the Printers folder, click the Add Printer icon to add one or more duplicate logical printers for a physical printer already installed on your print server.
- Right-click the logical printer you want to change the priority for, and then select Properties from the shortcut menu. Click the Advanced tab.
- Change the priority to be assigned to the logical printer and the users and groups that use this printer driver by entering a number in the Priority text box. The priority range goes from 1, which is the lowest priority, to 99, which is the highest priority.
- Click the Security tab and add the users and groups you want to allow to print at this priority level. Remove or deny print permissions to users whose printing should occur at a different priority level. Those users will utilize another printer with its own priority level.
- Click OK, and repeat the process for all other logical printers created for the printer.
Changing Spool Settings
Print spooling, or storing a print job on disk before printing, affects how clients perceive printing performance as well as the actual printing speed. You can change the way print spooling works to correct printing problems or to hold printed documents in the printer queue in case a user needs to print the document again. Follow these steps to change a printer's spool settings:
- In the Printers folder, right-click the printer you want to modify and select Properties from the shortcut menu.
- Click the Advanced tab to display the printer's spool settings, as shown in Figure 8-14.
- To decrease the time it takes to print a document, select the Spool Print Documents option, and select the Start Printing Immediately option to begin printing as soon as enough data is spooled.
- To ensure that the entire document is available to the printer when printing begins, select the Start Printing After Last Page Is Spooled option. This step might correct some printing problems.
- If you continue to have printing problems, choose the Print Directly To The Printer option to turn off spooling. Enabling this option will cause a performance hit on the server.
- Select the Hold Mismatched Documents check box to hold documents in the queue that don't match the current printer settings. Other documents in the print queue are unaffected by held documents.
- Select the Print Spooled Documents First check box to print the highest priority document that is already spooled first, ahead of higher priority documents that are still spooling. This step speeds overall printer throughput by keeping the printer from waiting for documents.
- Select the Keep Printed Documents check box to keep a copy of print jobs in the printer queue in case users need to print the document again. In this circumstance, the user can resubmit the document directly from the queue rather than printing from his or her application a second time.
- Clear the Enable Advanced Printing Features check box if you experience printer problems. Doing so turns off metafile spooling, which disables some printer options such as page order, booklet printing, and pages per sheet (if available on your printer).
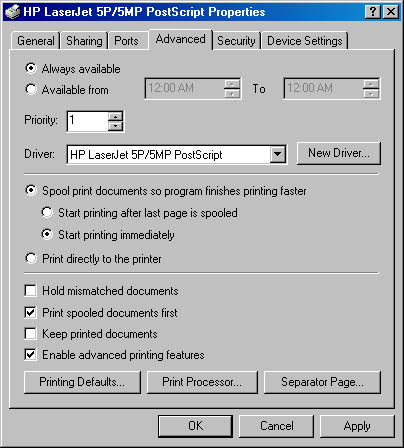
Figure 8-14. The Advanced tab of a printer's Properties window.
Changing Print Processor Settings and Specifying a Separator Page
The print processor determines the data format used with documents sent to the printer; generally either raw or EMF. (See "Understanding the Printing Process" earlier in this chapter for information on these data types and their advantages.) To change the type of print processor your print server uses for a printer, or to specify a separator page to insert between print jobs, follow these steps:
- In the Printers folder, right-click the printer you want to modify and select Properties from the shortcut menu.
- Click the Advanced tab. Click the Print Processor button to change the print processor or to specify a data type to use. When you're finished setting options in the Print Processor dialog box, click OK.
- Click the Separator Page button to select a page to insert between printed documents to help separate the print jobs. Click OK.
Setting Up a Printer to Use Both PostScript and PCL
If you have a printer that supports printing in two printer languages (usually PostScript and PCL), you can set up the printer to simultaneously support both languages. To do this, set up two logical printers (printer drivers) for the printer: one for each data type. Clients with PostScript documents then use the PostScript-enabled logical printer, while users with PCL documents use the PCL logical printer.
Open the Printers folder and click Add Printer to create a logical printer that supports the first data type (either PostScript or PCL). Then use Add Printer a second time to create a logical printer that supports the second data type.
Setting Installable Options and Printer Device Settings
Each printer comes with several configurable device options, such as which paper tray to print from, whether a duplexer is installed, and how to handle downloadable fonts. While the options that are configurable vary with the printer model, you can use the following procedure to change the printer device settings on any printer:
- In the Printers folder, right-click the printer you want to modify and select Properties from the shortcut menu.
- Select the Device Settings tab, and then click the underlined words to display a drop-down list box that you can use to configure an option, as shown in Figure 8-15.
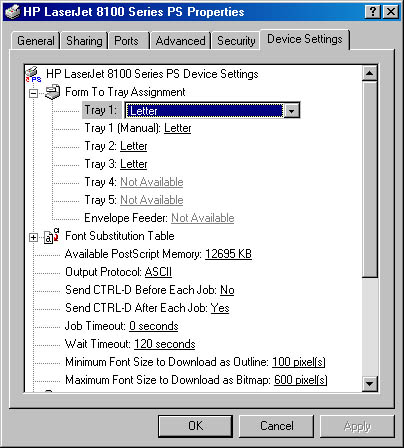
Figure 8-15. The Device Settings tab of a printer's Properties window.
TIP
If your printer has multiple trays with different forms, match the form to the tray so that documents using the form always print properly. Under the Form To Tray Assignment heading, select each tray and choose the form that the tray holds. If your printer supports Page Protection and has 1 MB or more of available optional memory, go to the Device Settings tab and turn on this option to ensure that complex pages print properly. When you turn this option on, the printer creates each page in memory before beginning to print.
Changing Default Print Settings
After you configure the printer options for your installed printer, you should set the default print settings that are used by clients. When setting the printing defaults that the logical printer uses on the print server, you establish a set of defaults used by all clients that connect to the printer.
This section describes how to set layout options, how to set paper options, and how to set quality defaults for a print server and attached clients.
Setting Layout Defaults
Layout involves such options as the orientation of documents and paper, the order in which pages are printed, and the number of pages per sheet of paper that are printed. To change these settings, follow these steps:
- In the Printers folder, right-click the printer you want to modify and select Properties from the shortcut menu.
- Click the General tab, and then click the Printing Preferences button.
- To change the paper orientation, click the Portrait button, the Landscape button, or the Rotated Landscape button, as shown in Figure 816. Note that the preview changes depending on the selection you choose.
- To specify whether the printer should start with the last page of a document or the first page, select either the Front To Back option, which is good for face-down printing, or the Back To Front option, which is better for page-up printers.
- To print multiple pages per sheet of paper, select the number of pages to print on a sheet from the Pages Per Sheet drop-down list box.
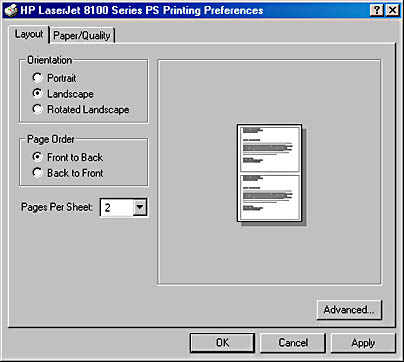
Figure 8-16. The Layout tab of a printer's Printing Preferences dialog box.
TIP
The Rotated Landscape orientation, if available, prints a page in the landscape format, but rotated 90 degrees counterclockwise.
Setting Paper and Quality Defaults
Paper and quality options are important printing defaults because you generally want most users to print on a certain paper size from a particular paper tray and with a certain quality setting. Most users change the default options only if their documents don't print the way they wanted, potentially causing a lot of waste if the defaults are inappropriate and the users don't correct them until after printing a copy (or more). Setting these defaults to a standard size paper (most likely letter size) and at the quality setting most appropriate for your users will save your company a great deal of money over time. To specify paper options and quality settings, follow these steps:
- In the Printers folder, right-click the printer you want to modify and select Properties from the shortcut menu.
- Click the Printing Defaults button on the General tab. Click the Paper/Quality tab.
- Use the Paper Source drop-down list box to select which tray (or other paper source) you want users to print from by default.
- Select the type of paper your printer is usually stocked with from the Media drop-down list box.
- If your printer driver has a Quality Settings section, use this part of the dialog box to choose a resolution or quality setting to use on your documents by default. In general, use the lowest quality settings that are acceptable to your users to increase printing speed, reduce waste, and lower costs.
- If you have a color printer, choose whether your users should print black or color by default.
- If your printer driver doesn't have Quality options on the Quality/Paper tab, click the Advanced button, and use the Advanced Options dialog box to set any layout, quality, or paper options that are available on your printer.
TIP
To set duplex printing, staples, and other advanced printer options, use the Advanced Options button—these settings might not be available elsewhere—depending on your printer driver and whether you've enabled these installable options.
Setting Print Server Options
While most printer configuration occurs in the printer driver for a particular printer, you can configure some of the actual print server settings. These settings affect all printers hosted by the print server; they include determining which forms are available to print on and which ports and printer drivers are available to use, as well as some spool settings.
Modifying the Forms Available on the Print Server
Forms are whatever material a printer can transfer ink or laser toner to in the shape of letters, characters, or graphics. Forms can be paper of various sizes, every sort of envelope, or other types of media such as film. Print servers are set up to handle a wide variety of standard forms by default, but occasionally it can be useful to set up additional forms that your printers can use, maybe because you use special company forms. Or perhaps you want to modify or delete an existing form. To do so, follow these steps:
- In the Printers folder, choose the Server Properties command from the File menu to open the Print Server Properties window, as shown in Figure 8-17.
- To modify a form, select the form and then use the Measurements boxes to alter it.
- To create a new form, select the Create A New Form check box, enter a name for the form in the Form Description box, use the Measurements boxes to define the form, then click Save Form.
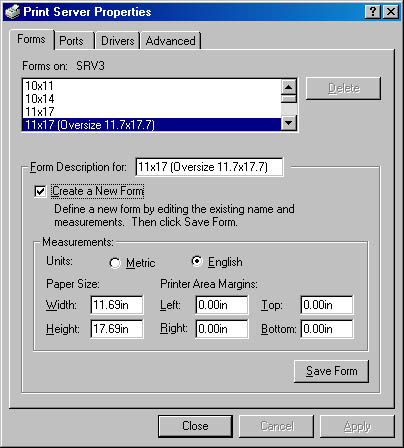
Figure 8-17. The Forms tab of the Print Server Properties window.
Configuring Ports and Drivers
You can use the Ports and Drivers tabs in the Print Server Properties window to configure the port and printer drivers that are available on your print server. You can add new ports for your printers or configure the printer drivers you want to make available to clients to download when they connect to your print server. To do so, follow these steps:
- In the Printers folder, choose Server Properties from the File menu.
- To view the ports available on your print server, click the Ports tab.
- Select a port and click Configure Port to modify the port settings, or click Add Port or Delete Port to add or remove a port from your system.
- Click the Drivers tab to view a list of currently installed drivers on the print server.
- To view the driver details for a printer driver, select the driver and then click the Properties button to display the Driver Properties window. Use this dialog box to view the properties for each file that makes up the printer driver.
- To update a printer driver, select the driver and click Update.
- To add a printer driver that you want to make available to clients to download, click the Add button to launch the Add Printer Driver Wizard, which walks you through the driver installation process.
- To remove a printer driver, select the driver and click the Remove button.
Configuring Advanced Print Server Settings
The Advanced tab of the Print Server Settings dialog box is extremely useful for configuring your print server for optimal performance and ease of use. You can and should specify where your spool folder is stored, and you can also control how the print server deals with printing events. To configure these settings, follow these steps:
- In the Printers folder, choose Server Properties from the File menu.
- Click the Advanced tab. In the Spool Folder text box, enter the location where you want to store your spool folder.

PLANNING
For optimal performance, place the spool folder on a separate drive from Windows 2000, its applications, and especially its swap file. Also make sure that the drive is big enough to hold all documents in the print queue. If you choose to enable the holding of printed documents, the drive needs to be even bigger.
- Select the check boxes next to the events to be logged.
To be notified of errors while printing remote documents, select Beep On Errors Of Remote Documents. To send a message to the user when the document finishes printing, select Notify When Remote Documents Are Printed. To display a notification message on the computer the document was printed on (even if the user who printed it is currently logged on elsewhere) select Notify Computer, Not User, When Remote Documents Are Printed.
TIP
The Notify When Remote Documents Are Printed feature can be useful on busy print servers when a significant delay might occur between the time that a client sends off a document and the time when the document reaches the head of the queue and actually prints. However, on less busy print servers or for users who need to print frequently, this feature can be annoying. If this situation occurs for your users, you can turn off the option to eliminate the problem.
EAN: 2147483647
Pages: 366