Installing and Configuring a DNS Server
DNS servers are an essential part of a TCP/IP-based network as well as an essential part of Active Directory. Microsoft recommends installing DNS on every domain controller when using Active Directory. This arrangement allows the Windows 2000 Dynamic DNS server to use Active Directory to store zone information—thus, full multimaster zone replication using Active Directory is permitted, the task of achieving fault tolerance is simplified, and DNS administration is made less difficult.
If you're using Active Directory-integrated DNS, you can skip the next section. Setting up Active Directory (see Chapter 10) will automatically configure DNS.
Installing DNS
If DNS wasn't installed on the domain controller during the installation of Windows 2000, you can add it easily, although certain configuration steps are necessary. First you must configure the TCP/IP and DNS domain name on the machine where the services are to be installed. Follow these steps:
- Go to Start and choose Settings, and then select Network And Dial-Up Connections. Right-click the connection you want, and choose Properties.
- Highlight the Internet Protocol (TCP/IP) entry, and then click Properties. Enter the IP address, subnet mask, and default gateway that you're using. Be sure the Use The Following DNS Server Addresses option is selected. In the Preferred DNS Sever box, enter the computer's assigned IP address.
- Select Advanced, and then choose the DNS tab. Supply the DNS addresses and names.
- Right-click the My Computer icon, and choose Properties from the shortcut menu.
- On the Network Identification tab, select Properties. In the Identification Changes box, select More.
- In the NetBIOS and DNS Domain Names dialog box, enter the DNS domain name, and click OK. A reboot will be necessary for the changes to take effect.
Once the server is configured correctly, you can install DNS server by following these steps:
- Open the Configure Your Server tool from the Administrative Tools menu.
- Select the Networking heading in the column on the left, and then choose the DNS subheading.
- To install the DNS service, click the Set Up DNS hyperlink.
Configuring the DNS Service
Zones are the brains of DNS; therefore, your DNS server is useless until you set up the zones for your domain. Zones allow you to store portions of the DNS namespace so that a single DNS server can serve a portion of the namespace.

PLANNING
When setting up your domains, start with the top-level domain. Then create subdomains and delegate control of the domains to other DNS servers as necessary.
The two types of zones that you need to be concerned with are forward lookup zones and reverse lookup zones. Forward lookup zones are the types of zones we normally associate with DNS servers; they return an IP address when given a DNS name. Reverse lookups are used less often, yet they are still important. They provide the ability to resolve an IP address into a DNS name, something that Internet Information Services (IIS) uses for its log files and troubleshooting tools such as Nslookup use as well.
Creating a New Forward Lookup Zone
To create a new forward lookup zone on your DNS server so clients can resolve a DNS name to an IP address, follow these steps:
- Select DNS from the Administrative Tools folder.
- Select your DNS server from the console tree. Then choose New Zone from the Action menu to start the New Zone Wizard. Click Next to start using the wizard.
- In the Zone Type window (Figure 6.20) choose one of the following options, and then Click Next to continue:
- Active Directory-integrated Use if your domain controllers are all running Windows 2000. This option can also be used on a mixed network if your UNIX servers are compatible with Microsoft DNS.
- Standard primary Use if your DNS server is running Windows 2000 Server but is not a Domain Controller.
- Standard secondary Use if DNS is hosted on UNIX servers. Use also if this server is to have read-only privileges in the zone with all data obtained from the primary DNS server.
- Select the Forward Lookup option, and click Next.
![]()
REAL WORLD Setting Up Secondary DNS Servers
Secondary DNS servers play an important role for TCP/IP-based networks. Their primary purpose is to provide redundancy if the primary DNS server doesn't respond to client queries, but secondary servers can also be useful in reducing network traffic if placed in a location where the zone is heavily queried. To provide additional protection from a network link failure, you should place secondary servers on a different subnet with routed LANs or across a WAN link. While we recommend setting up secondary DNS servers for both forward lookup zones and reverse lookup zones, because reverse lookup zones are used so infrequently, fewer secondary servers are required for these zones: they are usually placed outside the network and subnet that the reverse zone serves.
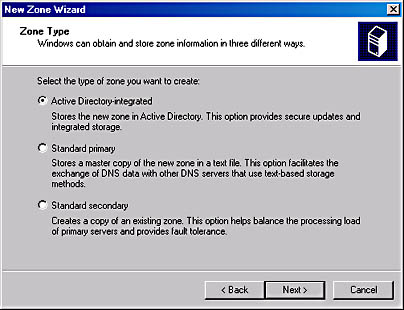
Figure 6-20. The Zone Type screen of the New Zone Wizard.
- Enter the DNS name for the zone in the Name text box, and then click Next.
- If you chose an Active Directory-integrated zone, it is created now. If you're creating a Standard primary zone, skip to Step 8. For a Standard secondary zone, the Master DNS Servers window opens. Enter the IP addresses of the master servers from which you want to copy the zone data, clicking Add (Figure 6-21). Use the Browse button to search for servers.
- Use the Up and Down buttons to arrange the IP addresses in the order that you want to contact them. Click Next when you're done, and then click Finish to complete the configuration of your secondary zone.
- To create a new file to store the zone data, select the Create A New File With This File Name option and enter the name you want to give the zone file, or use the one provided for you.
- To use an existing zone file to store your zone data, copy the file to the %SystemRoot%\System32\DNS folder, select the Use This Existing File option, and enter the filename in the box provided.
- Click Next, review the summary of your zone, and then click Finish to complete the creation of your zone.
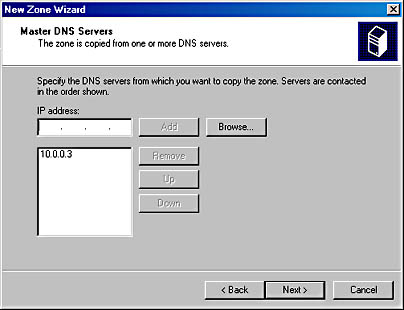
Figure 6-21. The Master DNS Servers screen of the New Zone Wizard.
Creating a New Reverse Lookup Zone
Reverse lookup zones allow clients to resolve a host's DNS name from an IP address, which is useful for troubleshooting tools such as Nslookup. And performing a reverse lookup with IIS log files allows the recording of a DNS name instead of an IP address. To create a new reverse lookup zone, follow these steps:
- Launch the DNS Management snap-in from the Administrative Tools folder.
- Select your DNS server from the console tree, and then choose New Zone from the Action menu to start the Create New Zone Wizard. Click Next to start using the wizard.
- In the Zone Type window choose one of the following options and then click Next to continue:
- Active Directory-integrated Use if your domain controllers are all running Windows 2000. This option can also be used on a mixed network if your UNIX servers are compatible with Microsoft DNS.
- Standard primary Use if your DNS server is running Windows 2000 Server but is not a Domain Controller.
- Standard secondary Use if DNS is hosted on UNIX servers. Use also if this server is to have read-only privileges in the zone with all data obtained from the primary DNS server.
- Select the Reverse Lookup option, and click Next in the Select The Zone Type window.
- Enter your network address in the Network ID box, as shown in Figure 6-22. (See Chapter 13 for more information on network addresses and TCP/IP addressing.)
- To enter the name of the reverse lookup instead of supplying the network ID, select Reverse Lookup Zone Name, and enter the name of thereverse lookup zone. Click Next.
- If you are creating a lookup zone that is Active Directory-integrated, the zone will now be created. If you are making a standard primary zone, the Zone File window will open.
- To create a new file to store the zone data, choose the New File option and enter the name you want to give the zone file, or use the name provided for you. To use an existing zone file to store the data, copy the file into the %SystemRoot%\System32\DNS folder, choose the Existing File option, and enter the file name in the box provided.
- Click Next, review the summary of your zone, and then click Finish to complete the creation of your zone.
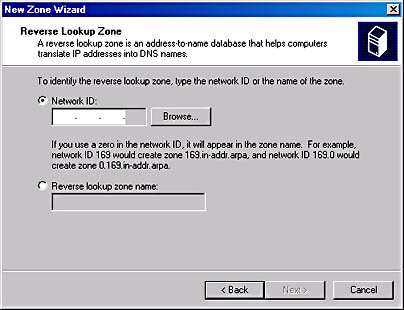
Figure 6-22. The Reverse Lookup Zone screen of the New Zone Wizard.
Creating Subdomains and Delegating Authority
In most large network environments, you need to create subdomains and delegate their management to other DNS zones that are hosted by other DNS servers. This step eliminates the obviously undesirable situation of having a large namespace hosted in a single zone by a single server. Thus, you might have a zone containing the root domain scribes.com as well as the subdomain marketing.scribes.com; however, you might have the subdomain tech.scribes.com and its subdomains delegated to a separate zone managed by another DNS server, as shown in Figure 623.
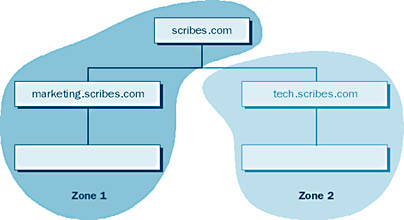
Figure 6-23. A domain tree with zones identified

CAUTION
Make sure that you have a host record created for your DNS server in the Forward Lookup Zone and a pointer record for your DNS server in the Reverse Lookup zone. DNS may not automatically create these (especially the pointer record) for you, so double-check them—otherwise your server may not work.
Note that zones must have a contiguous namespace, so it isn't possible to combine subdomains from different branches of your namespace and place them in a single zone—you'd need to create separate zones for each noncontiguous part of the domain. To create a new subdomain in an existing zone and then delegate authority over the domain to another DNS server, perform the following steps:
- Select the domain in which you want to create a new subdomain, and then choose New Domain from the Action menu.
- Enter the name of the subdomain in the dialog box that appears, and then click OK. This name should not be fully qualified. For example, if you were creating the subdomain tech.scribes.com under the domain scribes.com, you would type only tech in this dialog box.
![]()
NOTE
Subdomains don't have to be delegated to a different DNS server. Subdomains can even be created in new zone files and still be managed by the same server. This ability is useful if you want to host the zones on the same computer, yet manage them differently.
- To delegate authority over the subdomain, select the parent domain of the subdomain, and then choose New Delegation from the Action menu to start the New Delegation Wizard.
- Click Next, and then enter the subdomain name for the subdomain you want to delegate. Click Next again.
- Click Add to open the Create New Resource Record dialog box.
- Enter the name of the server you want to delegate authority to, or click Browse to locate its resource record in your DNS server's zone files.
- Enter the IP address or addresses for the server, clicking Add after entering each one. Click OK when you're done.
- Add any additional DNS servers that will host the delegated subdomain, as shown in Figure 6-24. Click Next to continue.
- Review the summary window, and click Finish to complete the delegation process.
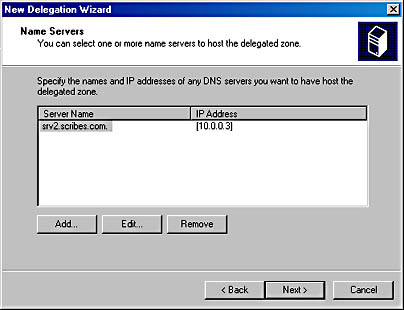
Figure 6-24. The Name Servers screen of the New Delegation Wizard.
Adding Host Resource Records
After you create your zones and subdomains, you should add resource records (RR) for your domain server and any other servers with static IP addresses or IP reservations (DHCP servers, WINS servers, routers, and so on). The steps that follow are for adding new host RRs, but the process to add new pointer RRs, Alias (CNAME) RRs, mail exchangers, or other RRs is quite similar. Note that your DNS server won't work properly without a host record and a pointer record, which may not be created automatically for you.
- Select the zone and domain or subdomain to which the host belongs, and then choose New Host from the Action menu.
- Enter the host name, or leave the Name box blank to use the name of the parent domain (Figure 6-25). Enter the host's IP address.
- Select the Create Associated Pointer (PTR) Record to create an RR for the host in the reverse lookup zone.
- Click Add Host, and then fill out the fields for any additional host records you want to create, or click Done.

TIP
To manually update your zone file, select the zone you want to update, and then choose Update Server Data File from the Action menu.

Figure 6-25. The New Host dialog box.
Configuring Zone Transfers
Because the DNS service is so important to a modern TCP/IP-based network, and because it's so essential to the operation of Active Directory, we highly recommend that you configure multiple DNS servers in each zone to provide fault tolerance in case one server isn't responding.
Windows 2000 supports several ways of achieving zone transfers between DNS servers managing a zone. If the DNS servers are using Active Directory to store their zone data, Active Directory handles the zone replication, allowing for a full multimaster model with zones transferring only updated records instead of performing full zone transfers.
Windows 2000 also supports Request For Comment (RFC) 1995-compliant incremental zone transfers when using standard zone files. This incremental zone transfer method permits a secondary DNS server to pull only the zone changes that it needs, to synchronize its copy of the zone data with the primary server's. If the serial number of the primary DNS server's zone file matches that of the secondary DNS server's serial number, no changes were made and no zone transfer takes place. Incremental zone transfers occur only if both servers support this feature; when performing zone transfers with Windows NT 4 DNS servers or other DNS servers that don't support this feature, a full zone transfer occurs. In a full zone transfer, the entire contents of the zone file are pulled from the primary DNS server by the secondary server.
If your DNS server is a secondary DNS server on a zone, your server is already configured to perform zone transfers with the master server in the zone. If your server is a primary server in the zone, your server is configured to perform zone transfers with any DNS servers that request them. This situation can be a potential security problem if someone wants to create a rogue DNS server and pull your zone data, so you might want to allow only certain DNS servers to perform zone transfers with your server. To modify the way zone transfers occur on your DNS server, follow these steps:
- Select the zone in which you want to enable zone transfers, go to the Action menu, and select Properties.
- Click the Zone Transfers tab, shown in Figure 6-26.
- To disable zone transfers entirely on your DNS server, clear the Allow Zone Transfers checkbox.
- To allow any DNS server to perform zone transfers with your DNS server, select To Any Server.
- To set up your server to allow only servers that have name server (NS) records in your zone file to perform zone transfers with your server, choose Only To Servers Listed On The Name Servers Tab.
- To create a list of approved servers with which your DNS server can perform zone transfers, select Only To The Following Servers. Then enter each server's IP address in the box provided, clicking Add after entering each one.
- To change whether secondary servers in your zone are notified when your zone file has been updated, click Notify.
- To disable the notification of secondary servers when changes to your zone file take place, clear the Automatically Notify checkbox, shown in Figure 6-27.
- To notify only DNS servers with name server records in your zone file, select Servers Listed On The Name Servers Tab.
- To create a list of servers that you want to notify about changes to your zone file, select the The Following Servers option. Then enter each server's IP address in the box provided, clicking Add after entering each one.
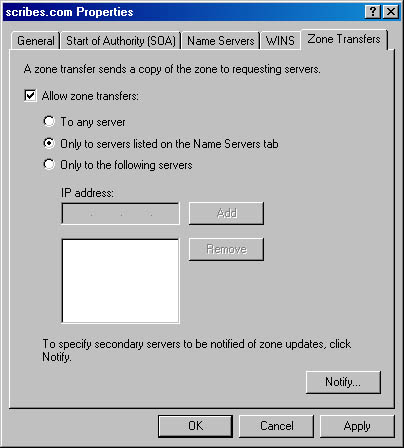
Figure 6-26. The Zone Transfers tab of the Properties window.

Figure 6-27. The Notify dialog box.
Interoperating with Other DNS Servers
By default, the Windows 2000 DNS server performs fast zone transfers with data compression and multiple resource records sent in each message. This zone transfer method works with all Windows DNS servers, and BIND DNS servers versions 4.9.4 or later. If you need to perform zone transfers with BIND servers earlier than version 4.9.4, you'll need to disable this fast zone transfer method. Select your DNS server from the console tree and choose Properties from the Action menu. Then click the Advanced tab, and clear the Bind Secondaries check box.
Enabling Dynamic DNS Updates
In Windows NT 4, the DNS server is a slight management headache because of the lack of dynamic updates. Every time a host is given a new IP address, an administrator has to go in and manually update the DNS zone file with the new IP address. Fortunately, the Windows 2000 DNS server implements RFC 2136-compliant dynamic updates. These dynamic updates allow Windows 2000 clients to update their own forward lookup DNS records, and they allow DHCP and WINS servers to update the forward and reverse lookup records of all clients. They also allow you to scavenge records that haven't been refreshed in a long time, reducing the gradual bloat that happens with DNS databases. (See Chapter 12 for more information on setting up aging and scavenging parameters.) Before you can reap any of the benefits from dynamic DNS, you have to turn it on, so follow these steps to enable dynamic updates:
- Select the zone in which you want to enable dynamic updates.
- Choose Properties from the Action menu and select the General tab.
- In the Allow Dynamic Updates drop-down list box, select Yes.
TIP
For dynamic DNS to work properly, you need to configure your DHCP server to update the DNS server when a client's IP address changes.
Enabling WINS Resolution
The Windows Internet Naming Service (WINS) allows NetBIOS names to be resolved into IP addresses. This capability is important for networks that need to support large numbers of pre–Windows 2000 Microsoft clients. DNS can work together with WINS to search the entire combined DNS and NetBIOS namespace, if necessary, when a client attempts to resolve a hostname.
In Windows NT 4, enabling WINS resolution within DNS is essential to successfully resolving hosts that might have changed their IP addresses recently—the dynamic WINS database provides an up-to-date IP address when the static DNS zone file can't. However, with Windows 2000, dynamic updates to the DNS server eliminate the need to use WINS servers to keep the namespace up-to-date, and WINS will be gradually phased out. To enable WINS resolution in a zone, follow these steps:
- Select the zone in which you want to enable WINS resolution, and then choose Properties from the Action menu.
- Choose the WINS tab and select the Use WINS Forward Lookup check box.
- To prevent the WINS record from being replicated to any secondary servers for compatibility reasons (non-Microsoft DNS servers don't support WINS-R records), select the Do Not Replicate This Record check box.
- Enter the IP address of each WINS server you want to query, clicking Add after entering each one.
You will find more about setting up WINS in the section "Setting up a WINS Server" later in this chapter.
Setting Up a Forwarder
No name server will be able to answer the queries of all clients; sometimes clients will request a DNS name that isn't in a zone managed by the DNS server. In these instances, you can configure a DNS server to forward the query on to a DNS server that is more likely to have the record in its zone or cache file. This ability is needed most frequently for resolving names external to the network on which the clients reside.
When a client wants to resolve a name outside the internal network, you can configure an internal DNS server to forward the query to a DNS server external to the network, perhaps on the other side of a firewall. This external name server can then perform further queries outside the network as necessary and return the results back to the forwarder DNS server. To configure your DNS server to forward unresolved queries to another DNS server, follow these steps:
TIP
For security reasons, a single DNS server will typically forward queries from the internal network to a DNS server on the other side of the firewall. All other internal DNS servers forward their queries to the designated forwarder to be passed on to the external name server (or resolved from the forwarder's cache file).
- In the console tree, select the DNS server on which you want to enable forwarding, and then choose Properties from the Action menu.
- Choose the Forwarders tab and select the Enable Forwarders check box.
- Enter the IP addresses of the DNS server or servers to which you want to forward unresolved queries, clicking the Add button after entering each one.
- Before moving on to the next server in the list of servers to forward queries to, enter the amount of time you want to spend attempting to contact a DNS server.
- To configure your DNS server as a slave server—a server that doesn't attempt to resolve any queries from its own zone files or cache—select the Do Not Use Recursion check box.
Setting up a Caching-Only DNS Server
Caching-only servers are DNS servers that don't host any zones and that aren't authoritative for any domains—they simply cache the queries that they perform on behalf of the clients that use the server. Caching-only servers are useful for sites that use a slow WAN link to other DNS servers. By simply caching queries instead of holding its own zone files, a caching-only server reduces network traffic because it never performs any zone transfers. To set up a caching-only server, follow these steps:
- Install the DNS service, as described earlier in this chapter.
- Configure the caching server with a static IP address.
- Launch DNS from the Administrative Tools folder, and choose Connect To Computer from the Action menu.
- In the Select Target Computer dialog box, select The Following Computer, enter the name of the DNS server from which you want to cache (Figure 6-28), and click OK.
The DNS server will be added to the DNS console on the caching server. The caching server will perform recursive queries on behalf of its clients and over time will accumulate resource records for answering future queries. You can clear the cache on a caching server by right-clicking the server's name in the DNS console and selecting Clear Cache.
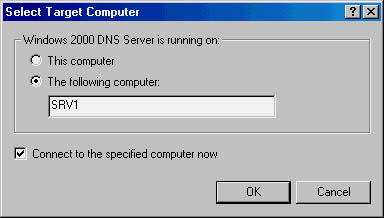
Figure 6-28. The Select Target Computer dialog box.
EAN: 2147483647
Pages: 366