Managing SMTP Virtual Servers
The fourth and last core service that is included as part of IIS on Windows 2000 Server is the SMTP Service. SMTP is the application-layer protocol that underlies the worldwide system of SMTP hosts (mail servers) on the Internet. If it's not already installed on IIS, use the Add/Remove Programs utility in Control Panel.
What the SMTP Service Does
You can administer the SMTP Service on IIS version 5 either by using the IIS snap-in for the MMC or via a Web browser using SMTP Service Manager (HTML). Like other core IIS facilities, it is fully integrated with Windows 2000 event and performance monitoring. IIS includes the SMTP Service primarily for use by mail-enabled Web applications. A simple example is an HTML form that a user fills out and submits, upon which the form handler (the script or program that takes the information entered by the client and actually does something with it) composes an e-mail message and sends it using the SMTP Service.
Note that the SMTP Service included with IIS isn't intended to replace a company mail server—IIS has no facility for creating individual user mailboxes. The SMTP Service is intended mainly for mail forwarding by mail-enabled Web applications, although it can both send and receive mail and relay mail from other SMTP hosts. If you need a full-featured mail server for your company, try Microsoft Exchange Server 5.5 and implement the Internet Mail Service on it to give it SMTP capability.
When you install the SMTP Service on IIS, it automatically creates a Default SMTP Virtual Server, as shown in Figure 28-26. You can host multiple SMTP virtual servers on a single machine, but this is rarely needed because the Default SMTP Virtual Server can be configured to forward mail for multiple SMTP domains. Like other IIS core services, the SMTP Service is managed by a combination of Properties windows and wizards.
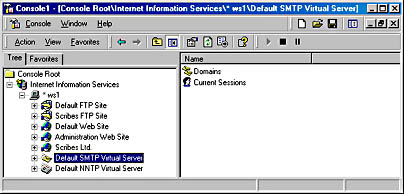
Figure 28-26. The Default SMTP Virtual Server shown in the IIS console window.
SMTP Directories
Important to the operation of an SMTP virtual server are a series of directories that are used for processing mail. For the Default SMTP Virtual Server, these directories are all located within the \inetpub\mailroot directory on the server. Some of the more important directories include the following:
- Drop If the SMTP Service receives incoming messages that are addressed to recipients belonging to SMTP domains managed by the SMTP virtual server, they are dropped here. Web applications can then be written to collect incoming mail delivered to this directory and process it accordingly.
- Pickup If the SMTP Service picks up outgoing messages, they are placed in the Pickup folder and delivered to their destination SMTP host once a connection is made with that host (or with an intermediate host that can relay mail).
- Queue If a message that a Web application places in the Pickup folder can't be delivered immediately (for example, if the remote SMTP host is temporarily down), it is moved to the Queue folder to await further attempts at delivery.
- Badmail If message delivery repeatedly fails, outgoing mail is classed as undeliverable, and if it can't be returned to sender, it winds up here.
Configuring the Default SMTP Virtual Server
To configure an SMTP virtual server, use the various tabs in its Properties window. For this example, we'll use the Default SMTP Virtual Server for simplicity. Configuring an SMTP virtual server is similar to configuring Web and FTP sites and NNTP virtual servers (all discussed previously).
The General Tab
The virtual server identity is configured on the General tab of the Properties window for the virtual server. IIS logging is implemented the same as for the other IIS core services. Note, however, that logging is disabled by default.
Identification An SMTP virtual server has a two-part identity similar to that of an NNTP virtual server. The two parameters that uniquely specify an SMTP virtual server are IP address and TCP port number (the default is 25). By clicking the Advanced button on this tab, you can assign multiple identities (IP address and TCP port number) to your server, but each identity must differ by at least one of these parameters. The usual procedure is to leave the TCP port set to 25 and use one IP address for the virtual server, with a mapping from this address to a fully qualified DNS name in a DNS server or Hosts file.
Connections Clicking the Connection button in the Connection section of the General tab opens the Connections dialog box (Figure 28-27). Here you configure connection limits separately for incoming and outgoing messages. You can either specify the number of connections allowed numerically or set them as unlimited by clearing the check boxes. You can set a timeout value also for outgoing connection attempts. You can also limit connections on a per-domain basis if multiple SMTP domains are configured for the virtual server. Note that you can specify the outgoing TCP port here, while you specify the incoming TCP port as part of the virtual server's identity settings (see previous section).
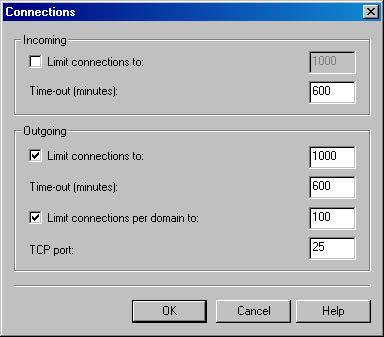
Figure 28-27. Configuring connection settings for the Default SMTP Virtual Server.
IIS Logging IIS logging is implemented the same as for the other IIS core services. Note, however, that logging is disabled by default.
The Access Tab
On the Access tab, you can choose the type of access and control you want.
Anonymous Access and Authentication Control The SMTP Service supports anonymous access, basic authentication, and Windows Security Package (Windows integrated security) for inbound connection attempts. Basic authentication security uses a user name and password, while Windows Security Package includes the Windows 2000 domain name as well. Clicking the Authentication button on the Access tab opens the Authentication dialog box where you configure these settings. Note that by default, an SMTP virtual server is configured to try to authenticate inbound connection attempts using all three authentication methods, if necessary.
The TLS (Transport Layer Security) option is essentially a variant of SSL encryption, and you can enable it here for inbound connection attempts. You must first obtain a server certificate from a certificate authority and install it on the SMTP virtual server before TLS can be properly enabled (see the next section). For more information on IIS authentication methods, see the earlier coverage of Web sites, FTP sites, and NNTP virtual servers, all in this chapter.
![]()
NOTE
The settings configured here specify how your SMTP virtual server authenticates remote SMTP hosts that are trying to connect to it to deliver mail, that is, for inbound connection attempts. To specify authentication methods for outbound connection attempts, select Outbound Security on the Delivery tab.
Secure Communications As expected, if you click the Certificate button, the Web Server Certificate Wizard (still a misnomer) starts, while you can click the Communication button to require that access take place on a secure channel, once the certificate has been installed on the virtual server. If you choose Require Select Channel, you must also enable TLS in the Authentication dialog box. Requesting, obtaining, and installing server certificates is discussed earlier in this chapter.
Connection Control IP address and domain name restrictions function in the same way for the SMTP Service as it does for the other three IIS core services.
Relay Restrictions Click the Relay button in the Relay Restrictions field on the Access tab to open the Relay Restrictions dialog box (Figure 28-28). This setting is important because allowing untrusted SMTP hosts to relay mail through your SMTP virtual server is an invitation for sending spam. You should generally deny relay privileges to all hosts and grant them to only known hosts that you trust or those that can properly authenticate with your server.
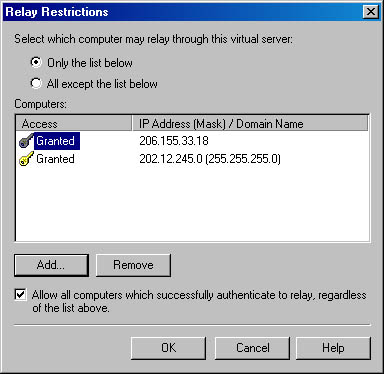
Figure 28-28. Configuring relay restrictions for the Default SMTP Virtual Server.
The Messages Tab
You can use the Messages tab to limit messages in three ways:
- Limit the maximum message and session sizes in kilobytes for this virtual server. (Session size refers to all the messages delivered by a single SMTP connection.)
- Limit the maximum number of outbound messages that can be sent in one connection. If more messages need to be sent, additional connections will be opened between the hosts.
- Limit the maximum number of recipients for a message.
In addition, you can change the directory where nondelivery reports (NDRs) are sent and also send copies of NDRs to an e-mail address that you specify.

TIP
Make sure the maximum session size is greater than the maximum message size. Don't choose a maximum session size that's too low, or a remote SMTP host might continually resubmit a message for delivery. On the other hand, if you regularly send a lot of messages to a few domains, set the maximum number of outbound messages per connection low enough so that the SMTP Service opens multiple connections to the remote host, resulting in faster and more efficient transfer of messages.
The Delivery Tab
The Delivery tab allows you to specify the following different settings related to mail delivery:
- Outbound Allows you to specify how your virtual server responds when it tries to connect to a remote SMTP host to deliver mail but can't connect. For outbound mail, you can specify a series of retry intervals, a delay notification value, and an expiration timeout value.
- Local For local delivery, you can specify only delay notification and expiration timeout values.
- Outbound Security Allows you to specify the authentication method (No Authentication, Basic Authentication, or Windows Security Package, any of which can run with or without TLS) when attempting an outbound connection with a remote SMTP host. If you specify either form of authenticated access, you need to specify credentials as well. Note that you can configure only one outbound authentication method for an SMTP virtual server, and anonymous access is selected by default because this is most commonly used on the Internet.
- Advanced Clicking this button opens the Advanced Delivery dialog box, on which you can configure:
- Maximum Hop Count Allows you to specify the maximum number of hops between SMTP hosts that is allowed before the message is determined to be nondeliverable. The value you specify here is included in the header fields of each message sent. Be sure to specify a value here to prevent messages from endlessly looping when they can't be delivered directly to the remote host.
- Masquerade Domain Allows you to specify the DNS domain name, which replaces the local domain name in the Mail From header field of each message sent. This feature is optional.
- Fully Qualified Domain Name Allows you to specify the full DNS name of the SMTP virtual server. The value displayed here is the one found on the Network Identification tab of the Control Panel's System Properties window, but you can change this if your server has multiple roles and DNS names.
- Smart Host Allows you to route all outgoing messages to a specific SMTP host instead of trying to connect to the host responsible for the recipient's DNS domain. You can enter either a fully qualified domain name or an IP address. (Place square brackets around the IP address if you use one.) This feature is optional.
- Attempt Direct Delivery Before Sending To Smart Host This option can be enabled only when a smart host has been specified. Its use is self-explanatory.
- Perform Reverse DNS Lookup On Incoming Messages Should be left disabled because it causes a significant hit on server performance.
The LDAP Routing Tab
If you want your SMTP virtual server to be able to access an LDAP-compliant directory service to obtain information like the addresses of senders and recipients, you can enable this feature and specify the name, schema type, binding type, account, password, and naming context for connecting to the directory server. If you enable LDAP Routing, the default entries in the fields allow the SMTP virtual server to connect to and use the Windows 2000 Active Directory. Supported directory services include
- Microsoft Exchange Server directory
- Microsoft Windows 2000 Active Directory
- Microsoft Site Server 3 Membership Directory
- Microsoft Commercial Internet System 2 LDAP service
- Custom directory service, such as an Internet service like Four11 or Bigfoot
The Security Tab
SMTP operators have limited administration privileges for the virtual server, similar to the way operators function in Web sites, FTP sites, and NNTP virtual servers.
SMTP Domains
Each SMTP virtual server that is created manages at least one SMTP domain. This domain is specified automatically as the default local domain, and you can view it by selecting the Domains node under the SMTP virtual server node in the console tree. This is the DNS domain that is being serviced by the virtual server, and any incoming messages addressed to recipients within this domain will either be dropped in the Drop folder or returned to sender with an NDR.
You can have only one default local domain on the virtual server, and this domain is stamped on the message headers of all outgoing messages. However, you can create additional alias domains so that your virtual server can manage more than one SMTP domain. Alias domains use the same settings as the default domain and deliver incoming messages to the same Drop folder.
You can also create remote domains and specify delivery requirements for each one differently, which is useful if some remote SMTP hosts that you need to connect to use TLS but others don't. Global TLS configuration isn't enough in this case. In addition, for remote domains you can specify a predefined delivery route and even use wildcards to include subdomains. Use remote domains for connecting to remote SMTP hosts to which you frequently need to send mail.
![]()
NOTE
Like the NNTP Service, an SMTP virtual server node has a Current Sessions node under it in the console tree that you can use to view current connections to the server and terminate any or all of those connections.
The New Domain Wizard
Use the New Domain Wizard to create either alias or remote domains. We'll only look at how to create alias domains here. (See the online documentation for information about creating remote domains.) To create an alias domain for the Default SMTP Virtual Server, follow these steps:
- Select the virtual server node in the console tree, click the Action button, point to New, and choose Domain from the drop-down menu. This starts the New SMTP Domain Wizard.
- Select the Alias domain type button, which will create an alias domain for the default local domain. Click Next.
- Specify the DNS name for the new alias domain, netsolvers.com. Click Finish.
- View the domains for the Default SMTP Virtual Server by selecting the Domains node in the console tree. Any incoming messages that are addressed to recipients in the netsolvers.com domain will be dropped in the Drop folder and stamped with the default domain name, scribes.com.
TIP
By opening the Properties window for the default local domain, you can change the location of the folder where mail is dropped from Mailroot\Drop to some other local folder on your server. Alias domains always use the same Drop folder as the default local domain, however.
EAN: 2147483647
Pages: 366