Managing WWW Sites
Let's now look in detail at the various site-level administrative tasks we can perform on IIS. We'll begin by looking at how to manage Web sites or virtual servers created using the WWW service. Then we'll consider FTP sites and SMTP and NNTP virtual servers in the following sections.
We've already briefly considered the Master Properties dialog box for the WWW service in Figure 28-4, and seen that there are 10 tabs that contain various settings we can configure. Nine of these ten tabs are also used at the site level for administering individual Web sites, and in this section we'll look at these various tabs and their settings in detail. For our choice of a Web site to configure in this section, we have selected the Default Web Site.
NOTE
A Server Extensions tab will also be present if FrontPage extensions are configured on the Web site, as discussed earlier in this chapter.
The Web Site Tab
The Web Site tab of the Properties window (Figure 28-8) allows you to specify Web site identities, to configure a limit for the maximum number of concurrent TCP connections with the server for HTTP sessions, to enable or disable HTTP Keep-Alives, and to enable IIS logging on your server. Let's examine how to assign identities to Web sites first.
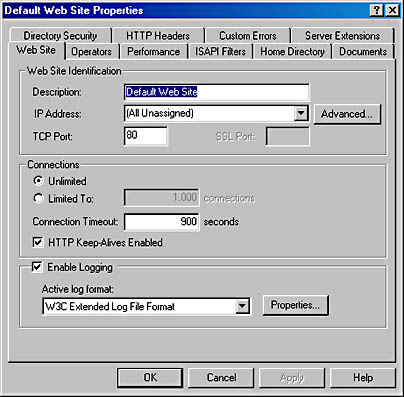
Figure 28-8. The Web Site tab for the Default Web Site.
Web Site Identification
Each Web site hosted on an IIS machine must have a unique identity so browser clients can connect to it to download its content. Web sites are defined using three different parameters: IP address, TCP port number, and host header name.
The identity for a Web site is specified on the Web Site tab of the Properties window for the particular Web site under consideration. For Web sites on the same machine to have unique identities, they must differ from each other in at least one of the three parameters just mentioned. Let's look at some different ways of specifying Web site identities by considering how to host several different Web sites on the same server.
Configuring Multiple IP Addresses on the Server's Network Card
You can configure multiple IP addresses on the server's network card or install multiple network cards, each with a different IP address. Select a different IP address for each Web site. Leave each site's TCP port set to 80 (the default TCP port for HTTP), and don't configure host header names. The advantage here is that clients can connect easily to each site by using the site's IP address in the URL they request (or by using a fully qualified DNS name if a unique host name has been configured on the DNS server for each of the IIS machine's IP addresses).The disadvantage is that if many sites must be hosted on the machine, then many IP addresses must be obtained and assigned to it. This isn't a problem on a private internetwork when using one of the private IP address blocks like 10.y.z.w, 172.16-31.z.w, or 192.168.z.w. On servers directly connected to the Internet, however, you must obtain a sufficient number of IP addresses from your ISP. Nevertheless, this method of specifying Web site identities is the preferred and commonly used one.
Configuring Only One IP Address for the Server's Network Card
Specify a different TCP port (above 1023) for each Web site hosted on the machine. The main disadvantage here is that clients must know the port number of the Web site to which they want to connect. For example, if the DNS name of the server is ws1.scribes.com and a Web site on the server is assigned port 8023, the client will have to use the URL http://ws1.scribes.com:8023 to access the site.Configuring One IP Address and Leaving the TCP Port Set to Default
Configure only one IP address for the server's network card and leave the TCP port set to the default value of 80 for each site. Configure a unique host header name for each site, using the Advanced button. Host header names are a feature of HTTP version 1.1 , which is supported by IIS 5. The host header name associated with each site is typically the fully qualified DNS name that is assigned to the site in the database of an available DNS server (or in the local Hosts file on the clients). ![]()
NOTE
When you open the Properties window for the Default Web Site and select the Web Site tab, the IP address is specified as (All Unassigned). This means that this Web site will respond to any IP addresses that aren t specifically assigned to other Web sites on the machine. That s actually what makes this site the Default one, and only one Web site on an IIS machine can have its IP address specified this way.
When the client requests a URL like http://sales.scribes.com, the client passes the host header name sales.scribes.com in the HTTP request headers that it sends to the server. (See Chapter 27 for more information on HTTP headers.) The server parses the host header name and identifies which Web site the client is requesting and returns the appropriate files. One disadvantage is that the client must also support host header names, that is, the ability to pass the DNS name of the site in its HTTP request headers. Host header names are supported by Microsoft Internet Explorer 3 or later and by Netscape Navigator 2 or later. Another disadvantage is that host header names don't work with SSL connections because the HTTP session is encrypted.
If you're working with older browsers that don't support host header names, you can implement a cookie-based mechanism to enable them to distinguish between Web sites having the same IP address and TCP port number. See the online documentation for more information on how to do this.

TIP
Unlike the previous version (IIS 4 for Windows NT), when you change the TCP port number for a Web site, you don't need to reboot your server for the change to take effect.
Connections
The Web Site tab also allows you to configure a limit for the maximum number of concurrent TCP connections with the server for HTTP sessions. You can also enable or disable HTTP Keep-Alives and specify a connection timeout value. HTTP Keep-Alives are a feature of HTTP 1.1 that enable a client to keep a TCP connection open with a server after downloading a file, in case other files need to be immediately downloaded from the server. If clients start complaining about the server being sluggish or that they're frequently receiving HTTP 500: Busy errors, try decreasing the connection timeout value so that unused TCP connections will time out more quickly.
![]()
NOTE
Connection timeouts specified on the Web Site tab are for active TCP sessions. TCP has its own settings for automatically terminating half-open TCP connections, such as those created during a Denial of Service (DoS) attack that tries to bring down a Web server by flooding its network connection with TCP SYN packets.
IIS Logging
The Web Site tab also allows you to enable IIS logging on your server. This feature is enabled by default and allows administrators to monitor access to the site by client browsers. Logging information can be saved in a variety of formats, including the following:
- NCSA Common Log File Format Creates a space-delimited ASCII file with a predetermined set of fields
- ODBC Logging Logs IIS traffic to any ODBC-compliant database using the specified data source name (DSN) for the database
- W3C Extended Log File Format (the default) Creates a space-delimited ASCII file with a group of fields that the administrator can specify
New IIS logs can be created on an hourly, daily, weekly, or monthly basis, or when the existing log file grows to a specified size. Logs are stored by default in the \%WinDir%\System32\LogFiles folder, but you can use the Properties button to modify this setting. Note that the older Microsoft IIS Log File Format (supported under IIS 4) is no longer available here.
TIP
Enabling IIS logging on the Web Site tab doesn't actually mean that visits to all parts of your site will be logged. In the Web site's dialog box, you can use the Home Directory tab's Log Visits check box to enable or disable the logging of accesses to content located in the site's home directory. On other tabs, you can similarly track visits to other directories or even individual files.
The Operators Tab
A Web site operator is a user account that can perform common administrative tasks that relate only to that site. Operators are like site administrators, as opposed to members of the Administrators group who can administer all aspects of all sites on a machine. Operators have the necessary rights to configure the following options and characteristics for the Web sites on which they are defined:
- Access permissions
- Logging
- Content expiration
- Content ratings
- Default documents
- Footers
However, operators cannot perform tasks that would modify the basic nature of the site itself, such as configuring the IP address, the TCP port number, bandwidth throttling, and application settings. Operators also can't create or delete virtual directories.
The Performance Tab
You can tune performance for individual Web sites using the Performance tab of the site's Properties window, as shown in Figure 28-9. On this tab you can configure the following settings:
- Expected number of hits per day The slider basically adjusts the settings for the IIS cache. For best performance, set the slider so that it is slightly higher than the actual number of hits per day you are receiving. If you set it too high, you're wasting system resources (memory).
- Bandwidth throttling You can use the Master Properties window for the server (at the server level) to globally limit the amount of network bandwidth that all IIS functions use for your machine. You can also specify a bandwidth limit for an individual Web site (at the site level). This restriction might be necessary, for example, if you're hosting multiple sites on your server and one of these sites is extremely popular. Limiting bandwidth for the popular site gives users better access to the remaining sites. Note that setting this value higher than the setting previously configured in the Master Properties window will override the Master Properties setting.
- Process throttling This option is useful when running ASP applications out-of-process on IIS, which is more CPU-intensive than running them in-process. Selecting this option will limit the CPU use for such applications in this site, but it doesn't actually produce any consequences unless Enforce Limits is also selected. (The consequences depend on the amount by which the limit is exceeded.) Leaving the Enforce Limits setting cleared only results in an event being written to the application log whenever the limit is exceeded.
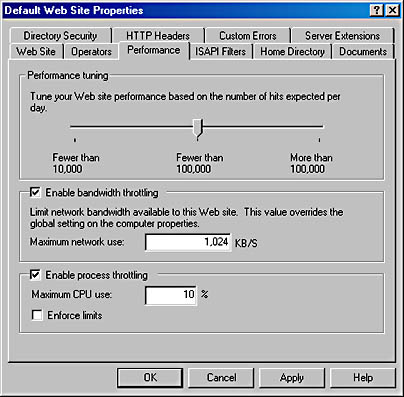
Figure 28-9. The Performance tab for the Default Web Site.
The ISAPI Filters Tab
Internet Server Application Programming Interface (ISAPI) filters are optional DLLs that perform specific actions when IIS processes an HTTP request from a client. You can use the ISAPI Filters tab to install a series of these filters and specify the order in which IIS processes them. Filters installed here at the site level are used only by the selected site; filters installed at the server level apply to all sites on the server.
ISAPI filters perform their action before the server actually responds to the HTTP request itself. For example, you could design an ISAPI filter to perform custom authentication, encrypt data, write traffic information to a custom log file, or perform some other action. Implementing ISAPI filters is beyond the scope of this book.
The Home Directory Tab
The Home Directory tab (Figure 28-10) allows you to specify the location of the content that is mapped to a Web site's home directory, to specify various access permissions and other settings for the directory, and to specify application settings relating to any Web application you have implemented in this directory.
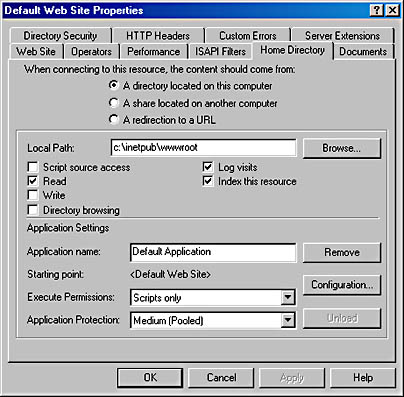
Figure 28-10. The Home Directory tab for the Default Web Site.
Home Directory
The home directory for a site determines the location of any content that is accessed using a URL such as http://Site_Name/File_Name, where Site_Name represents the NetBIOS name, IP address, or DNS name of the site, and File_Name represents the name of any particular HTML page, image file, script, or other file in the site's home directory. You can specify the home directory for a site in three different ways:
- As a directory located on a local drive of the machine.
- As a uniform naming convention (UNC) path to a network share located on a file server. (You need to specify credentials for connecting to the share.)
- As a redirection to a URL that instructs the client to connect to a different Web server (not even necessarily an IIS one) in order to access the content mapped to the home directory. This redirection can be either temporary or permanent.
![]()
REAL WORLD Redirecting Access
Being able to redirect the home directory (or any virtual directory) to a URL is useful when Web sites are being developed or are down for maintenance or upgrade. IIS gives you the option of redirecting a request for any file in the home directory to the same URL (such as a We're Down for Maintenance page) or to a similar file in the remote directory (for example, to redirect the client to a temporary mirror site). You can also redirect access to a subdirectory of the current home directory if your maintenance page or mirror content is located on the same server.Specify a permanent redirection only if you really plan to move the site's content to another server, as some browsers that receive an HTTP 301 Permanent Redirect message might actually modify a favorite or bookmark linked to the site automatically. The result is that when redirection is turned off, the client continues to access the alternate site instead of the original one.
Access Permissions
If you specify the location of the home directory as either a local directory or a network share, you have the option on the Home Directory tab of specifying various access permissions and other settings for the directory (Figure 28-10). These settings aren't available if you specify redirection to a URL for the home directory location. You can specify the following settings:
- Script Source Access Select this check box if you want users to be able to access the actual source code of scripts, such as ASP files. Note that this does nothing unless you also select either Read or Write. (Selecting Read then lets users read the source file for the script, while selecting Write allows them to modify the script.) This option is used primarily on development servers where content is created. It is disabled by default.
- Read Selecting this check box allows users to view the contents of a directory or file and its associated properties, such as creation time and file size. This setting is enabled by default.
- Write Selecting this check box allows users to modify the contents of a directory or file. Only browsers that support the PUT feature of HTTP 1.1—such as Internet Explorer version 4 or later—can write files to the server. This setting is disabled by default.
- Directory Browsing Selecting this check box allows users to view the contents of the home directory when no default home page is present in the directory. This setting should generally be disabled (and is by default) in order to hide the directory structure of your content directories from accidental viewing by users who might use this to snoop in places you don't want them to go.
- Log Visits Selecting this check box causes an entry to be added to the IIS log files whenever any file in the home directory is accessed by a client. Note that Enable Logging must first be selected on the Web Site tab before this feature will work. Logging of the home directory is enabled by default.
- Index This Resource Select this check box if you want the Indexing Service to add the contents of the home directory to its master index. By default, Indexing Service is installed when you install Windows 2000 Server.
![]()
NOTE
Although Read access is enabled by default on the Default Web Site, whether you can access a particular Web site and its contents depends on a number of conditions. See the section Understanding IIS 5 Security in Chapter 27 for more information on securing access to IIS Web sites.
Application Settings
If you have selected a local directory or network share for your home directory, you also have the option on the Home Directory tab to specify application settings relating to any Web application you have implemented in this directory. An example of a Web application might be a collection of ASPs working together to provide some programmatic functionality to the user who visits the site. Developing Web applications is not the subject of this book, but the settings that can be configured here include these:
- Application Name Use this field to give your application a unique friendly name.
- Starting Point Applications can consist of a tree of directories and their contents. The top of this tree is the application starting point.
- Configuration This button opens the Application Configuration dialog box, which allows you to configure numerous options for mapping applications to their interpreting script engines or programs, caching ISAPI applications for faster performance, specifying session timeout values, choosing a default ASP script language, and debugging settings.
- Execute Permissions This option allows you to specify which types of applications are allowed to run in the home directory. Choices include None, Scripts Only, or Scripts And Executables.
- Application Protection This option allows you to specify whether your application should run within the core IIS process (low protection), in a separate application thread pool together with other applications (medium protection), or in its own isolated thread pool as a separate process (high protection). The idea here is to protect other applications running on the server in case this one crashes. Selecting high protection means that the failure of your application won't affect any other applications running on the server, and you can restart your application without having to reboot the server. The more applications that run at medium or high protection levels, however, the greater the demand on the server's processing power.

CAUTION
If you specify Write access for the directory along with Scripts And Executables, your security might be threatened: an untrusted user might be allowed to upload a hostile executable program file to the server and cause damage.
The Documents Tab
The Documents tab of the Properties window for a Web site allows you to specify possible filenames for default documents for the home directory, and specify the order in which a browser attempts to access them. The three types specified by default are (in order) Default.htm, Default.asp, and Iisstart.asp.
For example, if a browser tries to connect to the Default Web Site on the server ws1.scribes.com by using the URL http://ws1.scribes.com, the server will first check to see whether a file named Default.htm resides in the home directory. If such a file is there, it will be returned to the client. If not, the server will check for a file named Default.asp. The process continues until either a file is returned or the list of default documents is exhausted. You can specify additional default document names, like Index.htm, or delete existing ones if you like. You can also disable default documents entirely, in which case, clients must know and type in the actual name of the file they want to access on the server, for example, by using the URL http://ws1.scribes.com/default.htm.
This tab also lets you specify the name of a footer file (written in HTML) that is appended to the bottom of every file retrieved from the site by a client. You could use this, for example, to add a copyright statement or disclaimer to the bottom of each page. If you're using FrontPage to develop your content, you can create complex footers that display information like the date when the file was last modified, a hit counter, and so on.
The Directory Security Tab
The Directory Security tab allows you to specify whether anonymous users are allowed to access content in your site, to restrict access to a Web site, and to enable secure HTTP communication. Let's take a look.
Anonymous Access and Authentication Control
To specify whether anonymous users are allowed to access content in your site or whether some form of authentication will be required, open the Authentication Methods dialog box, shown in Figure 28-11, by clicking the Edit button within the Anonymous Access And Authentication Control field on the Directory Security tab. Use the dialog box to configure these settings:
- Anonymous Access This option specifies whether anonymous access is allowed and which Windows 2000 user account is used to provide this kind of access. The default anonymous user account, created during installation of IIS on the server, is named IUSR_servername, where servername is the NetBIOS name of the server. Anonymous access means users can access content in the site using their Web browsers without needing to have their credentials authenticated in any way, and it's the typical authentication method used for public Web sites on the Internet. The other forms of authentication discussed next authenticate the user's credentials in some fashion and are used primarily for intranets, extranets, and secure Internet sites.
- Basic Authentication This option specifies whether basic authentication is allowed. If used, the client will be presented with a dialog box requesting credentials and those credentials are then passed over the network connection in unencrypted form. Basic authentication is defined in the original HTTP 1 specification and is supported by virtually all types of Web browsers, including the oldest ones. If users accessing your site are using older browsers that can't be authenticated using other forms of authenticated access, you might need to enable basic authentication on your site, but be aware that it is intrinsically nonsecure.
- Digest Authentication This new authentication method is defined in the HTTP 1.1 specification. It's supported by IIS 5 and can work across firewalls and proxy servers. A hash or message digest is passed across the connection instead of the user's actual credentials. The information is transmitted in clear text but is hashed, so it's essentially undecodable and secure. The domain controller for which the authentication request is made requires a plain-text copy of the user's password, however, so special precautions must be taken to secure the domain controller.
- Integrated Windows Authentication This is a new name for the option that was formerly called Windows NT Challenge/Response Authentication (and before that, NTLM—or NT LAN Manager—Authentication). A cryptographic exchange is used to securely authenticate the user without actually passing credentials across the connection. The user isn't prompted for credentials; instead, his or her currently logged on credentials are used. Integrated Windows authentication can also use Kerberos authentication if the server has Active Directory installed on it and if the client browser supports it.
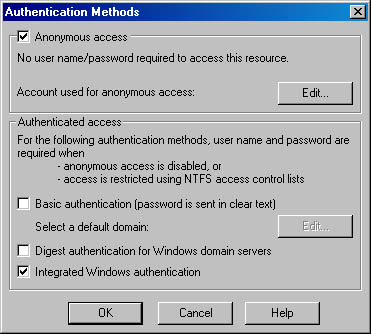
Figure 28-11. The Authentication Methods dialog box.
TIP
Integrated Windows authentication is designed to be used primarily on intranets and other internal networks because it won't work through an HTTP proxy connection.
![]()
REAL WORLD Combining Different Authentication Methods
Consider the consequences of selecting more than one method in the Authentication Methods dialog box. If you select Anonymous Access together with some form of authenticated access like Basic Authentication, anonymous access is attempted first. If this fails, authenticated access is tried. Anonymous access could fail if the NTFS permissions on the resource explicitly deny access to the anonymous user account, for example.If you select two or more forms of authenticated access, the most secure forms are attempted first. For example, integrated Windows authentication would be tried before attempting basic authentication. For information on how authentication fits into the general scheme of IIS security, see Chapter 27.
IP Address and DNS Restrictions
The Directory Security tab also allows you to restrict access to a Web site by giving clients a particular IP address or DNS domain name. Figure 28-12 shows the IP Address And Domain Name Restrictions dialog box that you can access from this tab.
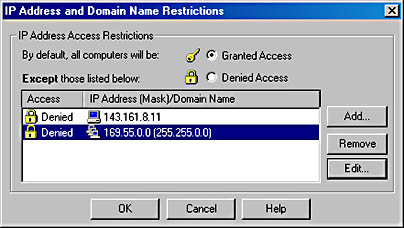
Figure 28-12. The IP Address And Domain Name Restrictions dialog box.
Use this dialog box either to allow all clients access to the site except for those whose IP addresses or domain names are as specified here, or to deny all clients access to the site except for those whose IP addresses or domain names are specified here. You can place restrictions on clients in three ways:
- Specify the IP address of a particular client.
- Specify a network ID and subnet mask representing a range of IP addresses.
- Specify the DNS name of a particular domain.
Note that selecting the last option can significantly affect server performance because reverse DNS lookups must be performed on all clients prior to granting them access. For information on how IP address and domain name restrictions fit into the general scheme of IIS security, see Chapter 27.
Secure Communications
The Directory Security tab also allows you to enable secure HTTP communications by implementing the SSL version 3 protocol, which you can use to encrypt Web traffic between client and server. SSL is essential if you plan to use your server for running Web applications that involve financial transactions or hosting sensitive information. Web browsers access a secure server using SSL by using URLs that are prefixed by https:// instead of the usual http:// prefix.
SSL is based on public-key cryptography, in which digital certificates are used to establish the identity and trustworthiness of servers (and of clients), while a public/private-key pair is used for encrypting and decrypting transmissions to ensure that the information being transmitted is secure and has integrity (in other words, that it's from who it says it's from). Public-key cryptography and its associated concepts are covered in Chapter 17.
Before attempting to implement secure communications, you must establish access to a certificate authority (CA) that can grant the IIS server the necessary server certificate and public/private-key pair. For this purpose, you have a choice:
- Use a trusted public CA like VeriSign, Inc. to obtain the certificate and key pair. This solution is good if you want to enable secure communications for a public Internet site you are hosting on your server.
- Install Certificate Services on one or more Windows 2000 Servers in your enterprise and be your own CA. This solution is best if you want to enable secure communications to a private intranet site you are hosting on your server. See Chapter 19 for information on how to install and configure Certificate Services.
To enable SSL, you first need to generate a certificate request file and submit this to a CA in order to receive a server certificate from the CA. The server certificate contains the associated public key and is used for verifying the identity of the server and establishing secure connections.
To obtain a server certificate, follow the steps outlined below. For our example, the server certificate is being requested for the Default Web Site on server ws1.scribes.com, while the server running Certificate Services is the domain controller dc1.scribes.com. The name of the CA for our scribes.com enterprise is Scribes.
- Click the Server Certificate button on the Directory Security tab of the Default Web Site Properties window. This starts the Web Server Certificate Wizard (Figure 28-13). Click Next.
- Select Create A New Certificate. Click Next.
- Select Prepare The Request Now But Send It Later if you plan to submit a security request file to a public CA. (Later, you'll need to install or bind the certificate you receive from the CA to your server.) Or select Send The Request Immediately To An Online Certification Authority if you want to request, obtain, and bind the certificate in one shot by submitting your request directly to a Certificate Server in your enterprise. (We'll follow the second option here.) Click Next.
- Specify a friendly name for the certificate (the name Default Web Site is suggested here by default) and a bit length to indicate the strength of the encryption key (512 or 1024 bits). Click Next.
- Specify organization and organizational unit names for your certificate. Click Next.
- Specify a common name for your site. Use the fully qualified DNS name for the site if your site is a public one on the Internet. In this example, we'll use ws1.scribes.com as the common name for the Default Web Site. Click Next.
- Specify the city, state, and country. Use official names and not abbreviations (except for two-letter country codes). Click Next.
- Select the CA you want to submit your request to (the server in your enterprise running Certificate Services). Click Next.
- Confirm your information, and click Next.
- A certificate request file is generated and submitted to the server running Certificate Services, which will return the requested server certificate and public/private-key pair. The wizard will automatically install the certificate on the server at this point and prompt you to click Finish when it's done.
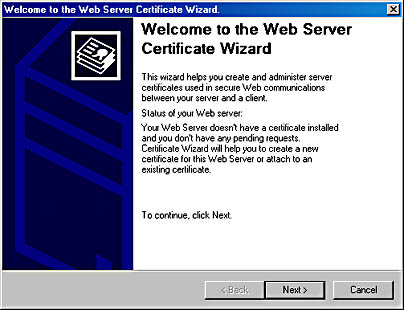
Figure 28-13. The Web Server Certificate Wizard.
Once a server certificate is installed on your Web site, you can view the certificate information by clicking the View Certificate button on the Directory Security tab. Figure 28-14 shows a certificate installed on the server ws1.scribes.com, which was obtained from server dc1.scribes.com, the Windows 2000 Server running Certificate Services.
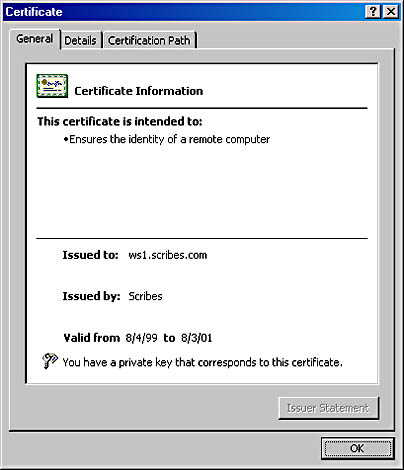
Figure 28-14. Server certificate for ws1.scribes.com issued by the certificate authority known as Scribes.
Now finish enabling SSL for the Default Web Site on ws1.scribes.com:
- Switch to the Web Site tab of the Default Web Site Properties window and verify that the SSL port is specified as 443, the default SSL port. (You can use the Advanced button to configure other SSL identities for the site if you want.)
- Switch back to the Directory Security tab and click the Edit button in the Secure Communications section of the tab. The Secure Communications dialog box opens (Figure 28-15).
- Select the check box Require Secure Channel (SSL) and click OK to finish configuring SSL for the Default Web Site. (The other options in this dialog box are discussed in the sidebar "Secure Communications Options.") Click OK again to apply the changes to your site and effect the settings.
- Now test secure communications by opening the URL http://ws1.scribes.com using Internet Explorer. Select the Default Web Site node in the console tree of IIS, click the Action button, and select Browse from the drop-down menu.
- Internet Explorer starts and tries to access the default home page of http://ws1.scribes.com. The result should be a message displayed that says "This page must be viewed over a secure channel." Choose Open from the File menu and enter the revised URL https://ws1.scribes.com.
- A dialog box might appear indicating that you are about to view pages over a secure connection; if it does, click OK. The home page Default.htm should display.
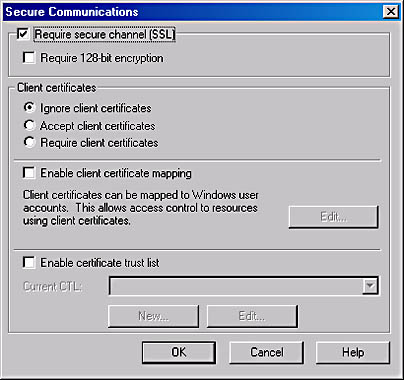
Figure 28-15. Enabling SSL using the Secure Communications dialog box.
![]()
REAL WORLD Secure Communications Options
Besides enabling SSL using the server certificate installed on the IIS system, you can also use the Secure Communications dialog box in Figure 28-15 for the following purposes:
- To specify that SSL connections will use strong 128-bit encryption. (This is available only in the United States and Canada under current U.S. encryption laws.)
- To specify how to handle client certificates. Client certificates verify the identity of clients and are typically used when remote users need to securely access a corporate intranet over an nonsecure Internet connection. You can specify either to ignore, accept, or require client certificates during SSL communications.
- To enable client certificate mapping. This feature enables administrators to create mappings between Windows 2000 user accounts and client certificates so that users who have the appropriate client certificate can automatically be authenticated and logged on to the network.
- To enable a certificate trust list (CTL). A CTL is a list of approved CAs for the Web site that are considered trusted by the Web site. CTLs are created using the CTL Wizard by selecting the New button at the bottom of the Secure Communications dialog box.
The HTTP Headers Tab
You can use the HTTP Headers tab of the Properties window for a Web site to enable content expiration on the site, to specify custom HTTP headers that are returned by the server to requesting HTTP clients, to enable and specify Recreational Software Advisory Council (RSAC) content ratings on the server, and to specify additional MIME mappings for a particular Web site.
Content Expiration
When you enable content expiration on the site, the result is that when a client browser requests a file from the site, the HTTP headers returned by the server include information regarding the expiration date of the site's contents. The client can then decide whether it needs to download a newer version of the file or use an existing copy in the client browser cache.
TIP
If your site contains information that changes frequently (like sports scores), you can force clients to always retrieve fresh copies of files from the server (and never use cached versions of these files) by selecting the Expire Immediately option.
Custom HTTP Headers
This rather esoteric feature allows you to specify custom HTTP headers that are returned by the server to requesting HTTP clients. You might use this option in certain situations involving firewalls or proxy servers to enable or disable specific features during HTTP sessions.
Content Rating
This option is used to enable and specify RSAC content ratings on the server. These settings rate the site's violence, sex, nudity, and language content and are typically enabled on sites hosting content unsuitable for viewing by minors.
![]()
MORE INFO
For more information about the RSAC, see http://www.rsac.org.
MIME Map
The global MIME mappings for an IIS server were discussed in the previous section on server-level administration. For site-level administration, you can specify additional MIME mappings for a particular Web site.
The Custom Errors Tab
The Custom Errors tab allows you to specify how your server will generate HTTP error messages when users attempt to access the selected Web site (Figure 28-16).
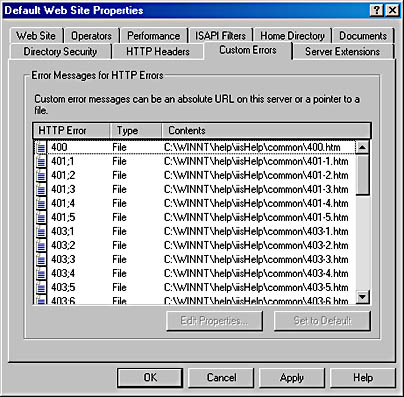
Figure 28-16. Specifying custom HTTP error messages.
The HTTP specification defines that the first header line returned by a Web server in response to a request by a client will contain a number and associated message indicating the status of the request. These three-digit numbers are called HTTP status codes, and they fall within various ranges:
- 200 through 299 A successful HTTP transaction has occurred. (The most common status code is 200 OK.)
- 300 through 399 Redirection has occurred to another URL.
- 400 through 499 An error has occurred. Examples include the following:
- 400 Bad Request The server couldn't understand the syntax of the request.
- 401 Unauthorized The user's credentials won't allow him or her to log on to the server.
- 403 Forbidden Access is denied for some reason other than user credentials, such as the client having a restricted IP address or needing to use SSL to access the server.
- 404 File Not Found The file you're trying to access doesn't exist (or is misplaced or misnamed) on the server.
- 500 through 599 A server error has occurred or the requested feature isn't implemented.
Instead of returning bare HTTP status codes and their brief messages for the error codes (400 through 499), however, IIS is configured by default to use predefined HTML pages that contain somewhat more information than the status codes and messages. These "error files" are located in the \%WinDir%\help\iishelp\common folder on the server, and you can modify them if you want.
Alternatively, by selecting one of these error files on the Custom Errors tab and clicking Edit Properties, you can specify that the Default HTTP status codes and messages will be returned by the server when that error occurs, or that any specified file located in either a local folder or a network share will be returned when that error occurs. Companies commonly use this feature to create error pages that contain elements like the company logo, the e-mail address of customer support, or even a search tool for finding the page the client is trying to access.
![]()
NOTE
IIS uses more detailed error messages than are included in the original HTTP specification. For example, the HTTP error code 401 which in HTTP simply means unauthorized is represented in IIS by a group of codes spanning from 401.1 through 401.5, representing various reasons why a server might deny a user s credentials.
EAN: 2147483647
Pages: 366