Server-Level Administration
Server-level administration involves the following tasks:
- Connecting to a machine running IIS to administer that machine
- Backing up and restoring the configuration of the machine
- Enabling global bandwidth throttling for all Web and FTP sites on the machine
- Configuring various master properties that apply globally to all Web and FTP sites created on the machine.
- Compressing files by using HTTP compression
- Configuring the global Multipurpose Internet Mail Extensions (MIME) map
- Setting server extensions (if you have Microsoft FrontPage 2000 server extensions installed)
Let's begin with the general administration tasks and global settings that you can configure for IIS running on a Windows 2000 Server machine. You can perform some common server-level administration tasks using the IIS) console introduced in Chapter 27.
Connecting to an IIS Server
You can administer multiple Windows 2000 Servers running IIS from a single IIS console window. To administer a server, you need to connect to it first. To do so, follow these steps:
- Select the root node (called Internet Information Services) in the IIS console tree .
- Click the Action button on the toolbar and choose Connect from the drop-down menu, or right-click the root node and choose Connect from the shortcut menu. (Remember that in a console window, the drop-down Action menu provides the same options as the shortcut menu that displays when you right-click any selected node.)
- In the Connect To Computer dialog box, type the name for the IIS machine to which you want to connect in the text box, and click OK. You can specify the name of the machine as any of the following:
- NetBIOS name (for instance, ws1)
- IP address (for instance, 172.16.11.210)
- Fully qualified DNS name (for instance, ws1.scribes.com)
- To disconnect from a server, select the node in the console tree that represents the server, click the Action button, and choose Disconnect.
Creating Configuration Backups
You can save the configuration setting for an IIS machine and all of its Web and FTP sites to a configuration backup file. Each backup file is stamped with a version number and its time and date of creation. You can create any number of backup files and restore these files if you want to restore your previous settings. This feature is quite useful—it allows you to take a snapshot of your IIS configuration before you start modifying permissions and other settings for the virtual servers, directories, and files on your machine.
![]()
NOTE
Configuration backup files restore only the IIS settings on your machine's Web and FTP sites and their virtual and physical directories and files. They don't back up the actual content files themselves, that is, the HTML, image, and scripts within a Web site. Use the Windows 2000 Backup Wizard and the Recovery Wizard to back up the content files for your sites.
Backing Up a Server Configuration
To back up the configuration of your IIS machine, follow these steps:
- Select the node in the console tree that represents your server.
- Click the Action button and choose Backup/Restore Configuration from the drop-down menu.
- As Figure 28-2 shows, the Configuration Backup/Restore dialog box that appears displays the various backup files you have created, their version numbers, and time/date of creation. Version numbers start with zero and increase sequentially.
- To create a new backup file, click the Create Backup button and give the file a friendly name. The backup file will be saved in the System32\inetsrv\MetaBack directory. The information is stored in binary format and is specific to the machine on which it has been created. If you reinstall Windows 2000 on the machine, you'll be unable to use previously created backup files to recreate your IIS configuration.
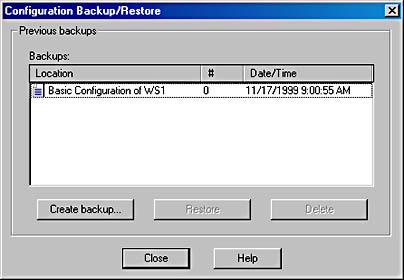
Figure 28-2. The Configuration Backup/Restore dialog box.
Restoring a Server Configuration
To restore the configuration of your server to a previous version, open the Configuration Backup/Restore dialog box, select the backup file you want to restore to, and click Restore. Note that IIS must stop its services in order to perform a restore, so a restore takes longer than a backup.

TIP
You can export the contents of the right-hand pane of the console window by selecting a particular node in the left-hand pane, clicking the Action button, and choosing Export List. You can save the information as an ASCII or Unicode text file in either tab-delimited format or comma-delimited format. This is a great way to document home directories for the various virtual directories you create within a Web site.
Configuring Server Properties
By far, the most time-consuming part of server-level IIS administration is configuring settings that are global to all virtual servers created on your machine. To access these settings, select a particular server node in the console tree, click the Action button, and choose Properties from the drop-down menu (Or you can select the particular server node and click the Properties button on the toolbar.) The Properties window for the specified server opens (ws1, in the example in Figure 28-3). The server name that's displayed for that server in the console tree can be either the NetBIOS name, the IP address, or the DNS name of the server. In this window you'll configure master properties, enable bandwidth throttling, configure MIME types, and possibly even configure FrontPage server extensions.
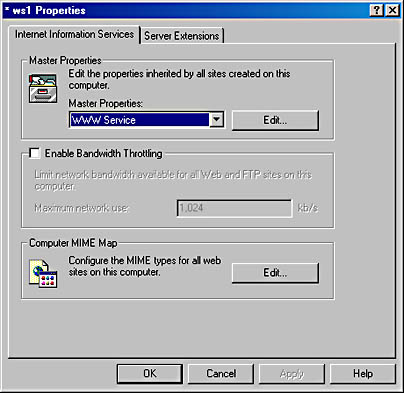
Figure 28-3. The Properties window for the IIS server named ws1.
Master Properties
In the Properties window, the Master Properties section allows you to open the master properties for either the WWW or FTP service running on your machine. For example, selecting WWW Service and clicking Edit opens the WWW Service Master Properties window for the server (Figure 28-4). You use the 10 tabs in this Properties window to configure the global default settings for existing Web sites that all the new Web sites you create will inherit. Note that some of the settings at this level are unavailable, as they can't be applied to all Web sites in general but only to specific Web sites in particular. For example, the IP Address setting on the Web Site tab can't be globally configured because it is specific to each Web site.
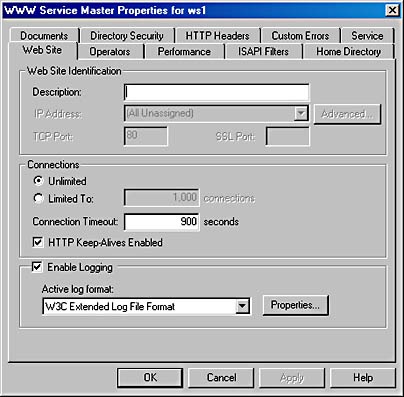
Figure 28-4. The WWW Service Master Properties window for the IIS server named ws1.
Most of these tabs are covered later in this chapter in the "Site-Level Administration" section because they're identical, and all settings can be configured at that level. The Service tab is the only tab we'll look at here because it's unique to server-level administration. This tab allows you to specify a single Web site on your IIS 5 machine that can be managed using the earlier version of Internet Services Manager (ISM) that is included in Windows NT. It also allows you to configure HTTP compression, which is explained in the next section.
![]()
NOTE
The settings you configure on the various IIS tabs are stored in a special hierarchical database structure called the metabase. The metabase allows more granularity in storing information than the registry, although some information is still stored in the registry for initiating IIS, for managing global functions like caching, threads, and concurrency, and for backward compatibility with previous versions of IIS (if you upgraded your machine from Windows NT to Windows 2000, for example). The metabase is stored as the file Metabase.bin in the System32\Inetsrv folder.
HTTP Compression
The Master Properties window let's you take advantage of HTTP compression, a new feature that allows IIS version 5 to compress files before sending them to clients (Web browsers) that request them. HTTP compression works only if the client supports this feature, and it can speed transfer of information between servers and clients considerably during an HTTP session. HTTP compression works with both static Web content, where it caches information that has been requested and compressed for future use, and also for dynamic content by performing compression on demand. HTTP compression adds extra processing overhead to the server (especially for dynamic files) and should be monitored accordingly.
HTTP compression is enabled or disabled at the server level, meaning that it can be globally turned on or off, only, for all Web sites on the server. To enable HTTP compression, follow these steps:
- Open the Master Properties window for the particular server on which you want to enable this feature, select WWW Service, and click Edit.
- Click the Service tab on the WWW Service Master Properties window for your server.
- Specify whether you want to compress static files, application files, or both types of files.
- For static files, specify the path to a temporary folder on a local drive where compressed files will be cached. This folder should be on an NTFS partition and shouldn't be shared.
- For static files, specify the maximum amount of content that can be cached in the temporary folder, or select Unlimited. (You'd better have a lot of disk space in that case!)
Bandwidth Throttling
Referring back to Figure 28-3, another server-level setting that you can configure is bandwidth throttling. By specifying a value in Kbps, you can limit the amount of network bandwidth used by all aspects of IIS on your particular machine. This ability is useful primarily if your machine takes on several roles in your network, such as a Web server, file and print server, application server, or domain controller. When you learn about site-level administration later in this chapter, you'll see that you can also apply bandwidth throttling to particular sites (virtual servers) hosted on the server (machine or physical server). Note that bandwidth throttling applies only to static content, not to dynamically generated content.
MIME Map
In the Properties window for the server Figure 28-3 refers to you can also configure the MIME mappings for that server. These mappings are used in HTTP headers sent by your IIS server to client browsers and indicate to the client which file types are registered and their associated MIME content types. For example, the file extension .HTM is mapped to the content type text/html.
You can create, modify, or remove these mappings, but it's seldom necessary. You can also configure MIME mappings at the site level, directory level, and file level, but you should normally configure them at the server level because changes you make at other levels will be overwritten if the server-level mappings are modified.
Server Extensions
By default, the installation of Windows 2000 Server will also install the IIS FrontPage server extensions on your machine. Therefore, the Properties window shown in Figure 28-3 will also include the Server Extensions tab, new to IIS 5 (Figure 28-5).
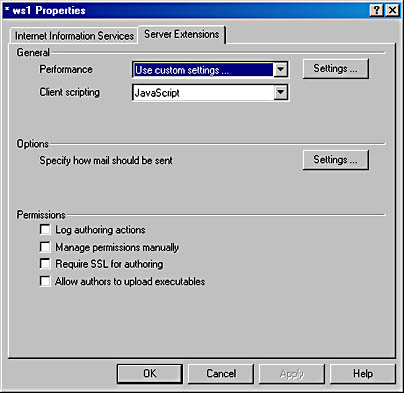
Figure 28-5. The Server Extensions tab for the IIS server named ws1.
You can use this tab to perform the following tasks:
- Configure cache settings to match the size of your FrontPage Web site in order to optimize performance
- Specify the client scripting language (VBScript or JavaScript) that will be used to generate client-side script by those FrontPage extensions that do this
- Configure SMTP e-mail settings for FrontPage extensions that are used as form handlers
- Enable logging of author actions in the Author.log file located in the _vti_log folder of the root FrontPage Web site
- Specify how FrontPage security settings are managed for the machine
- Require a Secure Sockets Layer (SSL) connection for FrontPage clients that are authoring content
- Allow FrontPage authors to upload executables like CGI scripts and Active Server Pages (ASP) content to the server
- Set various other features, depending on what additional software is installed on the server (such as Microsoft Office 2000)
A full discussion of integration between FrontPage 2000 and IIS 5 is more complex than we can cover in this book, but we must mention two more points here. First, a Server Extensions tab will also appear at the site level. The settings at the server level are similar to those shown in Figure 28-5, although several new options appear, including the ability to enable or disable authoring on the particular FrontPage Web site or subweb, and specifying how version control will be maintained for authoring. Second, the FrontPage Administrator tool of earlier FrontPage versions is now integrated as an MMC snap-in named FrontPage Server Extensions, and is also accessible through the shortcut called Server Extensions Administrator in the Administrative Tools folder.
EAN: 2147483647
Pages: 366