The WWW Publishing Service
Now let's take a look at some basic concepts and tasks associated with the WWW Publishing Service. We'll begin by examining the Default Web Site that is included as an example when you install Windows 2000 Server on a machine. Then we'll look at common tasks such as creating new Web sites and virtual directories and using Web sharing.
![]()
NOTE
Whether IIS was installed on your Windows 2000 Server during setup depends on how the installation was done. For example, if you upgraded a Windows NT 4 server that had a previous version of IIS installed on it, then Setup automatically upgrades these services to IIS 5. Otherwise, a default installation of Windows 2000 Server installs IIS and creates the Default Web Site, Default FTP Site, Administration Web Site, and Default SMTP Virtual Server, but not the Default NNTP Virtual Server.
The Default Web Site
In Figure 27-1 you saw an administrator's view of the Default Web Site—a series of sample configuration files whose default location on the server's local file system is C:\Inetpub\wwwroot, the root WWW publishing directory. The \Inetpub directory actually contains several important subdirectories, which are summarized in Table 27-1.
Note that some of these subdirectories will be present only if their related Windows 2000 optional components are installed on the server. Note also that you don't necessarily need to store Web site content in any of these directories—content can be located in any directory on the server, or on a network share located on some other server, as you'll soon see.
Table 27-1. IIS-related subdirectories located within the default C:\Inetpub directory
| Subdirectory | Description |
|---|---|
| AdminScripts | Sample IIS administration scripts for the Windows Scripting Host. |
| ftproot | Root directory of Default FTP Site. |
| iissamples | Miscellaneous sample material. |
| Remote administrator for the SMTP Service, using a Web browser. | |
| mailroot | Various folders used by the SMTP Service. |
| News | Remote administrator for the NNTP Service, using a Web browser. |
| nntpfile | Various folders used by the NNTP Service. |
| scripts | Default location for application scripts used by the Default Web Site. Includes samples and tools. |
| wwwroot | Root directory of the Default Web Site. |
Connecting to a Web Site
On the server, you can access the home page of the Default Web Site (Figure 27-2) in various ways by using a Web browser. Try out these methods:
- From the local console, click Start, point to Run, enter http://127.0.0.1, and click OK. This will open Internet Explorer and access the home page by using the TCP/IP loopback address.
- From the local console, start Internet Explorer, enter localhost in the Address bar, and press Enter.
- From the Internet Information Services console, select the Default Web Site node and either
- Right-click and choose Browse from the shortcut menu, or
- Click the Action button on the toolbar and select Browse from the drop-down menu.
When you attempt access from a remote machine on the connected network, you will see an "under construction" message, but that message actually tells you that the site is active and accessible. To connect, start Internet Explorer, press Ctrl+O to open the Open dialog box, enter any of the following, and then click OK:
- The IP address of the Web server (for example, 172.16.11.202)
- The NetBIOS name of the Web server (for example, ws1)
- The DNS name of the Web server (for example, ws1.scribes.com), provided either a name server is accessible or the Hosts file is configured on the client
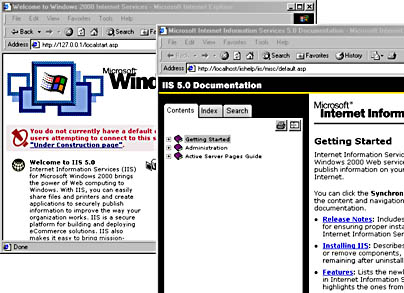
Figure 27-2. The home page of the Default Web Site.
Other Web Sites
The Default Web Site is only one small example of how you can use the IIS 5 WWW Publishing Service. In fact, you can create as many different Web sites as you want using IIS 5, and you can host the content (pages, images, and other files) for these sites in a variety of locations. Each Web site acts as a separate entity, or virtual server; that is, it acts as if it were running on its own Windows 2000 Server and using the full resources available to it on that server. To illustrate this, let's create a new Web site on the server ws1, create a simple home page for it, and then test it by connecting to it from another machine on the network.
Using the Web Site Creation Wizard
Before using the Web Site Creation Wizard to create a new Web site, you must decide how to name this site on the network. As you saw previously, when you use a Web browser like Internet Explorer to connect to a Web site and view its home page, you can specify the URL of the site in a variety of ways, including using the site's IP address, NetBIOS name, or fully qualified DNS name.
For this example, you'll bind a second IP address to the network interface card (NIC) on the Windows 2000 Server ws1 and establish a mapping between the new Web site you'll create and the new IP address you'll add. (Other ways to distinguish different Web sites on the same server are discussed in the section "Web Site Identification" in Chapter 28.) To add a second IP address, follow these steps:
- Right-click the My Network Places icon on the desktop and choose Properties from the shortcut menu (or start the Network and Dial-Up Connections utility in Control Panel).
- In the Network And Dial-Up Connections window, right-click the Local Area Connection icon and choose Properties from the shortcut menu (or double-click the icon and click the Properties button).
- In the Local Area Connection Properties window, double-click Internet Protocol (TCP/IP).
- In the Internet Protocol (TCP/IP) Properties window, click the Advanced button.
- In the IP Addresses box in the Advanced TCP/IP Settings dialog box (Figure 27-3), click Add, specify an additional IP address and subnet mask, and click Add.
- Click OK until all dialog boxes have been closed.

Figure 27-3. Adding additional IP addresses for Web site identities.
Two more steps are required prior to creating the site. First, establish a new directory, C:\scribesweb, on the local server, which will store the content for the new site. Then create a simple home page called Default.htm within this site, using basic HTML. If you aren't familiar with HTML, enter the following text into NotePad and save the file in the \scribesweb directory as Default.htm, ensuring that your editor does not add a.TXT extension:
<HTML> <HEAD><TITLE>Scribes Ltd.</TITLE></HEAD> <BODY> <H1>Welcome to Scribes Ltd.</H1> <HR> This site is under construction! </BODY> </HTML> |
Now create a new Web site called Scribes Ltd. (named after the domain name Scribes.com) by following these steps:
- Start the Internet Information Services console on server ws1 (or start it on a different server or workstation and connect to computer ws1 by clicking the Action button on the toolbar and selecting Connect from the drop-down menu) and select the server's name in the console tree.
- Click the Action button on the toolbar, point to New, and choose Web Site from the drop-down menu (or right-click the ws1 node in the console, point to New, and choose Web Site from the shortcut menu). The first screen of the Web Site Creation Wizard appears (Figure 27-4). Click Next.
- Type Scribes Ltd. as the description for the site. This name is displayed in the Internet Information Services console window and identifies the new site for the administrator. Click Next.
- Specify your second IP address as the one to be mapped to the site, leaving the remaining settings as they are (Figure 27-5). Click Next.
- Specify the path to the home directory for the Web site as C:\scribesweb. (Using the Browse button is easiest.) Note that the home directory for your site can be either a local directory or a network share. Leave the check box selected to allow anonymous access to the Web site. (Because this is a public Web site, you want anyone to be able to access it.) Click Next.
- Leave the access permissions set at their default settings. (We'll consider these permissions in more detail in Chapter 28.)
- Click Next and then click Finish to complete the Wizard. The new Scribes Ltd. Web site should appear as a node under server ws1 in the Internet Information Services console window, showing its single Web page Default.htm (Figure 27-6).
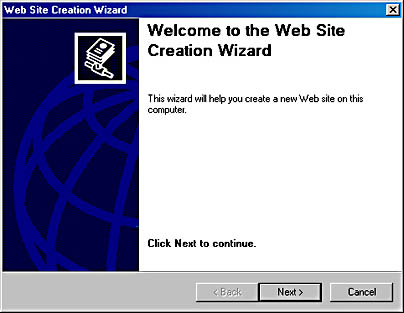
Figure 27-4. The first screen of the Web Site Creation Wizard.
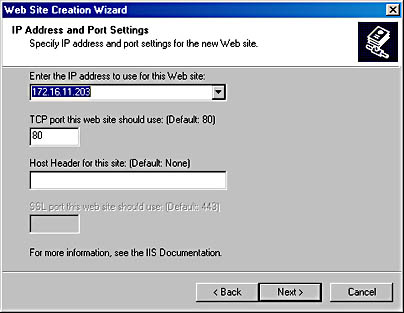
Figure 27-5. The IP Address And Port Settings screen of the Web Site Creation Wizard.
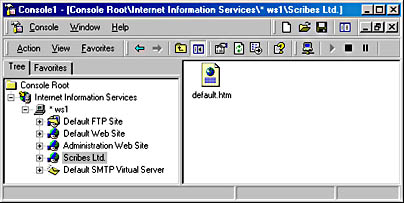
Figure 27-6. The new Scribes Ltd. Web site.
Testing the New Web Site
To test the IP address mapping (Web site identity) for the new Web site, go to a different machine on the network, start Internet Explorer, and open the URL http://172.16.11.203, which specifies the new Web site using its associated IP address. The page Default.htm should load in the browser window (Figure 27-7). Note that if a name server mapped this IP address to a DNS name like www.scribes.com, you could access the Web site by using http://www.scribes.com instead of by using the IP address.
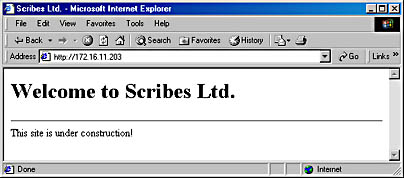
Figure 27-7. Testing the new Scribes Ltd. Web site from a remote machine.
As a further test, try opening the following URLs from the same machine:
- http://172.16.11.202
- http://ws1
- http://ws1.scribes.com (only if DNS is enabled)
Each of these URLs specifies an identity for the Default Web Site on the server ws1 and should open the "under construction" home page for this site. We'll look more at Web site identities in Chapter 28.
Virtual Directories
In the previous example you created a new Web site called Scribes Ltd. whose content was located in the home directory C:\scribesweb on server ws1. To access content in this directory, you can use either of the following URLs:
- http://<IP_Address>, where <IP_Address> represents the IP address bound to the server's NIC that is mapped to that particular Web site
- http://<DNS_Name>, where <DNS_Name> is the fully qualified DNS name (such as ws1.scribes.com) that is associated on the name server with the IP address mapped to that particular Web site
Taking the first URL, you can associate or map a particular URL with the Web content stored in the site's home directory as represented here:
C:\scribesweb <—> http://172.16.11.203.
But what if you want to locate content for this Web site in a variety of locations and not just in the \scribesweb directory on the server? You can do this by using something called a virtual directory. A virtual directory is a way of mapping an alias (a portion of a URL) to a physical directory containing additional Web site content not located in the home directory for the site.
For example, let's say we want to store additional content in the directory C:\salesstuff on the local server and associate it with the virtual directory /sales. Note that the virtual directory uses a forward slash (/) instead of a backslash (\). The URL-to-directory mapping would be
C:\salesstuff <—> http://172.16.11.203/sales
Note that from the point of view of the client using the Web browser, the /sales content appears as a subdirectory of the home directory for the Scribes Ltd. Web site. In other words, the content virtually appears as a subdirectory of the home directory http://172.16.11.203. But in fact, the content is physically located in an entirely separate part of the directory tree on the server's file system (instead of being located in \scribesweb\sales, as you might expect from the URL). Virtual directories thus enable a kind of virtual file system specified by URLs that bears no direct relationship to the actual location of Web content for the site.
Local Virtual Directories vs. Remote Virtual Directories
The content that is mapped to the alias representing a virtual directory can be located in one of two places, resulting in two different kinds of virtual directories:
- Local virtual directory The content is located on the local Windows 2000 server. This solution might be the simplest because all content for the Web site is located on the local server and can be backed up in a single operation. Content for different departments of a company can be located in different directories on the server for security and integrity reasons.
- Remote virtual directory The content is located on a remote file server on the network. This solution is often the best when publishing legacy content that is already stored on network file servers. Security is enhanced because a user account is required to access the remote share and suitable permissions can be assigned to this account. This remote placement of content also increases security by allowing content developers access only to file servers instead of to the Web servers themselves, and it reduces the processing load on the Web server. The only disadvantage is that the performance is slightly slower for content hosted on remote file servers, but this can be minimized by physically locating file servers close to the Web server on the network.
The Virtual Directory Creation Wizard
Now let's use the Virtual Directory Creation Wizard to create a remote virtual directory for the new Scribes Ltd. Web site. Before running the wizard, you must perform two tasks:
- Create a new user account in the domain to control access to shares mapped to remote virtual directories. You can give this user account any name you want, but for now, use the name RVD, which stands for remote virtual directory. Create this account by using the Active Directory Users And Computers console on a domain controller, and give it a secure password that never expires.
- Create the content directory and populate it with a Default.htm page. To do this, first create the content directory C:\salesstuff on file server SRV1. Share this directory using the default share name Salesstuff, and assign Read permission to the RVD account that you just created. Create a new Default.htm page for this directory or copy the previous one.

CAUTION
Never use an administrator account for controlling access to a remote virtual directory, because this could result in a security breach.
Now create a new remote virtual directory called /sales within the Scribes Ltd. Web site, by following these steps:
- Start the Internet Information Services console on server ws1 (or start it on a different server or workstation and connect to computer ws1 by clicking the Action button on the toolbar and choosing Connect from the drop-down menu).
- Select the Scribes Ltd. Web site in the console tree, click the Action button on the toolbar, point to New, and choose Virtual Directory from the drop-down menu (or right-click the Scribes Ltd. node in the console, point to New, and choose Virtual Directory from the shortcut menu). The Virtual Directory Creation Wizard starts. Click Next.
- Specify sales as the alias for the virtual directory. Note that you don't include the forward slash here. Click Next.
- Specify the UNC path \\SRV1\salesstuff as the path to the share that will be associated with the new remote virtual directory (Figure 27-8). You can also use the Browse button to locate the share on the connected network. Click Next.
- Use the Browse button to select the RVD user account. (This step enters the account in the form <Domain>\<Account> into the User Name text box, which is required.)
- Specify the password you assigned to this account, click Next, and confirm the password.
- Click OK and leave the access permissions settings at their default.
- Click Next and then click Finish to complete the wizard.
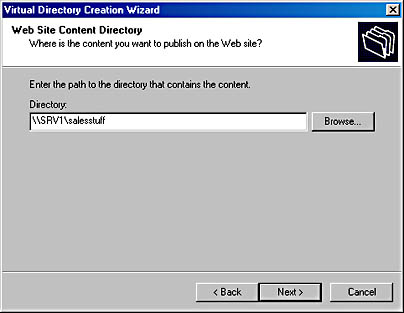
Figure 27-8. The Web Site Content Directory screen of the Virtual Directory Creation Wizard.
If you now examine the Scribes Ltd. node in the Internet Information Services console tree, you'll notice a new node beneath it representing the new virtual directory (Figure 27-9). Try viewing the Default.htm page in this virtual directory by accessing the URL http://172.16.11.203/sales from a Web browser on a remote machine.
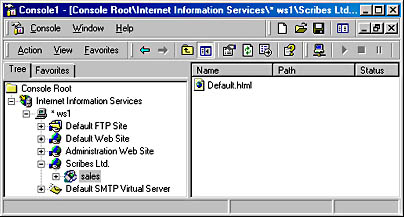
Figure 27-9. The /sales virtual directory within the Scribes Ltd. Web site.
Web Sharing
Another way to create a new virtual directory is to use what's called Web sharing. For example, say you have the directory C:\Testing located on the local Web server ws1 and you want to share this directory as a virtual directory of the Default Web Site. To do this, follow these steps:
- Right-click the \Testing directory in My Computer and select Sharing from the shortcut menu.
- In the Testing Properties window, click the Web Sharing tab.
- Select the Default Web Site from the Share On drop-down box. This will create a new local virtual directory mapped to the \Testing directory for its content.
- To open the Edit Alias dialog box (Figure 27-10), select the Share This Folder option. You can specify an alias that is different from the name of the folder if you like.
- Click OK twice and the virtual directory is created. Try accessing this directory by using the URL http://ws1/test. (Place a Default.htm page in the \Testing directory first.)
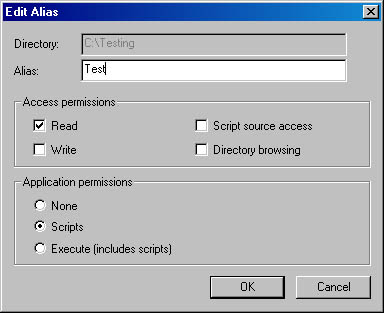
Figure 27-10. The Edit Alias dialog box.
Virtual Directories, Physical Directories, and Icons
Virtual directories can be confusing for a couple of reasons. First, there are two different icons you can use for nodes representing virtual directories in the IIS console. Second, physical directories can behave like virtual directories if they're physically located as subdirectories of the home directory or another virtual directory. Take a look at Figure 27-11 as an example. Looking at the various subnodes under the Scribes Ltd. node in the console tree, notice that
- The /sales virtual directory has an icon that looks like an open package or box with something green in it. This is the default appearance of a virtual directory icon and means that the virtual directory is configured as an application root, that is, the starting directory for a Web application, typically one developed by using ASP.
- The /support virtual directory has an icon that looks like a folder with a globe attached to it. This is a virtual directory that isn't configured as an application root. (You'll see how to configure and remove application roots in the next chapter.) Note also that the /support virtual directory has an /MIS virtual directory beneath it, which you would access by using the URL http://<Web_Site_Identity>/support/MIS .
- The /management virtual directory is currently unavailable for some reason (perhaps its associated content physical directory has been moved or deleted), and as a result it appears in the console tree as a red stop sign saying "Error".
- Finally, the /marketing directory isn't a virtual directory at all, but rather a subdirectory of the C:\scribesweb physical directory on the local server ws1. As a result, it appears with an ordinary folder icon in the console tree. However, users can connect to it as if it were a physical directory by using the URL http://<Web_Site_Identity>/marketing .
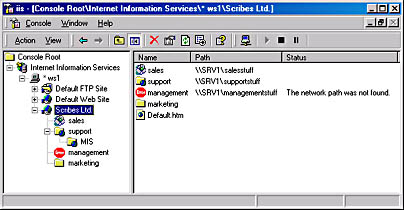
Figure 27-11. Confusion between virtual and physical directories.
EAN: 2147483647
Pages: 366