Querying the Index
The simplest way to query the index is to use the Search operation on the Start menu. Point to Search, choose For Files And Folders, and enter a filename or a single word from the text or some other known property. Depending on the number of documents to be searched, the use of the Indexing Service can make a remarkable difference in search times. Even in small- to medium-sized databases, a search that takes 10 seconds without indexing appears instantaneous with indexing.
Queries can also be performed using the Indexing Service query form, which enables more wide-range searches. Clicking the Query The Catalog directory in the Indexing Service console opens the query form (Figure 26-11).
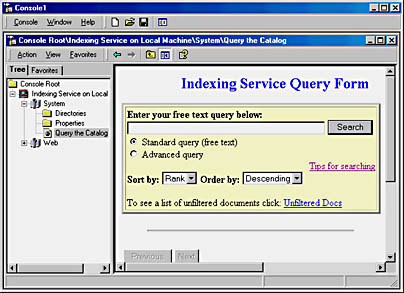
Figure 26-11. The built-in Indexing Service query form.
With the query form, you can do the following:
- Search for words and phrases.
- Search for words or phrases that are in proximity to other words or phrases.
- Search for words or phrases within textual properties. For example, you can search for a word that appears in a document's abstract or summary.
- Search for words or phrases in specific document formats, such as within an Excel spreadsheet or a Microsoft PowerPoint presentation.
- Use the relational operators <, <=, =, =>, >, and != against a constant, such as a date or file size.
- Use the Boolean operators AND, OR, AND NOT, and NEAR. (Note that the Boolean operators are available only in the English language.)
- Use wild cards such as * and ? and regular expressions for "fuzzy" queries.
- Rank results by the quality of the match.
The Indexing Service uses three types of files—very similar to those implemented by IIS—to allow the development of custom query forms, formatted results pages, and administrative scripts. These file types are
- Internet data query files
- HTML extension files
- Index data administration files
Creating Query Forms
With a query form, you can conveniently search for a word or phrase anywhere in a set of documents. The user simply enters a word or phrase and all documents containing the word or phrase are returned in a list.
With the Indexing Service, the administrator of a Web server can create customized forms to help employees and other clients find specific information from a set of documents. For example, a form can be tailored to search for a word or phrase (such as "systems management") or for properties (such as the author or subject). You create a query form in standard HTML format, just as you would create any Web page. If you know how to create pages in HTML format, you can quickly put together a simple query form such as the following:
<FORM ACTION="/scripts/querydemo.idq?" METHOD="POST"> So what's your question?: <INPUT TYPE="TEXT" NAME="CiRestriction" SIZE="60" MAXLENGTH="100" VALUE=" "> <INPUT TYPE="SUBMIT" VALUE="Start Search"> <INPUT TYPE="RESET" VALUE="Clear"> </FORM> |
The <FORM ACTION> line shows the location of the .IDQ (Internet data query) file, which defines query parameters such as the scope of your search, any restrictions, and query result sets. A basic .IDQ file looks something like this:
[Query] CiColumns=filename,size,rank,characterization, vpath,DocTitle,write CiFlags=DEEP CiRestriction=%CiRestriction% CiMaxRecordsInResultSet=100 CiMaxRecordsPerPage=25 CiScope=/ CiTemplate=/scripts/bdq.htx CiSort=rank[d] CiCatalog=d:\ |
The following list explains each line of the sample .IDQ file:
[Query] |
Identifies the information that follows as a query specification.
CiColumns=filename,size,rank,characterization,vpath,DocTitle,write |
Indicates the kind of information to return in the result set.
CiFlags=DEEP |
Tells the query to search all subdirectories within the scope.
CiRestriction=%CiRestriction% |
Indicates the query terms to search for.
CiMaxRecordsInResultSet=100 |
Sets the maximum number of results to be returned, 100 in this example.
CiMaxRecordsPerPage=25 |
Determines how many results are shown on each Web page returned, 25 in this example.
CiScope=/ |
Tells where to start the query. In this example, the query starts at the root of the storage space.
CiTemplate=/scripts/bdq.htx |
Indicates what file to use to format the results; in this case, it's Bdq.htx.
CiSort=rank[d] |
Tells how to sort the results. In this example, the results will be listed by rank—by how well the document matches the query—and [d] indicates that the results will be listed in descending order.
CiCatalog=d:\ |
Points to the index to use. In this example, the index stored on d:\ is to be used.
The combination of the sample HTML file and the sample .IDQ file produces the query form shown in Figure 26-12. Both of these files are in the Chapter 26 folder on the companion CD.
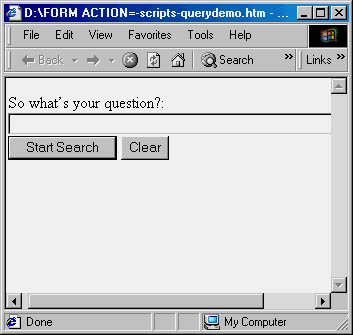
Figure 26-12. Creating a simple query form.
![]()
REAL WORLD "File Not Found" Errors
When you issue a query in the Indexing Service, the result set may include links to documents that were recently deleted from the server. Clicking on these links will return "file not found" errors. This problem occurs when you index and then delete files that contain long filenames. When these files are created, Windows 2000 creates an 8.3 short filename so that older applications can access the document. When the Indexing Service catalogs these files, it stores the information for both the long and short filenames. However, when the file is deleted, the Indexing Service removes only the information on the short filename from the catalog. Queries that match the document still return hits to the entry for the long filename.This long filename entry is usually removed when a master merge occurs, but it may not happen soon enough to prevent users from becoming annoyed. If this becomes a problem, you can edit the registry to prevent Windows 2000 from creating short filenames for older applications. To do this, open the Registry Editor (Regedt32.exe), and navigate to HKEY_LOCAL_MACHINE\SYSTEM\CurrentControlSet\Control\FileSystem. Set the NtfsDisable8dot3NameCreation value to 1. The usual warnings apply regarding backing up the registry before messing with it.
![]()
MORE INFO
For more on writing custom query forms and other aspects of the Indexing Service and IIS, see Running Microsoft Internet Information Services 4.0 by Leonid Braginski and Matt Powell (Microsoft Press, 1998).
EAN: 2147483647
Pages: 366